4-Day Weekender - Toddler bed!

...ask your questions in the appropriate forums BUT document your build here...preferably in a single thread...dates for updates, are appreciated....

Re: 4-Day Weekender - Walls up

Postby Kharn » Thu Apr 17, 2014 11:10 am

We made the complicated roof beams (to support the joints in the exterior panels) this morning, plus screwed and glued the walls in place.
20140417 walls up small.jpg
20140417 walls up small.jpg (167.91 KiB) Viewed 2809 times
User avatar
Kharn
500 Club
 
Posts: 655
Images: 1
Joined: Sun Jul 17, 2011 1:54 pm

Re: 4-Day Weekender - Walls up

Postby absolutsnwbrdr » Thu Apr 17, 2014 12:53 pm

Nice! Always fun to see the walls go up! :thumbsup:
Zach
Coming Soon...
Image Image
User avatar
absolutsnwbrdr
Donating Member
 
Posts: 2657
Images: 412
Joined: Mon Jan 25, 2010 6:10 pm
Location: Hanover, PA

Re: 4-Day Weekender - Walls up

Postby Kharn » Thu Apr 17, 2014 6:32 pm

One of our biggest challenges was setting up the lower forward panels, I kept them at the basic Weekender angle to maintain the classic look and have aerodynamics slightly better than a brick.

20140417 front face small.jpg
20140417 front face small.jpg (150.17 KiB) Viewed 2769 times


We also spent a lot of time getting the bottom edge at the rear of the galley perfect, since the lower segment of the hatch will hinge down from that so it needs to be just right.
20140417 garage 2 small.jpg
20140417 garage 2 small.jpg (124.88 KiB) Viewed 2769 times


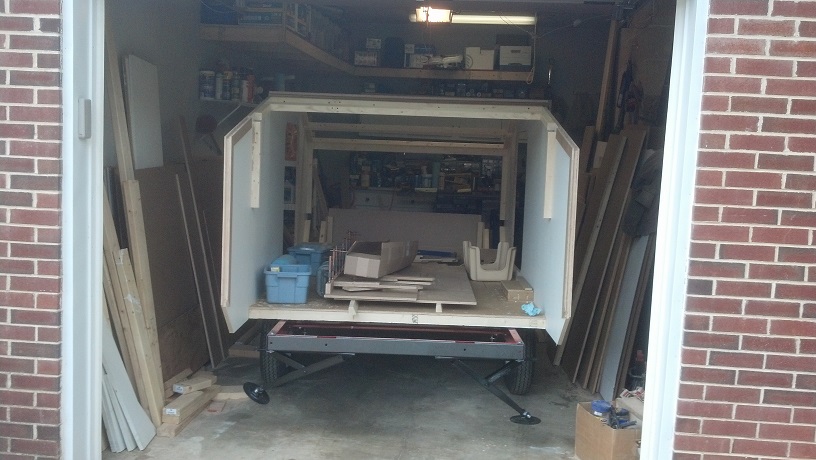
And finally, here's what I see when the trailer's in the garage for the night. I really need a bigger garage. :thumbdown:
20140417 garage 1 small.jpg
20140417 garage 1 small.jpg (114.56 KiB) Viewed 2769 times
User avatar
Kharn
500 Club
 
Posts: 655
Images: 1
Joined: Sun Jul 17, 2011 1:54 pm
Top

Re: 4-Day Weekender - Walls up

Postby S. Heisley » Thu Apr 17, 2014 11:32 pm

Having the walls up is a milestone. It looks like you could be camping in your new teardrop this summer!
User avatar
S. Heisley
Super Lifetime Member
 
Posts: 8775
Images: 495
Joined: Mon Sep 17, 2007 10:02 am
Location: No. California
Top

Re: 4-Day Weekender - Walls up

Postby Kharn » Fri Apr 18, 2014 7:16 pm

We spent most of today working on those forward angles and the lower storage area. Framing everything out and making sure every piece fit properly was a gigantic pain, but it will definitely be worth it in the end with all that storage behind the tongue box the normal Weekender profile doesn't include.
20140418 front small.jpg
20140418 front small.jpg (139.8 KiB) Viewed 2723 times

Not everything is screwed into place in this photo, thus a few obvious gaps:
20140418 front interior small.jpg
20140418 front interior small.jpg (112.38 KiB) Viewed 2723 times


Finally, we started working on the roof panels, the forward panel is also cut but I couldn't get it to sit in place for a photo.
20140418 roof panel small.jpg
20140418 roof panel small.jpg (88.81 KiB) Viewed 2723 times


One problem is that the bottom lip of the forward face and the underside of the lower storage area both need to be primed/painted so we can't glue them into place just yet. I'll have to paint them after my dad heads home so they're ready for when he comes back again.

Tomorrow we're working on the rest of the roof and figuring out the hatch.
User avatar
Kharn
500 Club
 
Posts: 655
Images: 1
Joined: Sun Jul 17, 2011 1:54 pm
Top

Re: 4-Day Weekender - Walls up

Postby Kharn » Fri Apr 18, 2014 9:02 pm

S. Heisley wrote:Having the walls up is a milestone. It looks like you could be camping in your new teardrop this summer!

The absolute deadline is a Tearjerker camping trip in October, but I hope to be camping in July.
User avatar
Kharn
500 Club
 
Posts: 655
Images: 1
Joined: Sun Jul 17, 2011 1:54 pm
Top

Re: 4-Day Weekender - Walls up

Postby Kharn » Sat Apr 19, 2014 9:52 pm

So we set all of the cabin exterior panels in place, put in every gusset imaginable (I swear my dad's demanded gussets for gussets :roll: ), cut the roof for the Fantastic Vent, drilled all of the roof supports for wires, and then hit a brick wall with figuring out how to handle the air conditioner. :oops:

Next week my dad's coming up again so we can work on the hatch, tongue box and air conditioner. There won't be enough time between Monday and Thursday for me to get the coats of primer, paint and Herculiner on the galley, forward storage floors and a few miscellaneous pieces, so those are going unpainted for another week (plus by then the tongue box will be ready and can get Herculiner at the same time).

Here's the rear roof:
20140419 cut for hatch small.jpg
20140419 cut for hatch small.jpg (107.78 KiB) Viewed 2682 times
User avatar
Kharn
500 Club
 
Posts: 655
Images: 1
Joined: Sun Jul 17, 2011 1:54 pm
Top

Re: 4-Day Weekender - Walls up

Postby Kharn » Mon Apr 21, 2014 11:38 am

I ordered draw latches for the AC door, hinge for the lower galley door and four more pipe clamps.
Unfortunately I won't be working on the trailer tonight or probably tomorrow, my kitchen faucet gave up the ghost on Saturday night and the previous homeowner's plumbing job (CPVC, Qwest and copper all in one kitchen cabinet :shock: ) in that area just needs to be torn out and replaced. CPVC glue = fun. :?
User avatar
Kharn
500 Club
 
Posts: 655
Images: 1
Joined: Sun Jul 17, 2011 1:54 pm
Top

Re: 4-Day Weekender - Walls up

Postby Kharn » Thu Apr 24, 2014 12:02 pm

So my dad showed up yesterday, we spent most of the evening figuring out the tongue box. It turns out I don't have to angle it down as far as I had planned, now it is 32" wide at the front instead of 24", since the larger width would touch the bumper at the same time as the side wall if I jack-knifed it. That also changes the miter angles and makes things a lot easier, the original width had 57 degree miters, now they're much more reasonable.

We also started laying out the forward cabinet dividers, since those are needed to support the air conditioner.

We'll see how much we can get done between this afternoon and Sunday, this is his last visit until June. :roll:
User avatar
Kharn
500 Club
 
Posts: 655
Images: 1
Joined: Sun Jul 17, 2011 1:54 pm
Top

Re: 4-Day Weekender - Forward cabinets

Postby Kharn » Thu Apr 24, 2014 7:40 pm

So this evening we conquered one of the more tedious areas of the build, the vertical dividers that split the forward cabinets and also hold up the air conditioner.
We had to do a bit of redesign, my air conditioner sketch turned out to be woefully inadequate. :(
20140424 front cabinet walls small.jpg
20140424 front cabinet walls small.jpg (106.12 KiB) Viewed 2546 times
User avatar
Kharn
500 Club
 
Posts: 655
Images: 1
Joined: Sun Jul 17, 2011 1:54 pm
Top

Re: 4-Day Weekender - Forward cabinets

Postby Kharn » Fri Apr 25, 2014 5:42 pm

We switched over to working on the hatch today, with two of the support ribs installed (two more will be used but weren't ready), we put the hatch into place to check for fit and everything worked out. :D

We cut the channel for the hatch seal to sit in.
20140425 hatch seal small.jpg
20140425 hatch seal small.jpg (63.27 KiB) Viewed 2505 times


A late afternoon rain shower made us quickly pack everything up and get the trailer back in the garage, so this evening we'll work on the cabinet at the foot of the bed. We also need to get the right screws for the hurricane hinges so we can put that in place.
User avatar
Kharn
500 Club
 
Posts: 655
Images: 1
Joined: Sun Jul 17, 2011 1:54 pm
Top

Re: 4-Day Weekender - Forward cabinets

Postby Kharn » Sat Apr 26, 2014 8:33 pm

Today we did more on the galley hatch, we tapered the spars, reinforced the hinge attachment area and debated wiring and locking plans. I keep forgetting to snap a picture when its mocked up, now its just a few sheets of plywood and the spars in the corner of the garage.

I'd originally wanted to have a tongue box with the lid exactly matching the sides, but I decided to go with a more conventional overlapping lid due to the complexity of the former's construction.
Here's the body of the tongue box:
20140426 tongue box small.jpg
20140426 tongue box small.jpg (120.74 KiB) Viewed 2464 times


Then we took apart the main bulkhead, the galley and the forward storage compartment so that I can waterproof all of their exposed surfaces.
20140426 deconstructed small.jpg
20140426 deconstructed small.jpg (135.11 KiB) Viewed 2464 times


Now I have a week and a half to get several big chunks (galley floor, forward storage, tongue box, bulkhead, and forward face) sanded, filled, primed, painted and Herculinered before Dad comes back for a single day visit to put it all back together. :frightened:
User avatar
Kharn
500 Club
 
Posts: 655
Images: 1
Joined: Sun Jul 17, 2011 1:54 pm
Top

Re: 4-Day Weekender - Forward cabinets

Postby Kharn » Mon Apr 28, 2014 8:46 pm

The second coat of primer is on the concealed pieces. Its quite cramped painting them in my garage with the trailer inside during a big rain storm, so no photo.

I have some big decisions to make shortly, including:
1) Hatch latch, do I want a central handle with rods going to each wall or a draw latch on each side?
2) Tail/marker light selection
3) Galley lighting modules (finding similar looking red and white modules is proving to be a challenge), switch location, etc
4) Interior lighting modules (figuring out the right light level so its not blinding while also not being too dim, plus also separate reading lights)
5) Power inlet size, 15 vs 20 vs 30 amp, I only have 15amp in my garage at the moment so either 20 or 30amp would require running new wire and a new breaker.
6) Gas shocks or prop rods, but this one can wait until the entire hatch is done and my wife can try opening it alone.
User avatar
Kharn
500 Club
 
Posts: 655
Images: 1
Joined: Sun Jul 17, 2011 1:54 pm
Top

Re: 4-Day Weekender - Forward cabinets

Postby Kharn » Sun May 04, 2014 5:10 pm

I finally got done with the truck bed liner on the underside of the galley, forward storage and tongue box.
The one gallon kit I'd bought for the floor was justtttt enough to complete the job so I avoided buying another quart of the stuff. :worship:
20140504 finished tongue bottom small.jpg
20140504 finished tongue bottom small.jpg (151.17 KiB) Viewed 2367 times

20140504 trailer full of parts small.jpg
20140504 trailer full of parts small.jpg (122.24 KiB) Viewed 2367 times


I ordered the trailer lights today, I went with all surface-mounted LED units so the penetrations through the wood should be minimal and easily sealed.

Next up is reassembling the galley & forward storage, making the air conditioner's door and pull-out tray, plus cutting the tongue box for a new lid design. I went from a lid flush with the sides to an over-lapping lid, then I decided I wouldn't be happy with that design so I'm going back to the original idea. Since the the box is completely glued and screwed together, it could get pretty interesting. :roll:
User avatar
Kharn
500 Club
 
Posts: 655
Images: 1
Joined: Sun Jul 17, 2011 1:54 pm
Top

Re: 4-Day Weekender - Forward cabinets

Postby Kharn » Thu May 08, 2014 8:26 pm

All of my trailer lights and my hatch latches showed up today. :thumbsup:
My dad stopped in for a very quick visit today/tomorrow so we can finish the forward shelves and AC hatch so that I'll be able to work on smaller stuff alone.
We set the galley floor, the main bulkhead and the forward storage units into place and glued/bolted/screwed them together. Then we moved onto the forward shelves.

Here's how the AC shelf will look, the AC will sit on the wood tray and slide out on 10" 100% extension sliders, so that ~8.5" of the hot side will be outside of the body. We'll be cutting back the shelves by 1/2" to add a flange for the door to seal against.
20140508 AC shelf small.jpg
20140508 AC shelf small.jpg (106.27 KiB) Viewed 2323 times


And excess Herculiner is a complete pain in the rear to clear off without damaging the paint underneath.
User avatar
Kharn
500 Club
 
Posts: 655
Images: 1
Joined: Sun Jul 17, 2011 1:54 pm
Top

PreviousNext

Return to Build Journals

Who is online

Users browsing this forum: No registered users and 15 guests