Our First Tear Build Journal - Updated 4/19/10

...ask your questions in the appropriate forums BUT document your build here...preferably in a single thread...dates for updates, are appreciated....

Postby SIXTOTWO » Sat Nov 07, 2009 9:27 am

Corwin C wrote:Just a thought about those interior locks ... make sure that they will not slide down and engage while you're driving down the road. I'd hate to see you get locked out! :R

Corwin


Thanks Corwin,
I did think of that. They are pretty tight sliding right now but we will be continually checking on them or I just mentioned to my other half that we should maybe put a pin in them or something when traveling.

I actually wanted them to be down closer to the handle but I turned my head for just a second and he put them up there...that bugger just doesn't obey!! :R :lol:


cdfnchico wrote:Wow...been awhile since I checked in...beautiful work!!

Thanks cdfnchico!!

Q
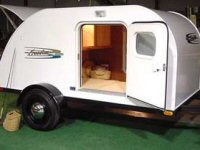
Terry and Sue Landis
BUILD THREAD
Image Image
******Embarassing our kids, just another quality service that we offer!******
User avatar
SIXTOTWO
Donating Member
 
Posts: 323
Images: 216
Joined: Sat Aug 09, 2008 1:26 pm
Location: Green Lane, PA

Postby SIXTOTWO » Sat Dec 05, 2009 9:27 pm

__________________
___________

Hey all, Haven't posted in a while. Actually there wasn't anything to post. We've been waiting on a guy at the local camper store to get us a price on some mill finish insert trim that we wanted. About a month or more waiting(didn't want to be a pest). Turns out he quit, left the store, then after about an hour he got a call begging him to come back and he claims that in that time they threw out all his papers with all our information on it. Do I believe the story....ummmmm.... :roll:

Anyhoo, Turns out that we can't get the mill finish so we are going with a white trim and we're gonna scuff it up and paint it the color we want. Thanks Len for the suggestion!!

We actually got a great price too. Less than $1. per foot for the white insert trim molding. Which is good because Christmas is coming and I have another project already in the works that we will need the funds for. We also bought the black plastic insert stuff and ordered a new set of trailer hookup wiring for our van of which is shot and needs replacing very badly!

I will post photos of my trim painting process even though it may not be the correct way to do it....it'll be my way of doing it. Although I would welcome any suggestions.

Till then...
Q

_________
____________________
Terry and Sue Landis
BUILD THREAD
Image Image
******Embarassing our kids, just another quality service that we offer!******
User avatar
SIXTOTWO
Donating Member
 
Posts: 323
Images: 216
Joined: Sat Aug 09, 2008 1:26 pm
Location: Green Lane, PA

Postby SIXTOTWO » Tue Dec 08, 2009 7:38 pm

______________________
_____________

I scuffed up the white paint on the RV Trim Molding with one of these finishing pads...not hard at all!
Image

Terry attached the trim after cutting out a notch to go around the hatch hinge so that we won't mess the paint up after it's painted.
Can anyone tell me...we had to order the end caps and they are not in yet. We didn't get a look at them except on a photo. Will we need to cut this down a little more to get the end cap in there or does it rest on top....I'm thinking it goes completly over the edge(end cap butt end up against the roof not setting on trim???)...have pictures anyone??? Would an end cap even be used here??
Image

We painted with a good quality tire rim paint. This is the sample piece.
Image

Trim isn't on yet in this picture but it's hanging over top of tear "curing"
While we were painting, Terry thought we should also paint the fenders. We will be getting more retro looking fenders when the funds allow. Also we will be moving the axle back a bit so the fenders we want will fit without being in the way of the door.
Image
I'm not too fond of these fenders! :thumbs down:

__________________
___________________________
Terry and Sue Landis
BUILD THREAD
Image Image
******Embarassing our kids, just another quality service that we offer!******
User avatar
SIXTOTWO
Donating Member
 
Posts: 323
Images: 216
Joined: Sat Aug 09, 2008 1:26 pm
Location: Green Lane, PA
Top

Postby Miriam C. » Tue Dec 08, 2009 10:38 pm

:thumbsup: :applause: :thumbsup: :thumbsup:
Wow almost done! I agree about the fenders. Some retro ones will look so much better.
“Forgiveness means giving up all hope for a better past.â€
User avatar
Miriam C.
our Aunti M
 
Posts: 19675
Images: 148
Joined: Wed Feb 15, 2006 3:14 pm
Location: Southwest MO
Top

Postby SIXTOTWO » Sun Dec 13, 2009 10:54 pm

____________________
____________
:thumbs up1:
Sooo excited, our mattress has been shipped and is making it's way across the country.

Ordered from Wally World.

Do they not have a warehouse on the East Coast?? They are shipping it from Bloomington, CA. Strange!!!

:applause:

We installed the RV insert trim molding. Went on without a hitch and looks good even though we painted it.

We also decided on a design for the cabinet doors, got all the materials and will work on that in our spare time. haha
:R

_______________
__________________________
Terry and Sue Landis
BUILD THREAD
Image Image
******Embarassing our kids, just another quality service that we offer!******
User avatar
SIXTOTWO
Donating Member
 
Posts: 323
Images: 216
Joined: Sat Aug 09, 2008 1:26 pm
Location: Green Lane, PA
Top

Postby doug hodder » Mon Dec 14, 2009 12:39 am

Terry....since you mentioned it, and are going to move the axle...could you flip it on the springs and put on some larger tires? It's a 5 bolt so will take other sized wheels. Might give it the look you want. I really like the wood finish interior/exterior you've done on it. It's got some flash! Nice job! Doug
doug hodder
*Snoop Dougie Doug
 
Posts: 12625
Images: 562
Joined: Tue Dec 14, 2004 11:20 pm
Top

Postby SIXTOTWO » Mon Dec 14, 2009 6:33 pm

Terry....since you mentioned it, and are going to move the axle...could you flip it on the springs and put on some larger tires? It's a 5 bolt so will take other sized wheels. Might give it the look you want. I really like the wood finish interior/exterior you've done on it. It's got some flash! Nice job! Doug


Yes Doug, We planned on putting it on top of the springs. Didn't think of larger tires but that's a great idea when the funds allow. Thanks! Thanks also for more compliments!!


______________
______

Well the mattress came in and I just got finished wrestling it into the Tear. haha, what a sight that was, glad there was nobody watching!!! :oops:

I had to cut it down about two inches, that also involved cutting open the cheese cloth, cutting off the bottom then sewing it back up. It still seems a little tight and I might have to do it all over again when the mattress fully expands. :? oh well...one step closer!!!

________
_________________
Terry and Sue Landis
BUILD THREAD
Image Image
******Embarassing our kids, just another quality service that we offer!******
User avatar
SIXTOTWO
Donating Member
 
Posts: 323
Images: 216
Joined: Sat Aug 09, 2008 1:26 pm
Location: Green Lane, PA
Top

Postby Thebigdirty » Tue Dec 15, 2009 2:04 pm

SIXTOTWO wrote:______________________
_____________


Can anyone tell me...we had to order the end caps and they are not in yet. We didn't get a look at them except on a photo. Will we need to cut this down a little more to get the end cap in there or does it rest on top....I'm thinking it goes completly over the edge(end cap butt end up against the roof not setting on trim???)...have pictures anyone??? Would an end cap even be used here??


__________________
___________________________


I would love to see some options to "cap" the Hurricane Hinge also. Sixtotwo do you have a photo of the caps you intend to use? By the way the trailer is really shaping up! Looks great :thumbsup:
Thebigdirty
Teardrop Builder
 
Posts: 26
Images: 22
Joined: Tue Sep 25, 2007 4:16 pm
Location: Phoenix, AZ
Top

Postby aggie79 » Tue Dec 15, 2009 2:42 pm

This is how Planovet (Mark) detailed his galley hinge and roof edge molding with end caps.

Image

(Mark, please excuse the blatant photo rip-off from your site.)

:thumbsup: Gig'em, Tom
Tom (& Linda)
For build info on our former Silver Beatle teardrop:
Build Thread

93503
User avatar
aggie79
Super Duper Lifetime Member
 
Posts: 5405
Images: 686
Joined: Tue Aug 07, 2007 5:42 pm
Location: Watauga, Texas
Top

Postby SIXTOTWO » Tue Dec 15, 2009 2:49 pm

Thanks BigDirty, Yes, that's exactly it. I just went down to take some photos but haven't had a chance to post them yet.

Thanks Tom.
Last edited by SIXTOTWO on Tue Dec 15, 2009 9:53 pm, edited 1 time in total.
Terry and Sue Landis
BUILD THREAD
Image Image
******Embarassing our kids, just another quality service that we offer!******
User avatar
SIXTOTWO
Donating Member
 
Posts: 323
Images: 216
Joined: Sat Aug 09, 2008 1:26 pm
Location: Green Lane, PA
Top

Postby SIXTOTWO » Tue Dec 15, 2009 3:32 pm

_________________________
_______________

End Caps. We painted them the color we wanted because we were having trouble finding the mill finish in this area. All they had was white.
Image

I don't think you can even tell that the trim was painted.
Image

End cap on front curbside.
Image

End cap at hinge.
Image


We even got the mattress in place. It works great! ;)
The mattress we got from WalMart online. Site to Store. 8" Memory Foam.
Image

____________
_____________________
Terry and Sue Landis
BUILD THREAD
Image Image
******Embarassing our kids, just another quality service that we offer!******
User avatar
SIXTOTWO
Donating Member
 
Posts: 323
Images: 216
Joined: Sat Aug 09, 2008 1:26 pm
Location: Green Lane, PA
Top

Postby goldcoop » Tue Dec 15, 2009 3:49 pm

Suz-

Lookin' Good!!!! :R

Cheers,

Coop
User avatar
goldcoop
Silver Donating Member
 
Posts: 1276
Images: 32
Joined: Mon Jul 04, 2005 8:02 pm
Location: Lewisburg, PA
Top

Postby SIXTOTWO » Tue Dec 15, 2009 9:50 pm

...

Thanks Coop, Sir!!

We're gettin' there!
It took a year but we are!!! Thanks for all your encouragement!!

:woohoo:
Terry and Sue Landis
BUILD THREAD
Image Image
******Embarassing our kids, just another quality service that we offer!******
User avatar
SIXTOTWO
Donating Member
 
Posts: 323
Images: 216
Joined: Sat Aug 09, 2008 1:26 pm
Location: Green Lane, PA
Top

Postby srodocker » Wed Dec 16, 2009 4:58 pm

so this is my first post but wow what a build your doing...maybe taking long but that just adds to the excitement that's going to come out of it.
srodocker
Teardrop Inspector
 
Posts: 1
Joined: Wed Dec 16, 2009 4:56 pm
Top

Postby bve » Wed Dec 16, 2009 8:29 pm

Really nice work going into this unit, I'll bet the cabin fever is going to set in early come spring. :lol:

Burke
Burke

KISS > COMPLEX
Image
Image

Build threads converted to PDFs.
As of 2008-08-08 I have added more build threads to the pdf collection
User avatar
bve
500 Club
 
Posts: 694
Images: 98
Joined: Sat Aug 25, 2007 1:44 am
Location: Edmonton, Alberta, Canada
Top

PreviousNext

Return to Build Journals

Who is online

Users browsing this forum: No registered users and 20 guests