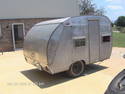
My first teardrop - the Kampster, Final Posting

...ask your questions in the appropriate forums BUT document your build here...preferably in a single thread...dates for updates, are appreciated....

Postby TinKicker » Mon Mar 30, 2009 8:41 am

Those clips look simple--how do they attach to the wheel?
Kelsey
__________
Go ahead and get your project started because it's just like having kids...if you wait to start until you're skilled enough or rich enough, you'll never do it. And just look at what you'd miss!
__________
In planning any project you've never attempted before, always allow for the three three's: It will take you three times longer, three times more material, and three times more money than you thought.
User avatar
TinKicker
Teardrop Master
 
Posts: 228
Images: 11
Joined: Sun Mar 16, 2008 9:26 pm
Location: Jasper, Alabama

Postby bbarry » Mon Mar 30, 2009 10:58 pm

TinKicker wrote:Those clips look simple--how do they attach to the wheel?


Dunno...was hoping someone else would chime in.

Brad
Brad

****************************
Jack of all trades, master of none.
****************************

Kampster build thread
User avatar
bbarry
The 300 Club
 
Posts: 360
Images: 159
Joined: Sun Dec 14, 2008 9:03 am
Location: Clearwater, KS

Postby bbarry » Mon Apr 13, 2009 7:01 pm

Varnish, varnish varnish. If I never see any more varnish, I'll be okay. We have the front bulkhead skinned and the first panel of interior ceiling in. I have to say...it looks great. I'm really pleased with how everything is fitting together. The difference in color is just the camera...it all looks similar in real life.

Image

Image

Image

Bessie the Teardrop Inspector approves:
Image

Front Lights (12v landscape lights from Lowes)
Image

Switches ($4 for 10 from Ebay)
Image

I'm finishing the varnish on one panel for the rear of the sleeping compartment before putting in the rest of the ceiling. After that, I need to run wiring and make the doors and hatch. Will I be done (or some semblence thereof) in time for ITG 3? We'll see...

Brad
Brad

****************************
Jack of all trades, master of none.
****************************

Kampster build thread
User avatar
bbarry
The 300 Club
 
Posts: 360
Images: 159
Joined: Sun Dec 14, 2008 9:03 am
Location: Clearwater, KS
Top

Postby Juneaudave » Mon Apr 13, 2009 7:26 pm

Brad...that varnish looks great!!!! Are you going gloss or a matt finish on the inside? :thumbsup: :thumbsup: :thumbsup:
User avatar
Juneaudave
Super Duper Lifetime Member
 
Posts: 3237
Images: 380
Joined: Sun Jul 03, 2005 12:11 pm
Location: Juneau, Alaska
Top

Postby bbarry » Mon Apr 13, 2009 9:23 pm

Thanks! It's gloss. If I were to do it again, I'd probably go with a satin or matte finish as it would show fewer dust specks. And I'd spray it with my new LVLP sprayer rather than brush it as that introduced a number of air bubbles. The wet sanding definitely helped with that.

Brad
Brad

****************************
Jack of all trades, master of none.
****************************

Kampster build thread
User avatar
bbarry
The 300 Club
 
Posts: 360
Images: 159
Joined: Sun Dec 14, 2008 9:03 am
Location: Clearwater, KS
Top

Postby Miriam C. » Mon Apr 13, 2009 9:51 pm

:applause: :thumbsup: :thumbsup: Alright! The lights look really good.
Last edited by Miriam C. on Fri Apr 17, 2009 10:22 pm, edited 1 time in total.
“Forgiveness means giving up all hope for a better past.â€
User avatar
Miriam C.
our Aunti M
 
Posts: 19675
Images: 148
Joined: Wed Feb 15, 2006 3:14 pm
Location: Southwest MO
Top

Postby kennyrayandersen » Mon Apr 13, 2009 11:19 pm

bbarry wrote:Thanks! It's gloss. If I were to do it again, I'd probably go with a satin or matte finish as it would show fewer dust specks. And I'd spray it with my new LVLP sprayer rather than brush it as that introduced a number of air bubbles. The wet sanding definitely helped with that.
Brad

You can take some 4-0 steel wool and some Woolwax and both remove the dust bumps and give it a semi-gloss look. I took a wood finishing class in college mistakenly thinking it would count for an arts and letters credit (had to end up raking intro to lit. drama and poetry anyway!) and was taught that actually you don’t want to use semi-gloss anyway, if you want a really nice finish. The reason is that to get the semi-glossed look, the manufacturers put clouding agents into the finish so that less light is reflected. By the time you put 2-4 coats of it on your wood you start to obscure the grain detail (OK, so this is REALLY fine finishing techniques). What they said to do instead is always put the gloss on, as many coats as you need/want and then you come back and essentially put really fine scratches on the outside, so as not to reflect the light so much, but also not obscuring the detail of the wood. You can do it with the really fine steel wool and Woolwax like I was saying earlier or you can go crazy with pumice and rottenstone (but that’s even more work!). The Woolwax method comparatively looks good and is pretty easy to do.
User avatar
kennyrayandersen
1000 Club
1000 Club
 
Posts: 1750
Images: 38
Joined: Sun Apr 29, 2007 10:27 pm
Location: TX
Top

Postby Ed K. » Tue Apr 14, 2009 7:23 am

kennyrayandersen wrote: was taught that actually you don’t want to use semi-gloss anyway, if you want a really nice finish. The reason is that to get the semi-glossed look, the manufacturers put clouding agents into the finish so that less light is reflected. By the time you put 2-4 coats of it on your wood you start to obscure the grain detail (OK, so this is REALLY fine finishing techniques). What they said to do instead is always put the gloss on, as many coats as you need/want and then you come back and essentially put really fine scratches on the outside, so as not to reflect the light so much, but also not obscuring the detail of the wood. You can do it with the really fine steel wool and Woolwax like I was saying earlier or you can go crazy with pumice and rottenstone (but that’s even more work!). The Woolwax method comparatively looks good and is pretty easy to do.


Another method is to use glossy varnish until the very last coat and then use the semi-gloss.

Ed
User avatar
Ed K.
Teardrop Builder
 
Posts: 41
Images: 8
Joined: Sun Apr 05, 2009 6:27 pm
Location: Minnesota
Top

Postby kennyrayandersen » Tue Apr 14, 2009 10:04 am

That should work as well, but you still will probably have a dust bumps because the Varnish dries so dang slow (unlike lacquer), so even if you use the semi-gloss you may want to follow up with the 4-0 steel wool and Woolwax :thinking:
User avatar
kennyrayandersen
1000 Club
1000 Club
 
Posts: 1750
Images: 38
Joined: Sun Apr 29, 2007 10:27 pm
Location: TX
Top

Postby bbarry » Tue Apr 14, 2009 8:50 pm

Thanks for the tips everybody! I'll keep them in mind for my next fine woodwork project. For this, I am using the "good enough" method.

1. Apply product
2. Sand (wet and/or dry)
3. Repeat until tired of working, then:
4. Declare it "good enough for the girls I go with", "good enough for government work", "good enough for who it's for" or similar.

Brad
Brad

****************************
Jack of all trades, master of none.
****************************

Kampster build thread
User avatar
bbarry
The 300 Club
 
Posts: 360
Images: 159
Joined: Sun Dec 14, 2008 9:03 am
Location: Clearwater, KS
Top

Postby Mark McD » Fri Apr 17, 2009 7:42 am

My personal favorite:
Do your best and caulk the rest.lol.

Looks great... like the use of low voltage landscape lights... easy to get, cheap, and look sharp. Nice.
I like turtles
Mark
I don't feel tardy
User avatar
Mark McD
The 300 Club
 
Posts: 427
Images: 63
Joined: Sat Jan 19, 2008 12:53 am
Location: Northeast Ohio
Top

Postby Senior Ninja » Fri Apr 17, 2009 10:12 pm

Brad,

Way to go. My thoughts exactly.
Mine has three coats of varnish inside and out. Of course I love the smell of varnish in the morning. lol Grew up in the family paint manufacturing business. Even the floor has three coats on the bottom, none of that gooey black stuff for me.

Steve


8)
Building the TD was the best thing I ever made.
Senior Ninja
Donating Member
 
Posts: 608
Joined: Fri Apr 28, 2006 4:16 pm
Location: Bakersfield, Kahlifornia
Top

Postby bbarry » Sat Apr 18, 2009 7:12 am

Mark McD wrote:My personal favorite:
Do your best and caulk the rest.lol.

Looks great... like the use of low voltage landscape lights... easy to get, cheap, and look sharp. Nice.


I like that one! 1/4" paint is a favorite of mine! In reality, I work pretty hard to do it right the first time. I've learned a lot of lessons over the years that have helped out a lot on this build. So far, the walls, bulkhead skins and ceiling have fit together well enough that I'm not going to need any trim. That makes me happy!

I borrowed the landscape light idea from a fellow member, Roger (T-vicky). He graciously allowed me, grandpa and the wife to come over and check out his build (along with his collections of cars and license plates). I may paint the black "lens cover" in an aluminum paint as the shelf underneath (not cut out yet in the pictures above) will be painted white on the inside and trimmed in aluminum. This will give a little continuity in the color scheme.

Now if I could only get a little more time off work to keep the progress going...

Brad
Brad

****************************
Jack of all trades, master of none.
****************************

Kampster build thread
User avatar
bbarry
The 300 Club
 
Posts: 360
Images: 159
Joined: Sun Dec 14, 2008 9:03 am
Location: Clearwater, KS
Top

Postby bbarry » Sat Apr 18, 2009 7:18 am

Senior Ninja wrote:Brad,

Way to go. My thoughts exactly.
Mine has three coats of varnish inside and out. Of course I love the smell of varnish in the morning. lol Grew up in the family paint manufacturing business. Even the floor has three coats on the bottom, none of that gooey black stuff for me.

Steve


Yeah, everyone around here thinks I'm crazy cause I actually like the smell of varnish. To me, I think it pairs well with the smell of freshly sawn oak. :)

Brad
Brad

****************************
Jack of all trades, master of none.
****************************

Kampster build thread
User avatar
bbarry
The 300 Club
 
Posts: 360
Images: 159
Joined: Sun Dec 14, 2008 9:03 am
Location: Clearwater, KS
Top

Postby greg755 » Sun Apr 19, 2009 6:39 pm

Hey when Grandma and Grandpa get done building your TD can you send them over to my house??? :D

Its looking good!!!!!
"It is a cruel thought, that, when we feel ourselves standing on the firmest ground in every respect, the cursed arts of our secret enemies, combining with other causes, should effect, by depreciating our money, what the open arms of a powerful enemy could not." --Thomas Jefferson to Richard Henry Lee, 1779. ME 4:298, Papers 2:298
User avatar
greg755
Grand Poobah
 
Posts: 439
Images: 65
Joined: Sun Dec 21, 2008 2:08 pm
Location: NY, Seneca Falls.... The Fingerlakes
Top

PreviousNext

Return to Build Journals

Who is online

Users browsing this forum: No registered users and 14 guests