Slow Build in Oz

...ask your questions in the appropriate forums BUT document your build here...preferably in a single thread...dates for updates, are appreciated....

Re: Slow Build in Oz

Postby MickinOz » Sat Apr 18, 2020 2:55 am

Reading Tony's build #4 log, he mentioned he had about 9 good years out of his first tear drop, but it had a few issues with regard to the galley walls. He said it was important to tie the walls together with the counter top. It really seems like a lot of teardrops just rely on 1/2 or 3/4 of inch of ply staying stiff enough to remain where you want it.
I can vouch for this being a problem. The right side wall in particular had more bends in it than Horrock's Pass. That's a lot of bends. In fact, I didn't think it was possible for plywood to bend on so many axes at once.
So I spent a fair bit of time with braces and straps and clamps pulling the walls in to line on whichever axis worked, before putting in the roof, the counter top, and the bulkhead, etc.
It worked. Each bit did its part and the walls became progressively straighter. Every panel is a stressed member, which I personally don't consider a bad thing.
Last job was to stiffen those big curved edges.
I cut far more hatch frames than needed, specifically so I could laminate a couple of frames.
I actually laminated them with "kinks" opposite to the ones I wanted to straighten out in the walls, so when I pulled it all together they had some chance of canceling each other out.
Seems to have worked.
Along the way, I offset the two frames I laminated together by 6mm. This gives me a 6 - 7 mm deep by 17mm wide groove in which to run the hatch seal.
Seemed easier than doing anything with a router to create a place to put the seal.
Sadly, I shall remain a far better metallurgist and assayer than wood butcher and photographer.

stiffeners installed 18.4.2020.JPG
stiffeners installed 18.4.2020.JPG (82.44 KiB) Viewed 2546 times


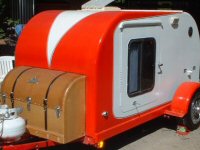
Does this look straight?
Right side 18.4.2020.JPG
Right side 18.4.2020.JPG (72.1 KiB) Viewed 2546 times


In the groove
Groove for seal 18.4.2020.JPG
Groove for seal 18.4.2020.JPG (74.05 KiB) Viewed 2546 times
MickinOz
1000 Club
1000 Club
 
Posts: 1255
Images: 3
Joined: Mon Feb 04, 2019 3:54 pm
Location: Somewhere, in 379,725 square miles of South Australia

Re: Slow Build in Oz

Postby swoody126 » Sat Apr 18, 2020 6:19 am

many of us who dabble in boatbuilding have seen the videos of how plywood is made which explains a lot

by nature the elements/plies combined to create plywood are wonky due to how they are cut

they buck n bawl as they are cut off the log refusing to lay flat

after being pressed into submission w/ great pressure n heat activated glue they twist n yaw even at rest

this is butt one element of my reasoning for buying/using marine plywood when building something important to me

by increasing the number of plies/given thickness you get a much more stable panel

quality marine plywood will typically have 5 plies/6mm(1/4") 7plies/9mm(3/8") up to 13plies/19mm(3/4")

and virtually all the plies are veneer plies of the same wood of the same thickness

the marine pywood has darn near zero voids and virtually no flaws on the surfaces

sorry to seemingly go off track here butt this thread is bringing out some of the issues created by using lesser grades of plywood in construction and i thought it could possibly help others in future builds

if not by their buying better plywood by at least helping future builders understand why the materials behave the way they do

if you ever get a chance to peruse one of CLC's teardrops you'll understand what i'm talking about

lesson over

sw
"we are the people our parents warned us about" jb
swoody126
500 Club
 
Posts: 769
Joined: Mon Feb 22, 2016 6:11 pm
Location: north of Ft Worth

Re: Slow Build in Oz

Postby MickinOz » Sat Apr 18, 2020 7:22 am

Lesson?
I know the difference, and made the decision to go with the lesser ply for various reasons.
Marine ply is lovely stuff, but it is twice the price, which wouldn't be a problem on an 8 x 4 standard build, or even on an 8 x 5 if we could get 5 x 5 sheets.
I'm building a 9 x 5, and its almost impossible to get any other size sheet than 1200 x 2400 (3 feet 11 and 1/4 inches x 7 feet 10 and 1/2 inches) here. You get the odd imported sheet that is a genuine 8 x 4.

On this non standard build size, there is a lot of wastage. A lot. So I made the decision to go with structural ply. It has the one essential thing, the absence of which seems to let a lot of people down - waterproof glue.
The only real difficulty I've had is one side warping at the rear, which I partly blame on the way I joined the extra piece on. I reckon I should have equilibrated the two pieces to make sure they were both the same moisture before I joined them.

That same tendency to bend easy paid off on the front wall. Edge had dramas bending 6mm marine ply to a 600mm radius, the 7mm structural ply fell into place.
But yes, lots of filling to do before I paint the plywood.
But the filler (sanding dust and PVA) is cheap, and I'd have to fill all the screw/nail holes anyway, and marine ply over here is made from pine, just like the structural ply.
Unless you get the imported hardwood one, which is bloody heavy.
So bugger it, a bit of filling here and there, maybe take a bit of extra care to get everything square.

To be honest, the one consideration that can't be ignored is the price.
Like I said, its double. I've used 4 sheets of 17mm, three sheets of 15mm, and 7 sheets of 7mm plywood so far.
On a first build, with the potential for rookie mistakes, the price differential was a deal breaker.
I am not particularly wealthy, and I would have given it a miss if I could only have marine ply.

If I were to give advice to any Aussie builder it would be this:
Make the floor from structural ply or formply - it's getting a frame under it and won't go anywhere.
Handpick the best ply you can find for everything else as long as it has an A bond.
If your walls are going to be single sheets of ply rather than frame clad inside and out with thin sheets, stick with the 8 foot length and use marine ply for that.
MickinOz
1000 Club
1000 Club
 
Posts: 1255
Images: 3
Joined: Mon Feb 04, 2019 3:54 pm
Location: Somewhere, in 379,725 square miles of South Australia
Top

Re: Slow Build in Oz

Postby swoody126 » Sat Apr 18, 2020 8:00 am

my intent was to provide information NOT TO OFFEND

I AM TRULY SORRY I RUFFLED YOUR FEATHERS

sw
"we are the people our parents warned us about" jb
swoody126
500 Club
 
Posts: 769
Joined: Mon Feb 22, 2016 6:11 pm
Location: north of Ft Worth
Top

Re: Slow Build in Oz

Postby MickinOz » Sat Apr 18, 2020 9:06 am

I apologise for the tone of my previous post.
My problem is I second guess myself a lot.
I do a lot of research before I do anything, then still spend time worrying whether I've made the right decision.
So the slightest suggestion I could have done better brings my self-doubt out in spades.

In an ideal world, I would use marine ply. If I could wander into the shop down the road and select whatever looks good.
I am a frustrated boat builder, by the way.
Always wanted to do it - west system epoxy and prime boat building timbers all the way.
A dory like they beach launch in Pacific City, Oregon was the dream.
They say dories are unstable, but anything used for commercial line fishing that can launch straight into the surf, and be surfed back onto the beach with a load pf fish is a damned seaworthy boat.
Followed after gaining experience on the dory, a full-on Maine lobster boat.

I just could never afford it.
Now, fuel is the cheapest its been for years, the materials have actually gone down in price and the kid have left home.
Maybe I should revisit that dream.

One decision I would do differently is the commercially made doors.
Having obtained them and had a good look at them, they are very nice, but I have formed a plan in my head as to how I'd make doors if I did this again.
The cost would be low, and the seal would be pretty darn good, if I say so myself.
That might have freed up some money for better materials.
Having said that, I confess that putting in those purpose built doors is a milestone I am really looking forward to.
MickinOz
1000 Club
1000 Club
 
Posts: 1255
Images: 3
Joined: Mon Feb 04, 2019 3:54 pm
Location: Somewhere, in 379,725 square miles of South Australia
Top

Re: Slow Build in Oz

Postby swoody126 » Sat Apr 18, 2020 10:32 am

UNDERSTOOD specially in the clime of the day...

sw
"we are the people our parents warned us about" jb
swoody126
500 Club
 
Posts: 769
Joined: Mon Feb 22, 2016 6:11 pm
Location: north of Ft Worth
Top

Re: Slow Build in Oz

Postby MickinOz » Mon Apr 20, 2020 4:21 pm

Took a trip to the city yesterday.
Saw a financial adviser who seemed worth her weight in cocky sh**.

Took the opportunity to gather some things for the trailer.
One last piece of ply for the hatch, and a couple of pieces of timber for the hatch frame.

Also some drawer slides.
I bought Goliath brand from the big green shed.
A pair of 450mm ones rated at 45kg.
I was vacillating a bit, 45kg is the lightest rating. Salesman sorted it for me. when he asked, " will your stove, frypan and bacon weigh as much as two and a bit bags of cement?" Good point.
I also bought a 500mm, 100kg pair.
I couldn't find a fridge slide anywhere near the right size for my little Engel.
I believe I'll be able to make a perfect size slide with these.

The slides came in at $40 for the two sets. Very reasonable by Australian standards.
MickinOz
1000 Club
1000 Club
 
Posts: 1255
Images: 3
Joined: Mon Feb 04, 2019 3:54 pm
Location: Somewhere, in 379,725 square miles of South Australia
Top

Re: Slow Build in Oz

Postby edgeau » Mon Apr 20, 2020 8:39 pm

I used the same ones for my fridge. All good

Sent from my Pixel 3 using Tapatalk
User avatar
edgeau
500 Club
 
Posts: 513
Images: 2
Joined: Sun Nov 13, 2016 8:21 am
Location: Gold Coast Australia
Top

Re: Slow Build in Oz

Postby MickinOz » Tue Apr 21, 2020 4:11 am

Not much doing today.
The trip to the smoke yesterday really took it out of me.
Except, the traffic in the CBD was practically non-existent.
Today, I ran the router around the roof sheets to trim everything flush with walls.
Sure lifts the tone of the joint. Looks less like a packing crate and more like someone who cares lives here.
Filled a heap of screw holes. I'm sticking with sanding dust and exterior PVA as a filler. I do hope that the PVA lives up to the "exterior" label.
Then, I pre-wired the front shelf so all I have to do is hook up the feed when I install it.
Looks OK, and the lights are just what I wanted. I took a bit of time, as the power/USB outlet was unswitched, meaning the PITA blue LED on the USB outlet is always on.

So I had to find a decent switch and fit it. No room for spade connectors.
Had a moment - I struggled with a couple of soldered connections. Was expecting the bloody USB converter to be cactus when I powered it up, coz things got damned hot.
But it charged an old smart phone no worries.
Hooked up an old battery charger to try it all out.
Tried the cabin light too.

what I will see laying in bed 21.4.2020.JPG
what I will see laying in bed 21.4.2020.JPG (71.81 KiB) Viewed 2808 times


Cabin light 21.4.2020.JPG
Cabin light 21.4.2020.JPG (76.98 KiB) Viewed 2808 times
wired shelf 21.4.2020.JPG
wired shelf 21.4.2020.JPG (49.37 KiB) Viewed 2808 times
MickinOz
1000 Club
1000 Club
 
Posts: 1255
Images: 3
Joined: Mon Feb 04, 2019 3:54 pm
Location: Somewhere, in 379,725 square miles of South Australia
Top

Re: Slow Build in Oz

Postby MickinOz » Tue Apr 21, 2020 4:15 am

Inside the surface mount power outlet, with switch added.
switched USB 21.4.2020.JPG
switched USB 21.4.2020.JPG (57.43 KiB) Viewed 2807 times
MickinOz
1000 Club
1000 Club
 
Posts: 1255
Images: 3
Joined: Mon Feb 04, 2019 3:54 pm
Location: Somewhere, in 379,725 square miles of South Australia
Top

Re: Slow Build in Oz

Postby MickinOz » Tue Apr 21, 2020 5:28 am

A word to the wise re: switches.
You use an AC switch on a DC circuit at your peril.
MickinOz
1000 Club
1000 Club
 
Posts: 1255
Images: 3
Joined: Mon Feb 04, 2019 3:54 pm
Location: Somewhere, in 379,725 square miles of South Australia
Top

Re: Slow Build in Oz

Postby MickinOz » Tue Apr 21, 2020 7:00 am

The next decision looms.
The spar that the hatch hinges off.
The generic Benroy plans say to laminate two 1 x 2 pieces of dimensional lumber together.
It explains that a "1 x 2" dimensional lumber is actually 3/4 x 1 1/2
That would be 19mm x 38mm.
Two laminated together would give a 38 x 38mm
I've been using 19 x 42 mostly.
Two of those laminated together would give me 38 x 42 but while I was in the smoke yesterday I bought a piece of 42 x 42.
So the size is reasonable, but, it is pine.
I note the generic plans call for pine for everything but that hatch spar, where the spec changes to poplar.
Presumably, the poplar is stronger.
What's the go?
How big do folks usually make their hatch hinge point?
Can't see it making a difference, but I"m using a full width hurricane hinge
MickinOz
1000 Club
1000 Club
 
Posts: 1255
Images: 3
Joined: Mon Feb 04, 2019 3:54 pm
Location: Somewhere, in 379,725 square miles of South Australia
Top

Re: Slow Build in Oz

Postby tony.latham » Wed Apr 22, 2020 7:38 am

I note the generic plans call for pine for everything but that hatch spar, where the spec changes to poplar.
Presumably, the poplar is stronger.
What's the go?


Hatches are heavy. My 5' hatches weight 50 pounds. There is also the added stress of compressed gas springs. For those reasons, I've chosen 2" x 2" oak for my hatch hinge spars. Weight, and screw holding.

Image

It may be overkill.

How big do folks usually make their hatch hinge point?


I'm scratching my head with that question but it's early here in Idaho. Whatcha mean? The hinge gap? :thinking:

Tony
User avatar
tony.latham
Gold Donating Member
 
Posts: 6912
Images: 17
Joined: Mon Jul 08, 2013 4:03 pm
Location: Middle of Idaho on the edge of nowhere
Top

Re: Slow Build in Oz

Postby MickinOz » Wed Apr 22, 2020 3:54 pm

Accidental double up deleted
Last edited by MickinOz on Wed Apr 22, 2020 4:08 pm, edited 1 time in total.
MickinOz
1000 Club
1000 Club
 
Posts: 1255
Images: 3
Joined: Mon Feb 04, 2019 3:54 pm
Location: Somewhere, in 379,725 square miles of South Australia
Top

Re: Slow Build in Oz

Postby MickinOz » Wed Apr 22, 2020 4:02 pm

tony.latham wrote:

I'm scratching my head with that question but it's early here in Idaho. Whatcha mean? The hinge gap? :thinking:

Tony

Thanks for the reply Tony.
I meant the generic plans call for two pieces of 2 x 1 dimensional lumber laminated together to make the spar that takes the hinge, which would make a piece 1.5 inches by 1.5 inches according to those plans, but I reckon I your plans for your build showed 2 1/4 inches, others probably used other sizes, etc.
So I was canvassing sizes. Of course that depends somewhat on available timber species.
I'm thinking I will be stuck with pine, which leaves me thinking about what size will be strong enough.
Two of the stock sizes currently floating around in my workshop (that'd be the carport to the rest of the world :) ) are 42 x 42 and 42 x 19.
End result would be 61 x 42. About 2.4 inches x 1.7 inches
I reckon I have an off cut of the 70 x 45 I used for the the long sides of the floor frame. I thought it too big, but it's LOSP preservative treated and structurally graded timber, so it might be the best thing to use. The other annoying thing with it is that it isn't dressed all round, so it has rounded edges. I might have to get the electric plane out and dress it.
Though my mate's girl friend has a nice DeWalt thicknesser. :thinking:
Hint for those still looking for a life partner - if you can't find a girl who owns her own boat launching tractor, do as my mate did and hook up with a girl who brought her own power tools and target rifles to the party.
MickinOz
1000 Club
1000 Club
 
Posts: 1255
Images: 3
Joined: Mon Feb 04, 2019 3:54 pm
Location: Somewhere, in 379,725 square miles of South Australia
Top

PreviousNext

Return to Build Journals

Who is online

Users browsing this forum: Google [Bot] and 12 guests