TwilightLane Cubbie Build

...ask your questions in the appropriate forums BUT document your build here...preferably in a single thread...dates for updates, are appreciated....

Nicely Done !!

Postby Chuckles2153 » Mon Apr 26, 2010 2:49 pm

I have enjoyed following your build :thumbsup: 
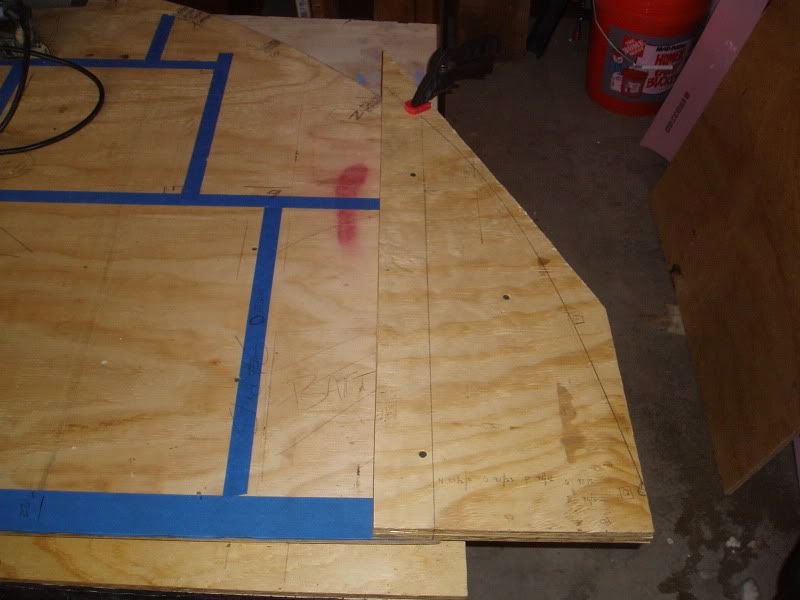
, Out of curiosity what's the opening with no tape? Is that going to be a shelf?.
And i'm the same way as to knowing what i'll be doing 2 or 3 steps ahead of time. But nice job so far, keep making sawdust and taking pictures :thumbsup: :applause:

Chuck
Chuckles2153
Teardrop Master
 
Posts: 154
Images: 74
Joined: Wed Mar 24, 2010 2:00 pm
Location: Franklin. Indiana

Postby TwilightLane » Mon Apr 26, 2010 10:23 pm

Thanks Chuck! Yeah that gap is a shelf. It may actually be cubbies on each side and shelf in the middle. We'll have to see what happens! 8)
Rob & Lori
Aspen & Tundra
My Instructable: http://www.instructables.com/id/Teardro ... l-Trailer/
User avatar
TwilightLane
The 300 Club
 
Posts: 484
Joined: Thu May 14, 2009 4:59 pm

Postby TwilightLane » Sun May 16, 2010 10:21 pm

Well it's been a while but I got a lot done this past weekend. Work's been super busy, which is good, but I've itching to make progress on my trailer!

I finally got to tackle pieceing on the ends of my side profiles. For folks just tuning in, I'm using an 8-foot long HF trailer. So the base of my profile is still 96 inches. But the bulge at the front of the trailer makes the overall length 9 inches longer. About 105 inches, give or take.

I customized the front of the trailer, but keeping the rear of the profile the same as the cubby plans. To figure out how to shape the piece I referred to grid drawing in the plans and essentially counted backward from the tail end of the profile.

I knew there main piece was 9 inches short. I wanted to lap joint the piece 2 1/2 inches. So I cut off a piece from a sheet of ply that was 11 1/2 inches wide, by 48. (I did the math first and figured out it would work to create both tail pieces).

Here are my notes (data) points transcribed to the workpiece.
Image
Image
Here is the whole layout. The dark line is my cut line.
Image
Rob & Lori
Aspen & Tundra
My Instructable: http://www.instructables.com/id/Teardro ... l-Trailer/
User avatar
TwilightLane
The 300 Club
 
Posts: 484
Joined: Thu May 14, 2009 4:59 pm
Top

Postby TwilightLane » Sun May 16, 2010 10:22 pm

I slide the sheets of ply back and used the 2x2 braces. Worked great.

Image
Rob & Lori
Aspen & Tundra
My Instructable: http://www.instructables.com/id/Teardro ... l-Trailer/
User avatar
TwilightLane
The 300 Club
 
Posts: 484
Joined: Thu May 14, 2009 4:59 pm
Top

Postby TwilightLane » Sun May 16, 2010 10:24 pm

Once I had my two pieces, I lined them up and screwed them together so they will have the same dimensions. I tapped in some nails to help my guide & draw the curve shape.

Image
Rob & Lori
Aspen & Tundra
My Instructable: http://www.instructables.com/id/Teardro ... l-Trailer/
User avatar
TwilightLane
The 300 Club
 
Posts: 484
Joined: Thu May 14, 2009 4:59 pm
Top

Postby TwilightLane » Sun May 16, 2010 10:29 pm

I clamped the piece to my work bench, then used a piece of foam molding held to the points (where I tacked the nails). Worked like a charm.

Image

The clamps at each end were key to holding the molding in place.

Image

That dark line is edge of the lap joint. See below...
Rob & Lori
Aspen & Tundra
My Instructable: http://www.instructables.com/id/Teardro ... l-Trailer/
User avatar
TwilightLane
The 300 Club
 
Posts: 484
Joined: Thu May 14, 2009 4:59 pm
Top

Postby TwilightLane » Sun May 16, 2010 10:31 pm

Aspen enjoyed hanging out on the driveway during a brief dry spell.

Image
Rob & Lori
Aspen & Tundra
My Instructable: http://www.instructables.com/id/Teardro ... l-Trailer/
User avatar
TwilightLane
The 300 Club
 
Posts: 484
Joined: Thu May 14, 2009 4:59 pm
Top

Postby TwilightLane » Sun May 16, 2010 10:34 pm

So now I've got the piece with the cut line on it. Clamped it up to my table and getting ready to cut.

Image

Image

And from underneath.

Image

Starting the cut, supported bythe ply.
Image

Midway thru:
Image
Last edited by TwilightLane on Sun May 16, 2010 10:58 pm, edited 1 time in total.
Rob & Lori
Aspen & Tundra
My Instructable: http://www.instructables.com/id/Teardro ... l-Trailer/
User avatar
TwilightLane
The 300 Club
 
Posts: 484
Joined: Thu May 14, 2009 4:59 pm
Top

Postby TwilightLane » Sun May 16, 2010 10:36 pm

Oh yeah, I had lined it up against the main part of the profile and it lined up well.

Image

Image
Rob & Lori
Aspen & Tundra
My Instructable: http://www.instructables.com/id/Teardro ... l-Trailer/
User avatar
TwilightLane
The 300 Club
 
Posts: 484
Joined: Thu May 14, 2009 4:59 pm
Top

Postby TwilightLane » Sun May 16, 2010 10:38 pm

I guess I didnt take a pic of the piece after the cut. I did line it up on the profile and discover this. The profile line is off by a hair. I traced it and cut it off w the jig saw. No sweat.

Image
Rob & Lori
Aspen & Tundra
My Instructable: http://www.instructables.com/id/Teardro ... l-Trailer/
User avatar
TwilightLane
The 300 Club
 
Posts: 484
Joined: Thu May 14, 2009 4:59 pm
Top

Postby TwilightLane » Sun May 16, 2010 10:41 pm

Just for kicks I lined up the tail end with the 'bulge'. Lined right up. The odd perspective makes it look like there is a backwards angle at the bottom right of the piece. That is actually the 2 inch straight section from an angle. The piece is tilted back to me and it looks funny.

Image
Rob & Lori
Aspen & Tundra
My Instructable: http://www.instructables.com/id/Teardro ... l-Trailer/
User avatar
TwilightLane
The 300 Club
 
Posts: 484
Joined: Thu May 14, 2009 4:59 pm
Top

Postby TwilightLane » Sun May 16, 2010 10:46 pm

Here I have separated the two identical pieces. I'm going to use a router and make a half lap joint. It'll be 2 1/2 inch wide.

Here is one half done. I jacked it up a little bit. For some reason, the depth of the router would slowly go deeper as I used it. I didnt realize it right away. But not a major problem.

Image

Test fitting it.

Image
Rob & Lori
Aspen & Tundra
My Instructable: http://www.instructables.com/id/Teardro ... l-Trailer/
User avatar
TwilightLane
The 300 Club
 
Posts: 484
Joined: Thu May 14, 2009 4:59 pm
Top

Postby TwilightLane » Sun May 16, 2010 10:52 pm

Here is the set up I used to cut the halflap joint. The 1x4 fence will keep the router on my cut line.

Image

I used some scrap pieces at each end to keep the router lined up.

Image
Rob & Lori
Aspen & Tundra
My Instructable: http://www.instructables.com/id/Teardro ... l-Trailer/
User avatar
TwilightLane
The 300 Club
 
Posts: 484
Joined: Thu May 14, 2009 4:59 pm
Top

Postby TwilightLane » Sun May 16, 2010 10:53 pm

Cut in progress.

Image

Whew those things throw a lot of sawdust!!
Rob & Lori
Aspen & Tundra
My Instructable: http://www.instructables.com/id/Teardro ... l-Trailer/
User avatar
TwilightLane
The 300 Club
 
Posts: 484
Joined: Thu May 14, 2009 4:59 pm
Top

Postby TwilightLane » Sun May 16, 2010 11:00 pm

Once I had the tail piece routed, I lined it up and traced it.

Image
Rob & Lori
Aspen & Tundra
My Instructable: http://www.instructables.com/id/Teardro ... l-Trailer/
User avatar
TwilightLane
The 300 Club
 
Posts: 484
Joined: Thu May 14, 2009 4:59 pm
Top

PreviousNext

Return to Build Journals

Who is online

Users browsing this forum: No registered users and 3 guests