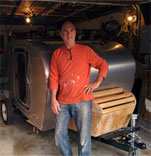
Building the "Heart of Gold" - Done 3/9/2014

...ask your questions in the appropriate forums BUT document your build here...preferably in a single thread...dates for updates, are appreciated....

Re: Building the "Heart of Gold" - started!

Postby drewh1 » Sat Feb 08, 2014 6:21 pm

Dano - BTW, so cool you make guitars, your work is awesome.

What fenders did you use on your builds? Really struggling with what to buy. Also am concerned my doors are too far back . . .

drew.
"If only I knew what I know now when I started . . ."

My Build Journal http://www.tnttt.com/viewtopic.php?f=50&t=56916
User avatar
drewh1
Donating Member
 
Posts: 245
Images: 7
Joined: Sat Aug 03, 2013 3:01 pm
Location: El Cerrito, CA

Re: Building the "Heart of Gold" - started!

Postby dano » Sat Feb 08, 2014 8:07 pm

Drew thanks for the kind words. The fenders that you posted are the ones that I have on my trailer. If you're not sure if there will be too long I can measure mine for you just say the word I'll run out to the garage with a tape measure. Also I can't wait to see your tires and wheels it sounds perfect this is been a fun build thread thanks for sharing. I tried mothers on a portion of my trailer that need to get some of the caulking off. It worked but OMG it was hard work there's got to be a better way. Dano
[email protected]
Morgan Hill Ca.
User avatar
dano
Donating Member
 
Posts: 280
Images: 0
Joined: Fri Aug 19, 2005 11:09 pm

Re: Building the "Heart of Gold" - started!

Postby KCStudly » Sat Feb 08, 2014 9:08 pm

Mothers is an abrasive polish. I wouldn't use it or other polishes on anodized aluminum as it will strip the finish off. I can't remember if you said whether your aluminum is raw or not. Just thought I would mention it.

A solvent or other cleaner might be better for removing adhesive stuff; try it on a scrap or unseen area first to make sure that it doesn't discolor.

Your work looks great! :thumbsup:
KC
My Build: The Poet Creek Express Hybrid Foamie

Poet Creek Or Bust
Engineering the TLAR way - "That Looks About Right"
TnTTT ORIGINAL 200A LANTERN CLUB = "The 200A Gang"
Green Lantern Corpsmen
User avatar
KCStudly
Donating Member
 
Posts: 9617
Images: 8169
Joined: Mon Feb 06, 2012 10:18 pm
Location: Southeastern CT, USA
Top

Re: Building the "Heart of Gold" - started!

Postby aggie79 » Sun Feb 09, 2014 12:51 pm

Drew,

The aluminum looks fantastic. Well done! :thumbsup: :applause: :beer:

My aluminum is anodized so like KC said I put a coat of 100% carnuba wax on once a year. If yours is not anodized, you may want to try some solvent to remove smudges. Another thought might be some Johnson paste wax. I apply it using the non-scratch scotchbright pad to the cast iron surface of my table saw to keep it from rusting.

Take care,
Tom
Last edited by aggie79 on Tue Feb 11, 2014 2:30 pm, edited 1 time in total.
Tom (& Linda)
For build info on our former Silver Beatle teardrop:
Build Thread

93503
User avatar
aggie79
Super Duper Lifetime Member
 
Posts: 5405
Images: 686
Joined: Tue Aug 07, 2007 5:42 pm
Location: Watauga, Texas
Top

Re: Building the "Heart of Gold" - started!

Postby bdosborn » Sun Feb 09, 2014 1:04 pm

Well done! :thumbsup: :wine:

Bruce
2009 6.5'X11' TTT - Boxcar
All it takes is a speck of faith and a few kilowatts of sweat and grace.
Image
Boxcar Build
aVANger Build
User avatar
bdosborn
Donating Member
 
Posts: 5512
Images: 778
Joined: Wed May 05, 2004 11:10 pm
Location: CO, Littleton
Top

Re: Building the "Heart of Gold" - started!

Postby Phooey » Sun Feb 09, 2014 5:32 pm

Your build is fantastic. I've really enjoyed watching it come together. I have found that Pam cooking spray will take pine sap and other sticky goo off of my car and trailer without messing up the finish. Spray it on and let it set for awhile. For really nasty spots I have used an old credit card as a scraper after the Pam has set for about ten minutes. No scratches, no damage to the finish.

:D
User avatar
Phooey
Teardrop Master
 
Posts: 222
Images: 45
Joined: Mon Aug 21, 2006 9:47 am
Location: California, Woodland
Top

Re: Building the "Heart of Gold" - started!

Postby RandyG » Mon Feb 10, 2014 3:56 pm

Yeah, I have a jar of Mothers at work and checked it first thing this morning. Don't use it on anodized, but I do get a mirror finish on raw Al. Good catch Kc! :beer:
Randy
Aircraft fabricator, novice carpenter, electrical apprentice, audio engineer dropout.
Build thread - http://www.tnttt.com/viewtopic.php?f=50&t=54126
User avatar
RandyG
500 Club
 
Posts: 695
Images: 115
Joined: Thu May 10, 2012 6:52 pm
Top

Re: Building the "Heart of Gold" - started!

Postby drewh1 » Mon Feb 10, 2014 3:59 pm

Thanks Phooey, i'll give it a try!

Tom - what fenders do you have have? Looks like you have 14" wheels as well. I'll see if I can find it in your build thread. I always enjoy going through it anyway.

drew.
"If only I knew what I know now when I started . . ."

My Build Journal http://www.tnttt.com/viewtopic.php?f=50&t=56916
User avatar
drewh1
Donating Member
 
Posts: 245
Images: 7
Joined: Sat Aug 03, 2013 3:01 pm
Location: El Cerrito, CA
Top

Re: Building the "Heart of Gold" - started!

Postby aggie79 » Tue Feb 11, 2014 2:47 pm

drewh1 wrote:Tom - what fenders do you have have? Looks like you have 14" wheels as well. I'll see if I can find it in your build thread. I always enjoy going through it anyway.

drew.


Hi Drew,

My fenders are Grants 11" modernistic/cub/ken-skill fenders. My wheels are 15" x 7" and my tires are P235-75R15. (I went with the 75 ratio because I wanted a taller tire to "fill up" the fender well.)

Take care,
Tom
Tom (& Linda)
For build info on our former Silver Beatle teardrop:
Build Thread

93503
User avatar
aggie79
Super Duper Lifetime Member
 
Posts: 5405
Images: 686
Joined: Tue Aug 07, 2007 5:42 pm
Location: Watauga, Texas
Top

Re: Building the "Heart of Gold" - started!

Postby drewh1 » Tue Feb 11, 2014 5:05 pm

Thanks Tom - the fenders and wheels look really good on your teardrop. I might be ending up with more of a modern look, mainly because of the doors, so I am not quite sure about fenders yet.

Hey - I do have another question - looks like you put the rivet heads underneath the hatch rather than on top. I have sealed rivets too but thought I should rivet from top down. Are you happy with the look, happen to have any close up shots? Did you use washers? Oh crap, too many questions . . .
"If only I knew what I know now when I started . . ."

My Build Journal http://www.tnttt.com/viewtopic.php?f=50&t=56916
User avatar
drewh1
Donating Member
 
Posts: 245
Images: 7
Joined: Sat Aug 03, 2013 3:01 pm
Location: El Cerrito, CA
Top

Re: Building the "Heart of Gold" - started!

Postby aggie79 » Tue Feb 11, 2014 11:52 pm

drewh1 wrote:Thanks Tom - the fenders and wheels look really good on your teardrop. I might be ending up with more of a modern look, mainly because of the doors, so I am not quite sure about fenders yet.


Drew,

I think the arched steel fenders would look fantastic on your teardrop. Maybe paint them black to match the door trim or paint them a blue or red to give some "pop" to the color.

drewh1 wrote:Hey - I do have another question - looks like you put the rivet heads underneath the hatch rather than on top. I have sealed rivets too but thought I should rivet from top down. Are you happy with the look, happen to have any close up shots? Did you use washers? Oh crap, too many questions . . .


The only pictures I have are the trim with sealant applied and one looking at the bottom side with the trim installed.

Image

Image

As with most of my build the hatch trim method I used was overly complex and unnecessary. First, I cut a strip of aluminum to go on the underside of the hatch projection, from the rib to the outer edge of the hatch, and glued it into place with sealant. Then I "pre-bent" the hatch trim and clamped it in place. Next I pre-drilled the holes for the rivets using the factory punch holes in the trim as a guide for spacing. The holes were drilled through the hatch trim, the aluminum sheet on the outside of the hatch, the plywood extension of the hatch, and the aluminum strip glued to the underside of the plywood. Then I removed the clamps and applied sealant to the bottom side of the hatch trim. The hatch trim has a small leg on the inboard side - I think its purpose is to raise the bottom the trim for sealant. To keep the trim from "rolling" as I applied the rivets, I used a small washer at each rivet hole between the hatch trim and the aluminum on the outside of the hatch. I then riveted the hole assembly from the underside.

I installed the rivets this way because I wanted as flat as possible surface for my double row of weatherstripping and I thought the "nubs" would not fit in the clearance between the hatch and sidewalls.

Take care,
Tom
Tom (& Linda)
For build info on our former Silver Beatle teardrop:
Build Thread

93503
User avatar
aggie79
Super Duper Lifetime Member
 
Posts: 5405
Images: 686
Joined: Tue Aug 07, 2007 5:42 pm
Location: Watauga, Texas
Top

Re: Building the "Heart of Gold" - started!

Postby drewh1 » Wed Feb 12, 2014 12:53 am

Tom - wow, thanks for the detailed reply, I am not sure what you did was unnecessary, you are just thorough. I think I need to put the rivets in from the bottom the way you did. Otherwise, my weatherseal will be compromised. so thanks. and yes, I will try the stock fenders first, once I get my wheels.

drew
"If only I knew what I know now when I started . . ."

My Build Journal http://www.tnttt.com/viewtopic.php?f=50&t=56916
User avatar
drewh1
Donating Member
 
Posts: 245
Images: 7
Joined: Sat Aug 03, 2013 3:01 pm
Location: El Cerrito, CA
Top

Re: Building the "Heart of Gold" - started!

Postby drewh1 » Thu Feb 13, 2014 5:21 pm

Another milestone! the hatch is skinned, and brake lights mounted. I also installed the galley seal. Look's like it is mostly sealing but might need a little tweaking.

also got my tires, and the wheels should be here today too.

IMG_2645.JPG
IMG_2645.JPG (117.09 KiB) Viewed 1921 times
IMG_2646.JPG
IMG_2646.JPG (107.04 KiB) Viewed 1921 times
IMG_2643.JPG
IMG_2643.JPG (118.71 KiB) Viewed 1921 times
"If only I knew what I know now when I started . . ."

My Build Journal http://www.tnttt.com/viewtopic.php?f=50&t=56916
User avatar
drewh1
Donating Member
 
Posts: 245
Images: 7
Joined: Sat Aug 03, 2013 3:01 pm
Location: El Cerrito, CA
Top

Re: Building the "Heart of Gold" - started!

Postby drewh1 » Thu Feb 13, 2014 5:22 pm

IMG_2648.JPG
IMG_2648.JPG (98.6 KiB) Viewed 1919 times
IMG_2642.JPG
IMG_2642.JPG (132.11 KiB) Viewed 1919 times
IMG_2639.JPG
IMG_2639.JPG (127.78 KiB) Viewed 1919 times
a couple more picks.
"If only I knew what I know now when I started . . ."

My Build Journal http://www.tnttt.com/viewtopic.php?f=50&t=56916
User avatar
drewh1
Donating Member
 
Posts: 245
Images: 7
Joined: Sat Aug 03, 2013 3:01 pm
Location: El Cerrito, CA
Top

Re: Building the "Heart of Gold" - started!

Postby Gunguy05 » Thu Feb 13, 2014 5:49 pm

GORGEOUS!! :applause:

Having that galley finished, the wheels on the way, and all that aluminum hanging must be awesome!!!!

Looks like the aluminum went one really well, that is one of the things that I am the most unsure about on our build. I can work a hammer, saw, and maybe a router, but the alumimum (especially the trim) scares the crap out of me.

Keep up the great work. You're almost there!
Brian


Checkout my buildThe Regal Eagle Bow front for 4
Image
Also my teardrop updates from blog on Dad Rambles
User avatar
Gunguy05
The 300 Club
 
Posts: 385
Images: 6
Joined: Mon Dec 02, 2013 4:45 pm
Location: South GA
Top

PreviousNext

Return to Build Journals

Who is online

Users browsing this forum: Google [Bot] and 20 guests