Optimized Winter Warrior O.W.W. OWW

...ask your questions in the appropriate forums BUT document your build here...preferably in a single thread...dates for updates, are appreciated....

Postby wlivesey » Sat Oct 16, 2010 7:54 pm

My gas springs are mounted on the inside. I like how they are protected from the elements that way. They push up against the ceiling instead of the bottom of the wall. The bottom of the spring is mounted at the top of the lower wall. Does that make sense?

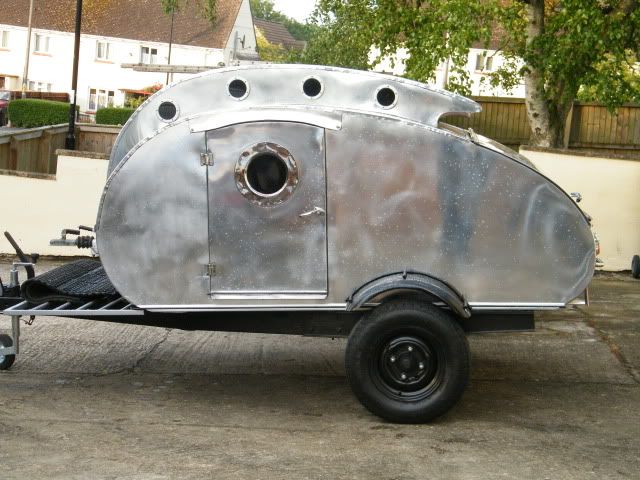
Here is a picture from my album. It's not the best but I think you'll get the idea.

The wife and I are enjoying our ww right now! :)

Image
User avatar
wlivesey
The 300 Club
 
Posts: 469
Images: 283
Joined: Sun Aug 12, 2007 1:22 pm
Location: DFW, Texas

Postby mikeschn » Sun Oct 17, 2010 6:14 am

I like that Bill. I think I'll move my gas springs inside!!!

Thanks!

Mike...

P.S. Which model number did you use?
The quality is remembered long after the price is forgotten, so build your teardrop with the best materials...
User avatar
mikeschn
Site Admin
 
Posts: 19202
Images: 475
Joined: Tue Apr 13, 2004 11:01 am
Location: MI

Postby RAYVILLIAN » Sun Oct 17, 2010 7:29 am

I'm putting mine on the inside also once I figure out how long to get them. Bill how long are the one you have both extended and closed and what lifting weight did you get?
Gary
Where ever we raise the hatch is home.
Darn blank states keep getting further away and we keep traveling slower ain't never gona get this map full.
111961Image
User avatar
RAYVILLIAN
Lifetime member
 
Posts: 1434
Images: 109
Joined: Thu Aug 05, 2004 9:33 pm
Location: Rayville MO
Top

Postby wlivesey » Sun Oct 17, 2010 9:03 am

RAYVILLIAN wrote:I'm putting mine on the inside also once I figure out how long to get them. Bill how long are the one you have both extended and closed and what lifting weight did you get?
Gary


My gas springs are about 27 inches extended and about 18 inches closed. They are 150lbs each but I'd like to upgrade them to about 175lbs each. My hatch is easy to lift but it doesn't raise on it's own right now. It's not a problem but would be nice if they had a little more lifting power. I'll see if I can find where I ordered them from and post a link.
User avatar
wlivesey
The 300 Club
 
Posts: 469
Images: 283
Joined: Sun Aug 12, 2007 1:22 pm
Location: DFW, Texas
Top

Postby mikeschn » Sat Jan 08, 2011 3:48 pm

I posted these in a thread for Russ the other day... I figured I'd better post them here where they belong.

Here's the beginnings of a scale model I am working on to verify that this is what we want to build...

Image

Image

Image

Image

Mike...
The quality is remembered long after the price is forgotten, so build your teardrop with the best materials...
User avatar
mikeschn
Site Admin
 
Posts: 19202
Images: 475
Joined: Tue Apr 13, 2004 11:01 am
Location: MI
Top

Postby mikeschn » Sat Jan 08, 2011 3:50 pm

I'd had the wheels on my todo list for a while now. I decided this morning to actually make sawdust...

Image

Image

Image

Image

The design seems a little low, I'm going to have to pull up my CAD model and see if that's what I really intended! :?

Mike...
The quality is remembered long after the price is forgotten, so build your teardrop with the best materials...
User avatar
mikeschn
Site Admin
 
Posts: 19202
Images: 475
Joined: Tue Apr 13, 2004 11:01 am
Location: MI
Top

Postby YuGun » Sat Jan 08, 2011 4:14 pm

Wow!!!!!
İt seen come out of the fantastic films,
Really impressive design. İ like it.
Otherwise CNC modelling really wonderful,
And as a basic amoteur modeller i jealous about it,
Can you share about it?
User avatar
YuGun
The 300 Club
 
Posts: 445
Joined: Sun Apr 11, 2010 1:25 pm
Location: Turkey
Top

Postby bve » Sat Jan 08, 2011 4:24 pm

Cool model Mike, made even more cool given you appear to be using your home made CNC.

Thinking back to Doug's Nomad build thread I'm thinking you may want to revise the wheel well openings (if the height is as planned) it looks like it will be tough to change a tire as it sits.

Did you ever decide on the width? Looks as though you are going with 5'.
Burke

KISS > COMPLEX
Image
Image

Build threads converted to PDFs.
As of 2008-08-08 I have added more build threads to the pdf collection
User avatar
bve
500 Club
 
Posts: 694
Images: 98
Joined: Sat Aug 25, 2007 1:44 am
Location: Edmonton, Alberta, Canada
Top

Postby mikeschn » Sat Jan 08, 2011 5:14 pm

Actually, I broke down and replaced my homemade CNC router with another hobbyist CNC router.

My CNC router was so slow, due mainly to the lead screws I was using, 1/4-20 screw thread. The new one uses 5 tpi! Rapids up to 220 IPM are possible. Check out these wicked threads...
Image

If you want to read more about it, you can check it out here...

http://www.probotix.com/FireBall_v90_cnc_router_kit/

Mike...
The quality is remembered long after the price is forgotten, so build your teardrop with the best materials...
User avatar
mikeschn
Site Admin
 
Posts: 19202
Images: 475
Joined: Tue Apr 13, 2004 11:01 am
Location: MI
Top

Postby bdosborn » Sat Jan 08, 2011 5:34 pm

I've been lurking over at an Australian offroad camper building site. This front end design seems to be popular with the home build guys.

Image

Image

Gary - Your trailer front end is shaped like this too, does it help with drag?

Image

I wonder if a tongue box shaped like this would improve mileage on the wider trailers?

Bruce
2009 6.5'X11' TTT - Boxcar
All it takes is a speck of faith and a few kilowatts of sweat and grace.
Image
Boxcar Build
aVANger Build
User avatar
bdosborn
Donating Member
 
Posts: 5594
Images: 806
Joined: Wed May 05, 2004 11:10 pm
Location: CO, Littleton
Top

Postby mikeschn » Sat Jan 08, 2011 5:44 pm

bdosborn wrote:Image


Wow, that's one heck of a front end. Might as well be a rocket!!!

Mike...
The quality is remembered long after the price is forgotten, so build your teardrop with the best materials...
User avatar
mikeschn
Site Admin
 
Posts: 19202
Images: 475
Joined: Tue Apr 13, 2004 11:01 am
Location: MI
Top

Postby RAYVILLIAN » Sat Jan 08, 2011 6:01 pm

Bruce the front end definitely helps with the drag and MPG. Pulling the old Warrior which is 5' wide and 10' long the best I've gotten MPG wise is 15.5 to 16. With the new one which is heavier 6' wide and 14' long total I've gotten 17.5 MPG on one tank. I'm guessing I"m getting about 1.5MPg better with the new trailer.

Gary

Where is this Australian offroad camper site I like those designs?
Where ever we raise the hatch is home.
Darn blank states keep getting further away and we keep traveling slower ain't never gona get this map full.
111961Image
User avatar
RAYVILLIAN
Lifetime member
 
Posts: 1434
Images: 109
Joined: Thu Aug 05, 2004 9:33 pm
Location: Rayville MO
Top

Postby bdosborn » Sat Jan 08, 2011 6:14 pm

RAYVILLIAN wrote:Where is this Australian offroad camper site I like those designs?


http://myswag.org/forum/

I like this build the best:

http://myswag.org/forum/index.php?topic=6359.0

Bruce
2009 6.5'X11' TTT - Boxcar
All it takes is a speck of faith and a few kilowatts of sweat and grace.
Image
Boxcar Build
aVANger Build
User avatar
bdosborn
Donating Member
 
Posts: 5594
Images: 806
Joined: Wed May 05, 2004 11:10 pm
Location: CO, Littleton
Top

Postby mikeschn » Sat Jan 08, 2011 6:36 pm

I guess I'll have to do some more optimizing eh? Especially on the front end. :o

Mike...
The quality is remembered long after the price is forgotten, so build your teardrop with the best materials...
User avatar
mikeschn
Site Admin
 
Posts: 19202
Images: 475
Joined: Tue Apr 13, 2004 11:01 am
Location: MI
Top

Postby mikeschn » Sat Jan 08, 2011 6:43 pm

Bruce,

Do you remember which thread you saw these builds in?

Mike...

bdosborn wrote:
Image

Image

The quality is remembered long after the price is forgotten, so build your teardrop with the best materials...
User avatar
mikeschn
Site Admin
 
Posts: 19202
Images: 475
Joined: Tue Apr 13, 2004 11:01 am
Location: MI
Top

PreviousNext

Return to Build Journals

Who is online

Users browsing this forum: No registered users and 16 guests