Travel trailer with slide out build

...ask your questions in the appropriate forums BUT document your build here...preferably in a single thread...dates for updates, are appreciated....

Postby Dmanrick » Sun Apr 10, 2011 7:37 pm

Well this weekend turned out ok, I didn't get quite as much done as I wanted because I was working alone. The helper (DW) babysat the grandbaby all weekend so she was pretty much unavailable.

First of all I got the 3rd wall paneled and installed.

Image

Then I took off the 2 sections of the front wall and paneled them. Before I got too far, I wanted to build out the bathroom walls. We just set the wall in the approximate place for now.

Image

I have the outside wall leaning out in this picture to help get the front walls into place.

Image

The we put the 2 front sections in and the outside is completely buttoned down

Image

Image

Next we buttoned down the bathroom walls.

Image

Here's a view looking into the kitchen area.

Image

View from kitchen area to the living room.

Image

I also temporarily placed the door on just to make sure it will fit.

Image

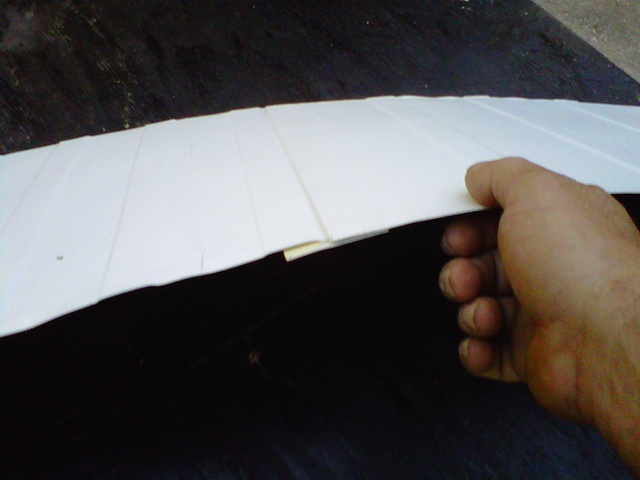
Then we started on the roof. The joists are 3 1/2" in the middle and 1 1/2" on the ends.

Image

You can see here where the last one is flat and the next to the last one is less taper so I can make a smooth transition.

Image

In these views you can make out a little of the ceiling. It is just luan with primer on it. We will paint it when it gets time.

Image

Image

These last two are just a couple of views from the outside.

Image

Image

I want to thank Fromeo again for posting his build topic. As you can see this one is really close to his. Without his very detailed explanation I wouldn't have gotten motivated.

There are a few differences but not that many so far. Mine I am sure is no where near as nice as his. Working by myself this weekend has had it's drawbacks. The most being the fit of the rubber beading. Without help on the inside while I was outside screwing it together, it don't look that great in a few spots. Hopefully we can adjust it this week.

I am going out of town next weekend so the main thing I want to do is get it covered in plastic. That's why I wanted to make sure the door fit because I am going to cut the plastic for the door to make it easier to get in and out of while I piddle.
Dmanrick
Gold Donating Member
 
Posts: 65
Joined: Tue Sep 14, 2010 8:42 pm

Postby fromeo » Tue Apr 12, 2011 11:46 am

Real nice work, Rick. It's coming along great!

With that welt bead, if you staple it to the panel first it'll make for a can't miss fit when you put the panels together. Cheap 1/2" air stapler makes it a real piece of cake.

- Frank
fromeo
Teardrop Master
 
Posts: 157
Joined: Tue Feb 27, 2007 2:01 pm
Location: Sicklerville, NJ

Postby Dmanrick » Tue Apr 12, 2011 8:21 pm

I did staple it but I stapled it about halfway from the edge to the bead and in some places it just got folded over and stuff. I messed with it today and it looks much better.

Looking at the pics of the ceiling joists, I need to do some belt sanding. Apparently one end is 1 1/2" and the other is about about 1 5/8". Oh well, I can't cut very good with the bandsaw obviously. About the only thing I do seem to be good at is shooting myself with the nail gun. That's twice in 2 weekends. :)
Dmanrick
Gold Donating Member
 
Posts: 65
Joined: Tue Sep 14, 2010 8:42 pm
Top

Postby Dmanrick » Mon Apr 18, 2011 8:09 pm

So we got back into town this evening and my bead roller dies were in. I am making my own siding out of coil stock so I asked a friend of mine in Illinois to make me some plastic dies for it to contour the coil stock for the siding. We are still playing with the spacing but I like the lower half better. Once we get the spacing down like we like it, I will build a jig to make it easy and the lines straight.

Here are a couple of pics of what we are doing.


This one is looking at it on the side of the trailer to see if we like the spacing and how the seams will look.

Image

This is how the seams are built. The top slides into the lower part of the upper piece and the bottom is stapled so that when the next piece is slid in, the staples are covered.

Image


And the last one is a picture of my bead roller. Once we start doing the siding I will make a jig and put my motor back on it and we should be able to crank them out pretty quickly.

Image
Dmanrick
Gold Donating Member
 
Posts: 65
Joined: Tue Sep 14, 2010 8:42 pm
Top

Postby fromeo » Mon Apr 18, 2011 9:04 pm

Nice work Rick! Is that vinyl or aluminum coil?

Have you seen Len's siding tutorial? He does something similar, with a trim brake and aluminum stock, then rolls the bends flat. Cool process.

- Frank
fromeo
Teardrop Master
 
Posts: 157
Joined: Tue Feb 27, 2007 2:01 pm
Location: Sicklerville, NJ
Top

Postby Dmanrick » Mon Apr 18, 2011 9:14 pm

That is aluminum. Yeah I seen his tutorial, that is what gave me the idea. I wanted a different pattern though.

Around here I was getting prices of about 2k for rv siding (delivered) and I just couldn't do that. That thing is way too small for that kind of money. I bought enough coil stock to do it all for 340.00 including tax.
Dmanrick
Gold Donating Member
 
Posts: 65
Joined: Tue Sep 14, 2010 8:42 pm
Top

Postby fromeo » Mon Apr 18, 2011 9:22 pm

Dmanrick wrote:That is aluminum. Yeah I seen his tutorial, that is what gave me the idea. I wanted a different pattern though.

Around here I was getting prices of about 2k for rv siding (delivered) and I just couldn't do that. That thing is way too small for that kind of money. I bought enough coil stock to do it all for 340.00 including tax.


I hear ya. My quote was $2200 + the trim pieces and that wasn't happening. I bought twice what I needed in Elkhart for $400, but it was a week long trip, er, I mean vacation :lol:

- Frank
fromeo
Teardrop Master
 
Posts: 157
Joined: Tue Feb 27, 2007 2:01 pm
Location: Sicklerville, NJ
Top

Postby Dmanrick » Mon Apr 18, 2011 9:26 pm

I'd have done the same thing in a minute. :)
Dmanrick
Gold Donating Member
 
Posts: 65
Joined: Tue Sep 14, 2010 8:42 pm
Top

Postby Dmanrick » Sun Apr 24, 2011 7:40 pm

Well we didn't get to work on this thing today but we did get to work on it a little friday and yesterday. We got all of the wiring done on the front wall and the side with the door on it. We also insulated those two walls with 1 1/2" styrofoam.

Here's my buddy getting the marker light wires finished up.

Image

Here we have put some of the homemade siding up.

Image

All of the front is sided except for the very bottom piece. I will save that and do all of the bottom pieces at the same time.

Image

Image

This is what the siding looks like close up.

Image

We also couldn't get a nice brake on the bottom for the joints so I hit craigslist up and brought me a new toy. :)

Image

The homemade siding doesn't look too bad at all. There is a slight ripple in the panels from going through the bead roller but you really can't see it very well unless you are standing and looking straight sideways at it.

It's good enough for me anyway.
Dmanrick
Gold Donating Member
 
Posts: 65
Joined: Tue Sep 14, 2010 8:42 pm
Top

Tiny Travel Trailer w Slide Out Update 5/07

Postby Dmanrick » Sat May 07, 2011 8:16 pm

Well life has gotten in the way and I haven't been able to do much the last couple of weeks. Me and mama spent all day today on it so here's a quick update.

First we finished running the wires and got the side wall and the rear wall insulated. After trimming the expandable foam we made all of the side wall siding and started installing it.

Image

Image

Then we installed the window and the door.

Image

After taking a break until the sun went down a little we formed all of the siding for the back wall.

Image

In this pic you can see where I drilled the holes for the running light wiring already so we should be able to start hanging siding first thing in the morning.

Image


I am hoping to get not only the rear wall sided but the other side wall done tomorrow too. That might be pushing it though. It gets really hot out there in the afternoon. I'm just ready to get it dried in so I can start on the inside with the ac going.
Dmanrick
Gold Donating Member
 
Posts: 65
Joined: Tue Sep 14, 2010 8:42 pm
Top

Postby Sam I am » Sat May 07, 2011 9:46 pm

Great work! The siding looks really good. You have some serious metalworking skills! I'm eager to see it finished.
User avatar
Sam I am
500 Club
 
Posts: 770
Images: 106
Joined: Sun Jul 02, 2006 9:19 pm
Location: Central PA
Top

Postby Dmanrick » Sat May 07, 2011 10:00 pm

Thanks! Me too! :)

Actually it shouldn't be too bad. We won't have a stove or anything so the kitchen will be simple. The main thing is the slide out and the bathroom.
Dmanrick
Gold Donating Member
 
Posts: 65
Joined: Tue Sep 14, 2010 8:42 pm
Top

Postby Wimperdink » Sat May 07, 2011 10:11 pm

You had me at "bead roller"! :lol:


What kind of siding is this? Anything like roof flashing on a roll?

What does the jig look like to keep the lines straight and parallel?

Is there a die that you can use to fold the edges over then pound flat to make your female side connections, or does that require the brake?

Sorry for all the questions but I really like the way your siding is coming out. ok one last one... is it time consuming?
Image You know a man is on the level if his bubble is in the middle.
User avatar
Wimperdink
1000 Club
1000 Club
 
Posts: 1058
Images: 33
Joined: Mon Sep 17, 2007 8:29 pm
Location: East TN
Top

Postby Dmanrick » Sat May 07, 2011 10:23 pm

It is aluminum coil stock that is white and kind of has a texture. It comes in rolls that are 24 inches by 50 foot. It is used to wrap trim boards on houses.

This clamp and 1x4 is what I use to keep the lines straight. It actually works pretty good.

Image

I have a tipping die that we originally tried to use that will make a bend in it but it didn't work very well, if the brakes are not straight, it looks like crap and it's awful hard to keep a perfectly straight line in a 10' or 12' piece. The brake works great though. My original thought was to buy it off of craigslist , use it then put it back on there but I will probably keep it.

As far as time consuming, me and the wife cut the 4 pieces for the back, rolled the humps in them and got them all broken in 30 or 40 minutes. Once you get a system down, it isn't bad. The first piece I did took over an hour and looked like crap. With a 24" piece of metal, each piece has to be rolled 7 times and then do the braking but it isn't too bad.
Dmanrick
Gold Donating Member
 
Posts: 65
Joined: Tue Sep 14, 2010 8:42 pm
Top

Postby Wimperdink » Sat May 07, 2011 11:53 pm

Hey thanks for the quick response. One last question for you.... How will you finish the top to keep water out of the seams or will you go for a full size sheet of aluminum on the top? You cleared up a lot of my misunderstandings... thanks... excellent work with your trailer. :thumbsup:
Image You know a man is on the level if his bubble is in the middle.
User avatar
Wimperdink
1000 Club
1000 Club
 
Posts: 1058
Images: 33
Joined: Mon Sep 17, 2007 8:29 pm
Location: East TN
Top

PreviousNext

Return to Build Journals

Who is online

Users browsing this forum: No registered users and 11 guests