Another Teardrop build - DONOR ON EBAY NOW.

...ask your questions in the appropriate forums BUT document your build here...preferably in a single thread...dates for updates, are appreciated....

Postby grizz » Fri Sep 30, 2011 12:33 pm

I was at home today doing clinical trials reading and summarising, (part of my job)

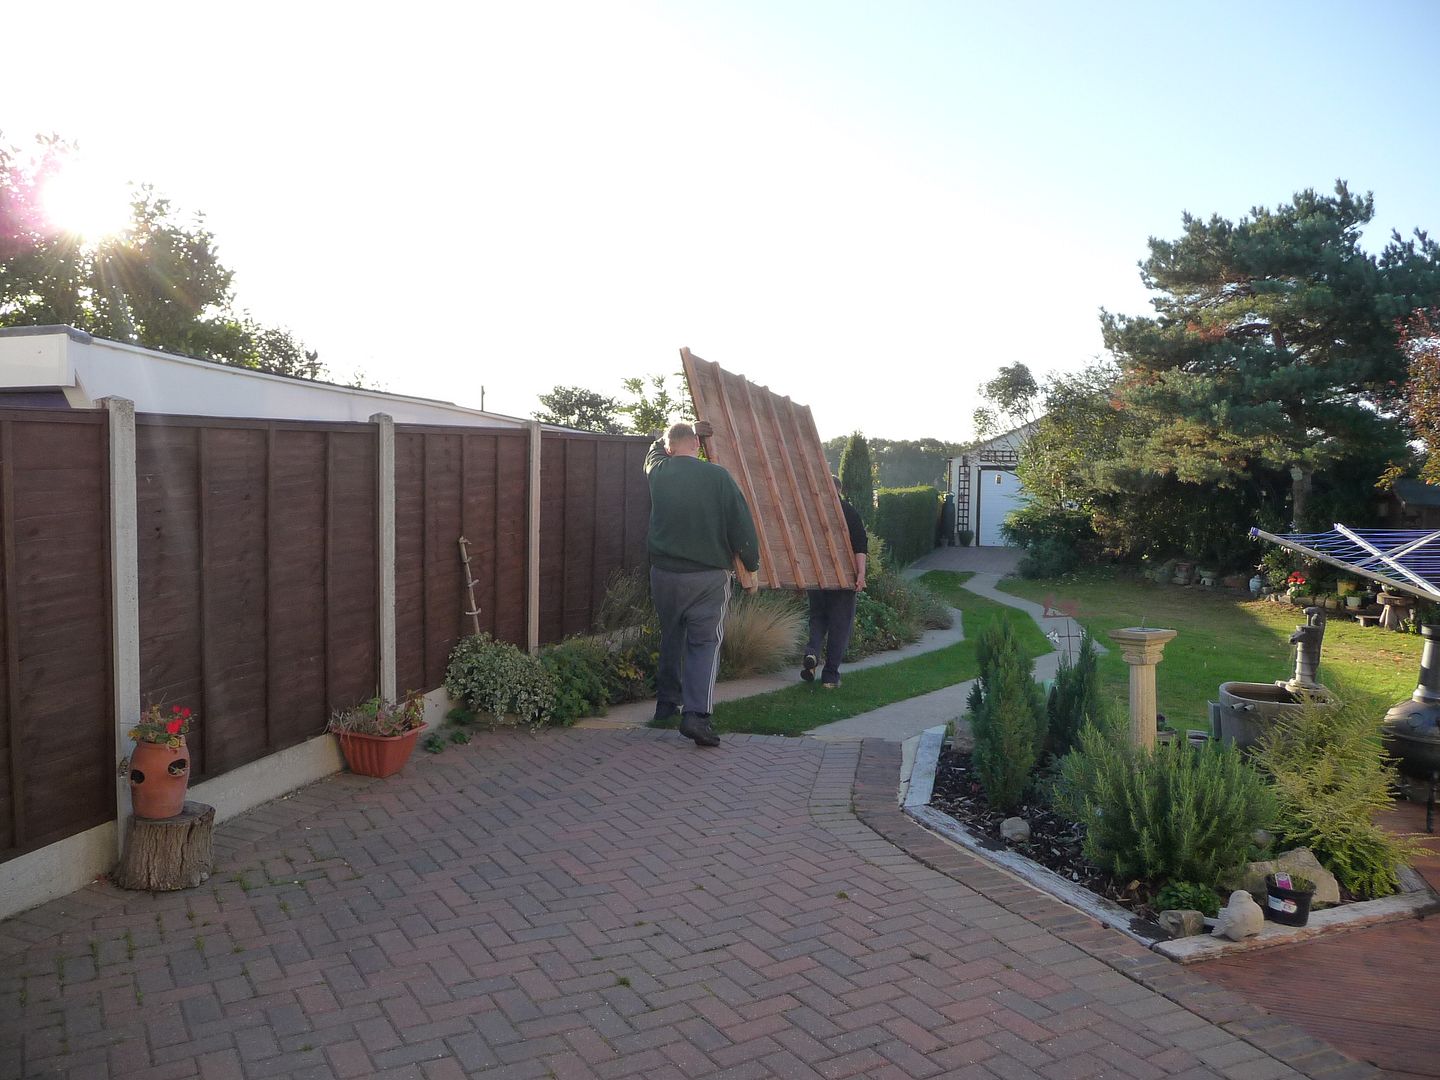
By 5pm I was done and had hit the wall wrt taking stuff in, so perfect time bail out and get into the garage to complete the little pedal car.

I wanted to add some sort of structure to the front and found a piece of thick clear perspex that was part of the previous owner of the house's ski-boat.
I measured, and cut it with the diamond blade on the angle grinder, then sanded all the edges smooth on the beltsander.

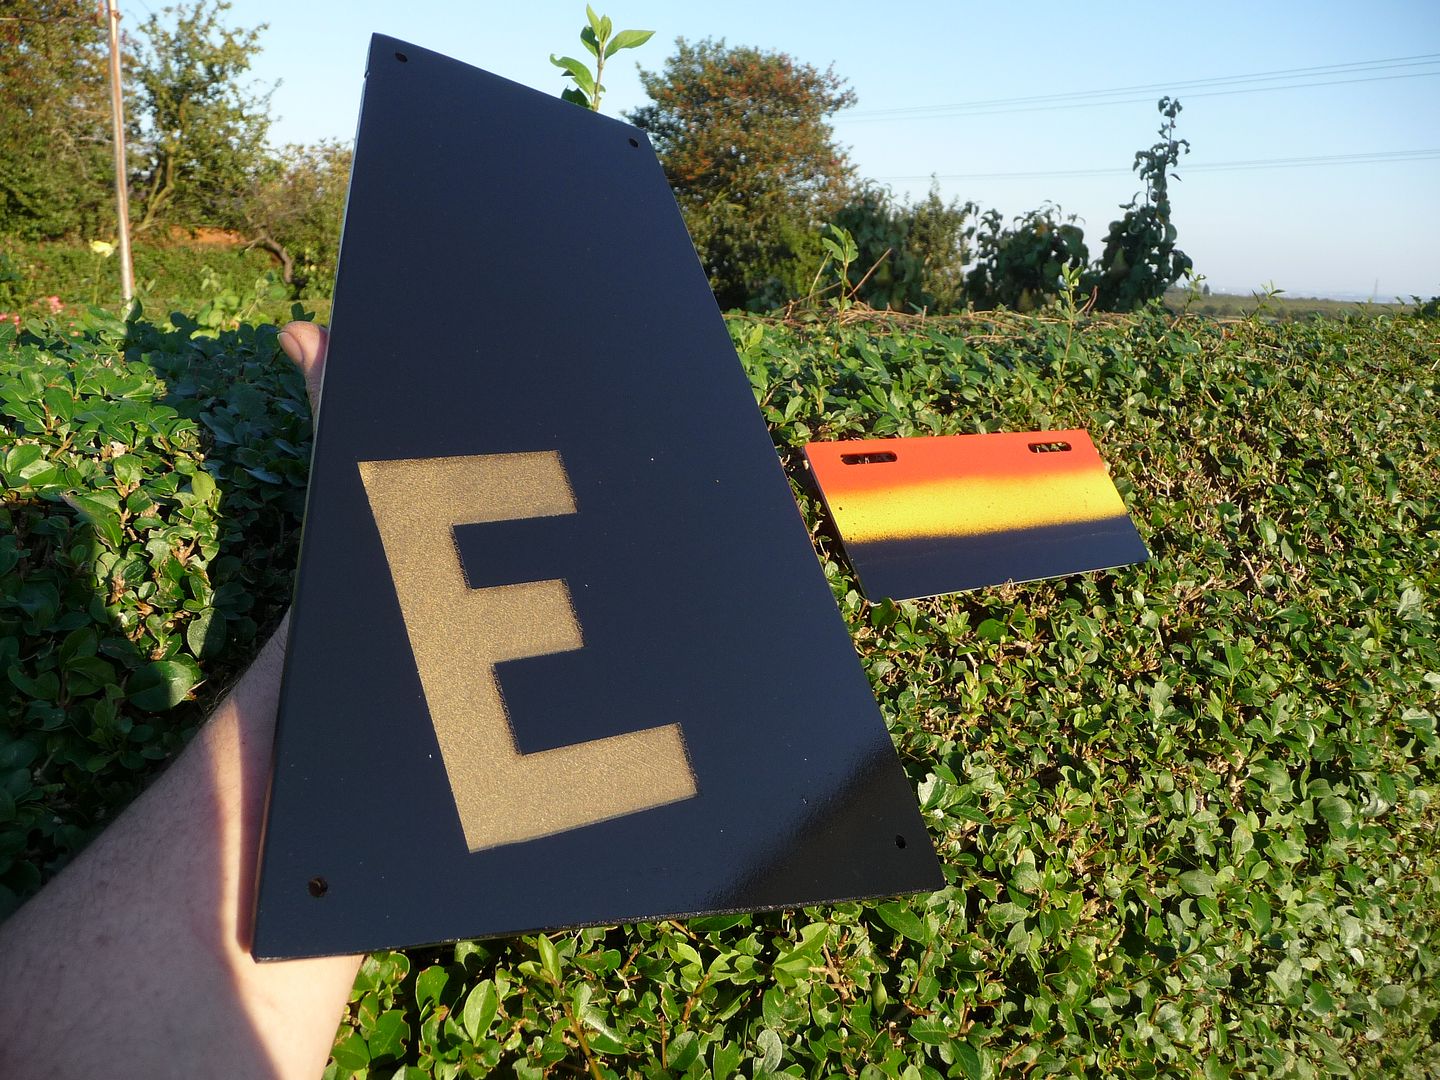
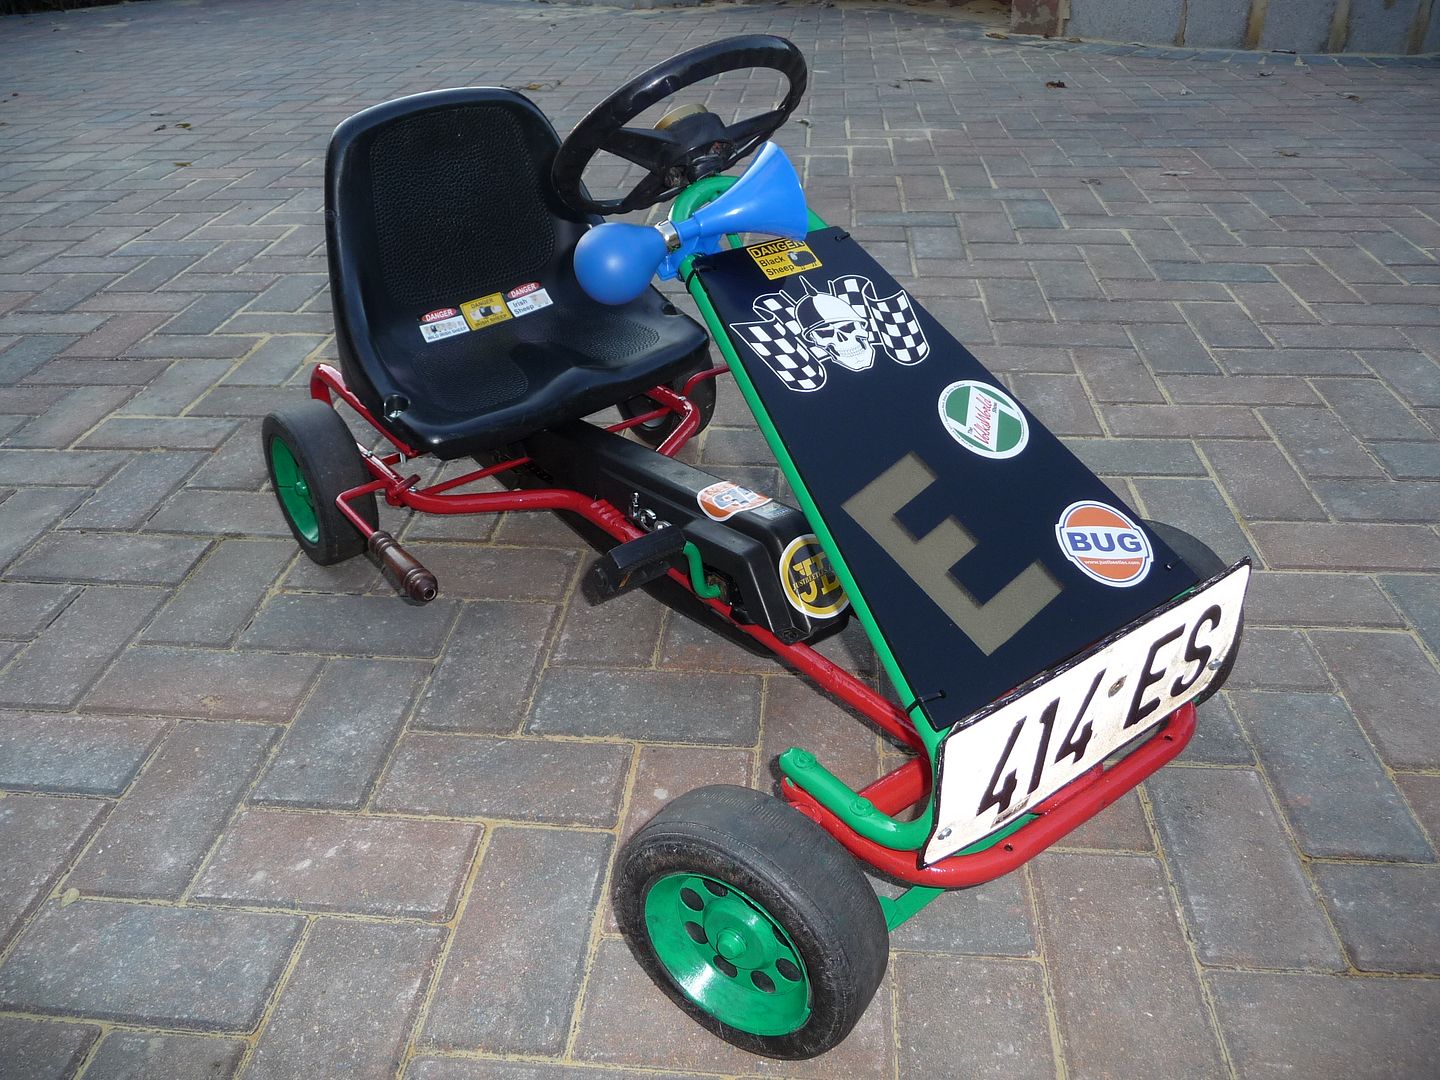
I had planned on getting Edison's (the little guys name) initial or name onto the kart some or other way.
So I used some gold spraypaint I had bought at a sale in January and sprayed a big patch on the rear in gold. On the front I used masking tape to lay out the "E" after the gold dried, it was covered with 2 coats of gloss black at the rear and once that dried, the front got 3 coats to, over the masked section.
Fortunately the day has been hot and dry, so the coats dried reasonably fast.
Next up was a small plate that came off a scooter years ago, Blue plastic, covered in grey undercoat and then Yellow, Red and Black, as a nod toward the German origins of the kart.

Image

After all the paint had dried, it was time to start the final assembly, and most importantly adding the stickers.
Nicola had searched Ebay to find an skull and chequered flag themed sticker and came up trumps.

The other stickers came from my collection of allsorts.

Image

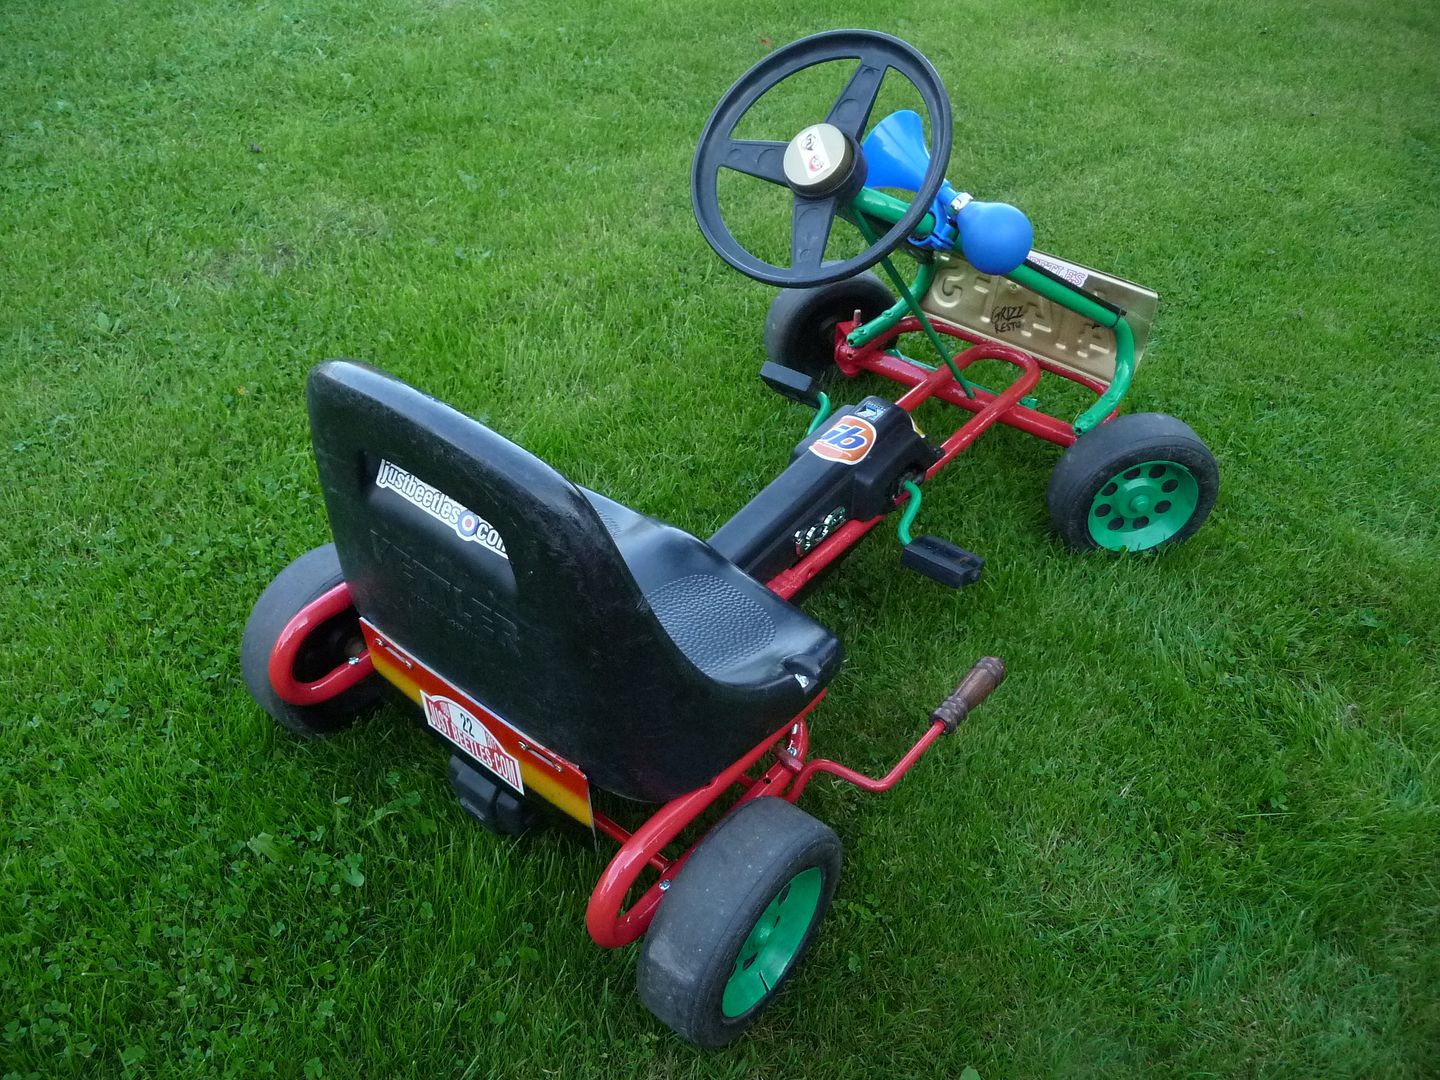
When completed I took the kart into the house and plonked it on the coffee table for Nicola to inspect...... Happy to report that she was both pleased and a bit impressed with the final outcome.

On the way back to the garage I thought a pic of the unflattering rear would do as well.

Image


I hope you guys have enjoyed this little resto report.

Next up, indoors decorating the weekend.
Greetings from England.

Rian.


Hoping to get it all done in time.
User avatar
grizz
1000 Club
1000 Club
 
Posts: 1210
Images: 29
Joined: Mon Sep 21, 2009 2:37 pm
Location: Rochester, Kent, UK

Postby chorizon » Fri Sep 30, 2011 8:49 pm

Dude...

That rocks!

Why not just get the outside sorted, seal it up from the elements and then start on the interior?

The inside looks nice.

I'd say its an excellent platform and the price is definitely right...

...just gotta get it home
:thumbsup:
User avatar
chorizon
Platinum Donating Member
 
Posts: 871
Images: 94
Joined: Tue Feb 26, 2008 12:44 pm
Location: Austin, Texas

Postby grizz » Sat Oct 01, 2011 1:36 am

chorizon wrote:Dude...

That rocks!

Why not just get the outside sorted, seal it up from the elements and then start on the interior?

The inside looks nice.

I'd say its an excellent platform and the price is definitely right...

...just gotta get it home
:thumbsup:


Thanks Joshua, as I look further into the FREE caravan, I am starting to feel sorry for it.

Typically 80's they are not pretty, but were hand built and to destroy it, would in my book not be fair.

Get my drift ?

Here is a link to another guy who bought one, and then tidied it up.

From what I understand, The one I have been offered , looks the same or worse than this from the outside.

http://fluffle-valve.co.uk/joomla/index ... &Itemid=41

I am quite good at cleaning stuff up and making it work.

So maybe we will end up with another caravan on the drive..... just what I need. 8) 8) 8)
Greetings from England.

Rian.


Hoping to get it all done in time.
User avatar
grizz
1000 Club
1000 Club
 
Posts: 1210
Images: 29
Joined: Mon Sep 21, 2009 2:37 pm
Location: Rochester, Kent, UK
Top

Postby grizz » Sat Oct 01, 2011 11:40 am

In other news, I just splurged £226.00 on a machine for the woodwork room.

It will also come in usefully for the new teardrop build and some other things I get up to.

Most importantly, it will keep me out from under Nicola's feet during winter. Now I will have to build a small log burner for the woodwork shed as well, to keep me warm when banished there.

I have been wanting to get back into woodwork, and more specifically lathe work, and more artisitc wood turning for some time now.
I used to do a lot of it years ago.

Once again, Nicola came to the rescue, telling me "Just buy a bloody lathe man ! Get on with it" Only payment she wants for it is a take out Chinese dinner. Lucky me, or what.

I have realised while researching that many modern lathes are lightweight, and often not very versatile, while the older machines from the 50's 60's and even 70's were built with cast parts and durability are the forefront of design. The offering from Toolshop/toolmart/machineshop.com and others was significantly inferior.

With this in mind I started looking at the Myford ML8 and other similar oldskool lathes..... prices , if you got the right machine were less than an inferior new machine.

Some of the 50's and 60's machines also came with various attachments , and one of the things I wanted was to be able to do both inside and outside turning, so one could do a 24 inch wooden plate or bowl on the outside of the machine.

Today was just browsing Ebay, as you do and saw a Coronet Major Wood turning lathe, circular saw, thicknesser/planer in the last 15 minutes of its bidding, 18 bids, up to £185.00

So I quickly Googled some reviews and saw it was more than I wanted. Called the seller to check more info and bid while speaking to kim, with 20 seconds to spare.

This is what they look like. The one I have bought comes with its own bench and a load of tools as well.

The one I have bought is a lot more dusty and on a different bench.


Image

Thicknesser/planer and circular saw on side.

Image

Image


Now I just need to go collect it.

And wait for the new woodwork shed to be built, then we are in business.
Greetings from England.

Rian.


Hoping to get it all done in time.
User avatar
grizz
1000 Club
1000 Club
 
Posts: 1210
Images: 29
Joined: Mon Sep 21, 2009 2:37 pm
Location: Rochester, Kent, UK
Top

Postby eamarquardt » Sat Oct 01, 2011 11:49 am

On this side of the pond there is similar machine called a Shopsmith. They have all sorts of attachments like yours including a band saw. They have a variable pitch pulley drive system so you can vary the speed. The prices vary a lot depending on condition, location, and how badly the seller wants it gone.

Your's looks pretty nice and a bit more compact.

Good hunting.

My best buy to date was a Delta combination 12" disk and 6X48 belt grinder/sander (a $1,500 machine) for fifty bucks at a garage sale. It did, though, need a $35 bracket which I bought online.

Cheers,

Gus
The opinions in this post are my own. My comments are directed to those that might like an alternative approach to those already espoused.There is the right way,the wrong way,the USMC way, your way, my way, and the highway.
"I'm impatient with stupidity. My people have learned to live without it." Klaatu-"The Day the Earth Stood Still"
"You can't handle the truth!"-Jack Nicholson "A Few Good Men"
"Some people spend an entire lifetime wondering if they made a difference in the world. The Marines don't have that problem"-Ronald Reagan
User avatar
eamarquardt
Silver Donating Member
 
Posts: 3179
Images: 150
Joined: Sat Nov 11, 2006 11:00 pm
Location: Simi Valley, State of Euphoria (Ca)
Top

Postby grizz » Mon Oct 03, 2011 11:57 pm

Hallo Gus.... here is one to make you smile.


I had to come to Bristol for 2 days training this week, almost 4 hours drive, due to traffic onditions.

After a few false starts before, I made it to visit Deli Dave and Rosie in Malmesbury after work last night.
I have known and become good friends with Dave over time while building the Grizz-Pod and he is always a willing mentor and teacher with many great ideas on saving effort and making things easier when building.

An amazing evening of tea, biscuits, chat, sharing (me being constantly amazed at both of them and their hidden skills) stories and enjoying Scoobie the dogs company.....

Earlier on I got a message from Nicola to see if I had placed a bid on a French Art Deco woodburner stove (which is still in France right now)on Ebay, this was for the new shed, I had started looking around the night before on Ebay to see what home made ones cost compared to me making one, and then discovered the French stoves and sent her a link......
I mentioned this to Dave while chatting and he and Rosie gave each other a look, upon which he asked me if I wanted a stove, oh and it would be for nothing. My obvious reply was along the lines of Yes please, if it is what we are looking for Versus a home built one, which was still very much in my mind.
They took me to the "Wood shed" and under a load of kindling and chopped up pallets was an old Esse Dragon stove. I texted a pic to Nicola, her instant response was "LOVELY, How much ? " to which Dave replied "Its yours if you want it"
WOW WOW WOW !! Thank you Dave & Rosie !
I am sure you will agree, making your own burner is awesome and a great exercise, but getting given a beautifull, characterful vintage stove beats that hands down.

So now it is in the back of the car, along with a massive length of offcut flexible stainless flue pipe from one of Dave's jobs.

It needs some cleaning, replacement of the door glass, and the cast iron inner grate managed to break while we were loading it ( easy to fix ) Pics of the stove when I get home and have unloaded it.

Here is a Google pic of an Esse Dragon.

I love the detail. The top ornate grid comes off to leave you with space for 2 large pots or kettles.

Image
Greetings from England.

Rian.


Hoping to get it all done in time.
User avatar
grizz
1000 Club
1000 Club
 
Posts: 1210
Images: 29
Joined: Mon Sep 21, 2009 2:37 pm
Location: Rochester, Kent, UK
Top

Postby grizz » Tue Oct 04, 2011 3:55 pm

Got in from Bristol after 7pm tonight.

Unloaded the stove and flue with Mickey's help.

This was how I first saw it at Dave's place, after he had cleared away the wood and kindling.

Both pics were taken in bad light with the mobile phone. Better pics when I have cleaned and polished it.

Image

Image

After Mickey helped me fish it out the back of the car, he was making all the right noises, and mentioned he was impressed.
Greetings from England.

Rian.


Hoping to get it all done in time.
User avatar
grizz
1000 Club
1000 Club
 
Posts: 1210
Images: 29
Joined: Mon Sep 21, 2009 2:37 pm
Location: Rochester, Kent, UK
Top

Postby eamarquardt » Tue Oct 04, 2011 11:49 pm

Cool (or really hot, your choice).

I've had good success tig welding cast iron a couple of times now. I bought some high Ni content stick welding rod for filler. I break off the flux and then tig away. Nothing special about it and excellent results to date.

I'm rising from the ashes of my trip this summer and getting busy again (to the extent possible). I'm gonna get back to treasure hunting (garage saleing) again but more for the fun of it than looking for anything special. I have too much already but there must be something I can't live without and I'll know it when I see it.

Cheers,

Gus
The opinions in this post are my own. My comments are directed to those that might like an alternative approach to those already espoused.There is the right way,the wrong way,the USMC way, your way, my way, and the highway.
"I'm impatient with stupidity. My people have learned to live without it." Klaatu-"The Day the Earth Stood Still"
"You can't handle the truth!"-Jack Nicholson "A Few Good Men"
"Some people spend an entire lifetime wondering if they made a difference in the world. The Marines don't have that problem"-Ronald Reagan
User avatar
eamarquardt
Silver Donating Member
 
Posts: 3179
Images: 150
Joined: Sat Nov 11, 2006 11:00 pm
Location: Simi Valley, State of Euphoria (Ca)
Top

Postby grizz » Sun Oct 09, 2011 1:18 pm

Almost the last pic in this section of the Sub-thread.....


Found the little guy a "Racing suit" at the bootfair for 50p - Bargain.

Image

Hope to get a pic of him on the kart from his dad.
Greetings from England.

Rian.


Hoping to get it all done in time.
User avatar
grizz
1000 Club
1000 Club
 
Posts: 1210
Images: 29
Joined: Mon Sep 21, 2009 2:37 pm
Location: Rochester, Kent, UK
Top

Postby grizz » Sun Oct 09, 2011 2:13 pm

Right, today was a road trip of sorts.

I got Mickey and his LWB Hi-roof Mercedes Sprinter van booked up to run down to Headley where the lathe was situated.
Cost of his van and labour was £87.00 so adds up to a total £313.00 for the machine including the transport. A price I am still happy with.


We took a pallet truck along and some ply and scaffolding boards to get the thing into the van.

Here is Mick and Colin moving it toward the van.

Image

Back home I had some other stuff to do first, but by 5pm I got back to the garage to start cleaning it and gloating about my purchase.

Everything is in great condition, and heavy, solid and beautifully engineered. Real Old Skool quality.

Image

There are couple of home made parts as well, a box under the circular saw to catch most of the sawdust. Also a neat shield/box/catch behind the actual main turning area of the lathe bed, again to contain some of the flying wood shavings.

Image

Once I started to pack out, clean and inspect the extras that came with the lathe, my grin just got wider.... now I just need to learn how to use most of it.

The set of chissels on a home made rack would cost quite a packet, and are mostly hardly used.

Some of the bits still have price tags on them, and very old packaging..... makes for interesting reading and mathematics when you look at the whole deal.


Image

Cutting tools, extra planner blades, chucks etc.

Image

And lastly, a load of extra attachments for the machine.
Some home made, and these are often more valuable as they expand the use of the machines.

Image


Lastl, tonight I whacked a cheeky £100.00 bid on a 1660mm tall old skool bandsaw as well, and won. Now I just need to figure out when to fetch it.

The shed is being delivered and assembled tomorrow.....

I prepped the space yesterday, using some left over paint the previous owner had left in the garage, and while I was at it, gave a steel shelving unit I bought for £10.00 off the back of a scrap steel merchants van a coat of white enamel paint. Perfect for storage space.

Image

Shelves looking OK for a tenner.

Image


Thats all for tonight.
Greetings from England.

Rian.


Hoping to get it all done in time.
User avatar
grizz
1000 Club
1000 Club
 
Posts: 1210
Images: 29
Joined: Mon Sep 21, 2009 2:37 pm
Location: Rochester, Kent, UK
Top

Postby grizz » Tue Oct 11, 2011 2:47 pm

I have to say that I feel quite chuffed, I bought a 1.660m tall industrial bandsaw for £100.00 on Sunday with a cheeky bid in the last few seconds too, pics later when collected.

The shed, thanks to Lewis for all the advice, has been delivered and built.

The guys, Mark and Richard from Staffordshire Sheds were here before 08.00 on Monday, Nicola made them Bacon butties and coffee when they landed, and in spite of that, they were packed up and gone before 10.00.

Image

Image

I am very pleased with the job, and shed I bought.

I may have mentioned that I had the windows moved about, double doors fitted and also two boards worth of extra height added. This makes the inside feel like a room, rather than a shed.

Floor panels going down the drive.

Image

Floor panels down.

Image

The speed at which the guys worked caught Nicola unawares, and by the time she went down with more coffee and biscuits, the sides and roof panels were up.

Image

By 18.15 when I came home the light was changing, and Nicola led me down to the shed with eyes blindfolded.....

I am rather pleased with the shed, and see Hannah's "Surf-Pod" teardrop being built out of there, and hopefully many a winters day spent in there making "Stuff"

Here is another shock pic for those of you who know me to always be dressed in shorts and safety toe-teckter sandals..... yes, this is me after the day job.


Image

I was fortunate that Bobby, who laid the paving found me 5 sheets of used 4x8 ply in 1/2 and 3/4 inch thickness, and two of them were damaged and had some cut out of them.... still, I have managed to salvage enough of the 3/4 inch ply to lay on the floor to support the machines that will make their way in there. Again, used and lightly damaged, but I am pleased for the 5 sheets at £8.00 each.

One of the sheets will be used to make up a new table top for the lathe.

Next job is a couple of coats of wood preserver on the outside, before moving the shed into a its final resting place and moving stuff in there.
Greetings from England.

Rian.


Hoping to get it all done in time.
User avatar
grizz
1000 Club
1000 Club
 
Posts: 1210
Images: 29
Joined: Mon Sep 21, 2009 2:37 pm
Location: Rochester, Kent, UK
Top

Postby grizz » Fri Oct 14, 2011 2:19 pm

Today I had an all day work meeting at Gatwick airport in a hotel, this was about 15 miles from where the bandsaw I snagged on Sunday was.
So after work the Satnav took me down there to collect.

Got there and the first thing that struck me was how cool the farm name was.

Image

Jason, the seller is a model maker and works on scenery for movies etc.
He recently bought a job lot of tools from someone who built the sets of the Harry Potter movies, so it seems the bandsaw has some "history" to it.
He had dismantled it for me before I got there, so it took the two of us a few minutes to load the two halves.
He also gave me 3 new blades along with the deal.

I drove home and Tom (to my surprise) came to help me unload, unprompted.
He also sneaked up to the house and fetched the camera, because I had started cleaning my prize.
This saw will have a lot to contribute to the teardrop build.
Also when I get going with the lathe it wil lstart earning its keep. Best part is that the "neck" is really deep, probably close to 18 inches.

Image

Still need to check what power the motor puts out in the morning, the three pulleys are great for creating a very stable blade. I think the machine has about 5 speeds based on the pulleys on the other side.

Image

It also has about 3 different safety cutout and power switches.

Clean enough for tonight.

Image
Greetings from England.

Rian.


Hoping to get it all done in time.
User avatar
grizz
1000 Club
1000 Club
 
Posts: 1210
Images: 29
Joined: Mon Sep 21, 2009 2:37 pm
Location: Rochester, Kent, UK
Top

Postby GuyllFyre » Fri Oct 14, 2011 4:46 pm

What brand is the bandsaw?
It looks really nice!
Things I have for sale on craigslist:
http://albany.craigslist.org/search/?ar ... catAbb=sss

Things I have for sale on eBay:
http://www.ebay.com/sch/merchant/seansmith
User avatar
GuyllFyre
Donating Member
 
Posts: 209
Joined: Fri May 21, 2010 9:35 pm
Location: Scotia, NY
Top

Postby grizz » Sun Oct 16, 2011 1:02 pm

GuyllFyre wrote:What brand is the bandsaw?
It looks really nice!


Hi Guy, I am not sure what brand, but it is very solid and well made.

The 4 blades alonce could be worth £80, so \i feel very pleased about the whole deal.

I guess this will be the last posting on the prep for the build, as the shed is now ready in basic terms.
I still need to build a smallish work bench, cut a hole in the side if the shed for long lengths of timber to be pushed through over the table saw, or the planer thicknesser, so basically creating a hatch .... thinking like a pirate here.... Arrrrr!!

Yesterday we had Nicola's mums 80th and Toms 16th birthday BBQ, which left me again doing the meat cooking solo for 25 people.
Nicola and Hannah had done loads of prepparation before hand, and the day was a resounding success, again leaving me feeling proud of her and the kids. Tom was like a Duracel bunny, offering drinks etc around all day.

I had painted the shed outside 2 coats of heavy duty wood preserver earlier in the day, so after lunch a bunch of us pushed it back to about 4 inches from the wall.

I fitted the cut 3/4 inch ply extra floor as well, and screwed the boards down.

Started off by dismantling the lathe this morning, bastardo heavy thing, nearly had a hernia when Mickey and I took it off the table.
I had cut a new 3/4 inch board for it, which was being fitted on top of the existing table top.

Image

Next up I got some new heavy duty office floor tiles that Mickey had taken from a clearance job, rather than skip them.
I have a decent vacuum cleaner, so sawdust on the floor, carpet is not big issue, insulation is though.

Carpet done.

Image

Two weeks ago I bought a decent skate board from a bootfair for £2.00 to use when I moved heavy stuff.

This was the second time it worked today .... rolling the newly assembled bandsaw to the shed form the garage. Neat thing is that when I got to the step, I stood on the tail, pulled back and got the front wheels up the step in one, meaning I only had to walk the bandsaw into the room and into position.

Image

I also fitted that shelving unit and cleaned all the accessories with WD40, fine sandpaper and some elbow grease.

Image

Later on this afternoon I fitted some of the chissels and also the files I was buying from boot fairs the last few months. Due to the high quality of most metal files, they make great wood turning tools.

Image


Next Sunday we are set to go to Derbyshire to fetch the donor caravan.

Then the planning of the build can start in earnest, and stripping down the donor into useable parts.

Looking forward to that, along with getting the power to the shed connected up so that I can start turning something.
Greetings from England.

Rian.


Hoping to get it all done in time.
User avatar
grizz
1000 Club
1000 Club
 
Posts: 1210
Images: 29
Joined: Mon Sep 21, 2009 2:37 pm
Location: Rochester, Kent, UK
Top

Postby grizz » Sun Oct 23, 2011 12:37 pm

Yesterday I started after midday with the shed.

Got some insulation into the ceiling area and then used hardboard to contain it.

It will be painted in white later, to maximise light reflection when I am working down there.

Image

I also built a 53 inch by 23inch workbench, which should be able to take a decent knock. Mainly for lightter jobs when it is all set up.

I have not fitted the table top, as the walls need to be insulated and hardboard added.

Image


TODAY : Roadtrip no3 up to derbyshire to fetch the free caravan. If truth be told, and all added up, then it costs me £150 so far to get it back to where it is parked now.
Still cheaper than a decent tent.

This is a mid '80's Castleton Roberta caravan.

These were pretty much bespoke , hand built caravans.

There is still a strong following and club scene around the Castletons

They also maintain their value really well, and all finishes are top quality on them.

I had poor Nicola up at 5am and we left at 5.30am for Johns place, getting there just after 06.00 , Nicola then went home back to bed..... John and I left his place at 06.30 as agreed.

Along the way we stopped for a Full English breakfast and a mug of tea at the service station.

When we got there it was madly busy....

Image

After breakfast we were back on the road and got to Nicks place by 10.00 am.

The shock on Johns face was worth a photo in itself when this met us......

Image

We hooked up fast, got the lights sorted and set off.

A couple of miles down the road we pulled over to add the large side mirrors.

Image

The views around this part of the country are really lovely.

Image

We pulled over at a service station and filled up. The whole trip would cost £83.00 in diesel, the Honda performing exceptionally well.

Image

Back home just before 15.00 and the fit was tight, as always, but easy to negotiate for any driver with a valid license.

Image

Mickey was over the moment we landed to inspect and help us move it down to the garage.

Nicola made us a cuppa , after John was off home to lovely Roast Chicken lunch..... NOM NOM !!

As soon as John left, Nicola was in there with the vacuum cleaner and a big bowl of hot water and all her secret potions for cleaning.
She scrubbed and deep cleaned the inside

Image

Followed by the door, which was just a test bed for her abilities.

Image

Finished...

Image

I then started on the rest of the windows, while she continued with the ceilings and walls, with Mickey supervising our endeavours.

Windows up close, this is just the first pass to get most of the moss off.

Image

Just the door and windows given a first clean.

Image

Seems almost a crime to chop up such a lovely and capable caravan, just to build a teardrop.
Greetings from England.

Rian.


Hoping to get it all done in time.
User avatar
grizz
1000 Club
1000 Club
 
Posts: 1210
Images: 29
Joined: Mon Sep 21, 2009 2:37 pm
Location: Rochester, Kent, UK
Top

PreviousNext

Return to Build Journals

Who is online

Users browsing this forum: No registered users and 10 guests