TTT # 1 - Quick and Cheap

...ask your questions in the appropriate forums BUT document your build here...preferably in a single thread...dates for updates, are appreciated....

Re: TTT # 1 - Quick and Cheap

Postby M C Toyer » Wed Jun 06, 2012 7:20 am

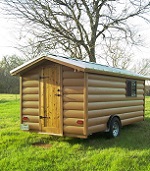
2bits wrote: What is the brown side sheeting? I don't believe I have ever seen that before.


Thomas -

It is Edco Steel Siding and this particular board and batten pattern is designed to be used vertically but the principle is the same as a horizontal siding.

Here is EDCO's product guide. http://www.edcoproducts.com/pdf/Product-Guide-2010.pdf

It is not ideal for small trailers because of the profile which requires somewhat bulky trim and it cannot be easily bent crossways. Lengthwise is not a problem with a metal brake and that is what I did at the top of the wall to make the transition to the roof of one continoius piece.

The main advantage, other than I had it available, is strength and durabaility. It would be a great product for your woodshed in the woods.

The green material is also the same steel it just comes flat and can be formed into many shapes with a metal brake or even hand tools. Lots of potential for making trim and flashing on the trailers.

M C
User avatar
M C Toyer
The 300 Club
 
Posts: 363
Images: 11
Joined: Thu May 31, 2012 8:59 pm
Location: Pilot Point (Denton County) Texas

Re: TTT # 1 - Quick and Cheap

Postby M C Toyer » Wed Jun 06, 2012 7:53 am

[quote]toypusher wrote:I may have missed it, but did you do anything to seal water from the J-channels? If you tow in the rain, I would be afraid of it driving the rain into the J-channels and soaking into your wood. I would put some silicon (or something like that) sealant in all of the J-channel sections.

Just my opinion.

Great build though! :thumbsup:[/quote]


That's a legitimate question and a common long running debate. It is often the first thing asked by homeowners after I complete their siding job, "Aren't you going to caulk that?"

Basicially when the j-channel is used vertically it is intended to facilitate drainage. If it is used horizontally such as the top or bottom of the door opening it requires some additional flashing.

The application, similar to shingles and wood lap siding, is that water runs down, over and away. Filling the void in the j channel with any sealer would defeat that purpose and could trap water that would have otherwise drained away.

It is true that a driving rain or driving in the rain could cause water in the channnel to be forced behind it and behind the siding itself. That is the reason for using the house wrap membrane. However that water would drain out at the bottom. On horizontal siding there are actually small drain holes punched in the bottom of each lap for drainage and ventilation.

I suspect that in some cases where extreme mesasures are taken to seal the underside of wood trailers that in itself can cause wood damage if water does somehow penetrate the sidewalls or floors and gets trapped.

Just my personal opinion but I would recommend that any trailer floor, whether a shigle sheet of plywood or the boxed construction with insulation sandwiched in between still have a provsion for drainage out of the bottom after it is sealed similar to the little one way vents found in the floor pans, doors and side panels of cars.

Wood rots, not because it gets wet, but because it cannot dry out.

M C
Last edited by M C Toyer on Thu Jun 14, 2012 11:17 pm, edited 1 time in total.
User avatar
M C Toyer
The 300 Club
 
Posts: 363
Images: 11
Joined: Thu May 31, 2012 8:59 pm
Location: Pilot Point (Denton County) Texas

Re: TTT # 1 - Quick and Cheap

Postby toypusher » Wed Jun 06, 2012 9:26 am

MC,

Thanks for the clarification. I continue to learn something new everyday.
User avatar
toypusher
Site Admin
 
Posts: 43040
Images: 324
Joined: Fri Jan 28, 2005 12:21 pm
Location: York, PA Area
Top

Re: TTT # 1 - Quick and Cheap

Postby StandUpGuy » Wed Jun 06, 2012 9:35 am

M C Toyer wrote:
[quote]toypusher wrote:...

Wood rots, not because it gets wet, but because it cannot dry out.

M C

But plywood delaminates because it gets wet.
User avatar
StandUpGuy
1000 Club
1000 Club
 
Posts: 1090
Images: 52
Joined: Sun Mar 27, 2011 6:15 pm
Top

Re: TTT # 1 - Quick and Cheap

Postby Eric_kc0ahk » Wed Jun 13, 2012 9:21 pm

M.C.

Looks good!
User avatar
Eric_kc0ahk
Teardrop Inspector
 
Posts: 11
Joined: Thu Jun 16, 2011 2:05 pm
Location: Nebraska
Top

Re: TTT # 1 - Quick and Cheap

Postby pappaw » Thu Jun 14, 2012 11:09 am

Kewl job. :thumbsup:

Like the colors too, kinda a low profile when parked in the outdoors. ;)

Cheers: Jeff :beer:
Image Cheers from Granny, Pappaw, and Cocoa (the Dachshund) Image
pappaw
Teardrop Master
 
Posts: 240
Images: 14
Joined: Mon Nov 22, 2010 12:15 pm
Location: S.W.Ohio
Top

Re: TTT # 1 - Quick and Cheap

Postby M C Toyer » Thu Jun 14, 2012 8:19 pm

Thanks.

I traded the yellow sit-on kayak for a sit-in that is green. It is powered by a small battery trolling motor.

I keep the plastic camo tarp on for a sun and rain screen for the kayak when the trailer is not on the road. It is on a self supporting frame made from vinyl electrical conduit. The frame breaks down and rides on the rack when traveling. It is assembled with four clevis pins on the corners then bowing the top supports.

I have a larger tarp which extends down over the sides and galley for heavy rain when camped for extended periods.

Image

Here's a complete view of the galley.

Image

The coleman stove sits on a shelf attached to the door which closes over the sink and drainboard when traveling. The red dishpan rides on top.

Image

The large plastic crate rides on the other side and is for bread, chips and non perishable food. I set it out of the way on top of the trailer when cooking

Image

There are 4 sliding baskets on the underside of the top shelf. The crate, coleman, and dishpan hold them closed when traveling.

There are 6 baskets sitting on top of the shelf plus the freeshwater tank. I keep utensils, pots and pans, plates and cups, condiments, coffee, tea, drink mix, etc. in the various baskets. The closet rod holds all in place but the 4 small baskets on the right and the contents of the 2 on the left can be removed without removing the rod.

Image

The cooler for perishable foods is on the bottom shelf plus two 5 gallon gray water tanks for the sink and a small knock-down cast iron grill.

Image
User avatar
M C Toyer
The 300 Club
 
Posts: 363
Images: 11
Joined: Thu May 31, 2012 8:59 pm
Location: Pilot Point (Denton County) Texas
Top

Re: TTT # 1 - Quick and Cheap

Postby StandUpGuy » Thu Jun 14, 2012 9:04 pm

The tarp set up is totally awesome. I live in North Carolina and in Summer it is hot. If one had such a tarp roof it would most certainly cool off the trailer. If it was possible to bring this tarp setup along on a trip it could be handy. Especially if it was made to be longer and hang over the galley area.

Nice job on that.
User avatar
StandUpGuy
1000 Club
1000 Club
 
Posts: 1090
Images: 52
Joined: Sun Mar 27, 2011 6:15 pm
Top

Re: TTT # 1 - Quick and Cheap

Postby LDK » Thu Jun 14, 2012 9:36 pm

toypusher wrote:I may have missed it, but did you do anything to seal water from the J-channels? If you tow in the rain, I would be afraid of it driving the rain into the J-channels and soaking into your wood. I would put some silicon (or something like that) sealant in all of the J-channel sections.

Just my opinion.

Great build though! :thumbsup:


He has house wrap on it so he's good to go. :lol: 
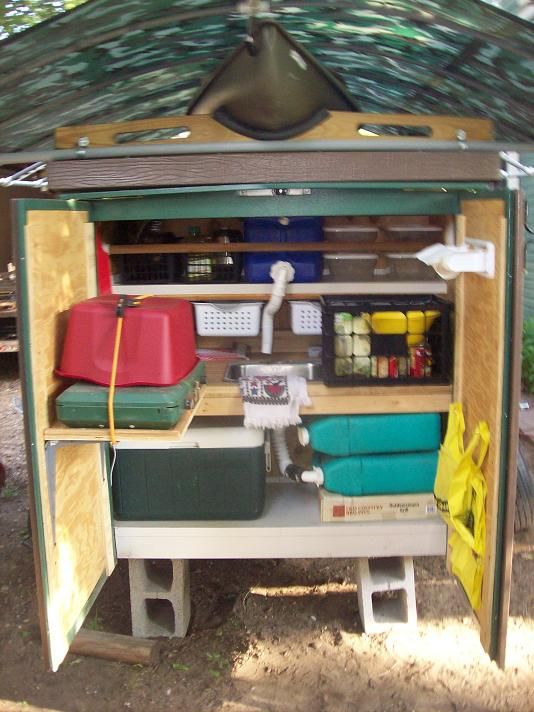
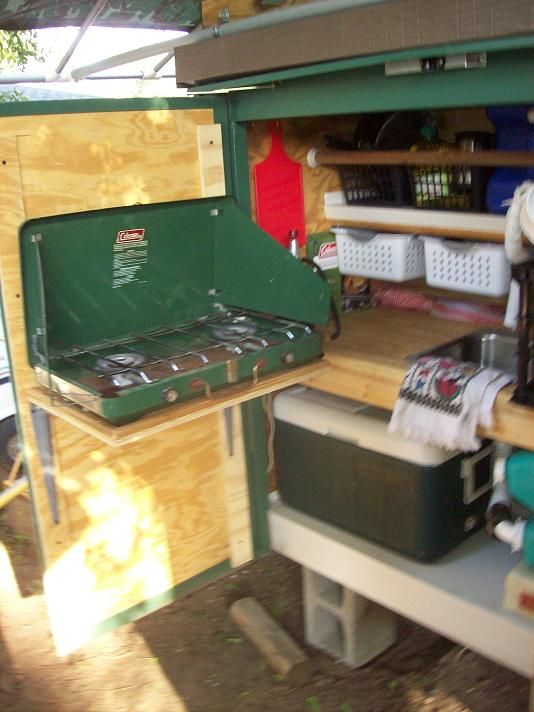
That is one thrifty built camper! :thumbsup:
LDK
Gold Donating Member
 
Posts: 1419
Images: 1
Joined: Fri Jan 22, 2010 8:29 pm
Top

Re: TTT # 1 - Quick and Cheap

Postby M C Toyer » Thu Jun 14, 2012 10:01 pm

I generally look for natural shade when camping but it is useful for those times when none can be found. It packs up to a bundle of a dozen separate straight pieces of pvc nine feet long so is easily transported on the rack. The bowed top rails straighten out when removed. The perimeter rails have the metal conduit inside for rigidity.

The smaller tarp shown is stretched within the horizontal outside rails and rain water can run freely off if I'm not around.

The larger tarp is stretched over the outside rails and will collect a puddle of rain water there which would need to be pushed up ocassionally in a hard rain. I also have side curtains to use with the larger tarp if needed for screening the porta-potty / dressing room and the galley area.
User avatar
M C Toyer
The 300 Club
 
Posts: 363
Images: 11
Joined: Thu May 31, 2012 8:59 pm
Location: Pilot Point (Denton County) Texas
Top

Re: TTT # 1 - Quick and Cheap

Postby 2bits » Thu Jun 14, 2012 11:31 pm

Thanks for replying and the PDF doc also MC! I like seeing a man thinking for himself and doing what fits! :thumbsup:
Thomas

Image
User avatar
2bits
2bit Member
 
Posts: 5132
Images: 8
Joined: Thu Dec 27, 2007 6:04 pm
Location: Lake Tawakoni, TX
Top

Re: TTT # 1 - Quick and Cheap

Postby celticquetzel » Sat Jul 20, 2013 8:59 am

Some really clever ideas. I like the front hatch. Also, we preach a lot about "reduce, reuse, recycle" but you've done a really nice execution demonstrating these principles. Very inspirational. Caro
celticquetzel
Teardrop Master
 
Posts: 124
Joined: Thu May 30, 2013 4:14 pm
Top

Previous

Return to Build Journals

Who is online

Users browsing this forum: No registered users and 14 guests