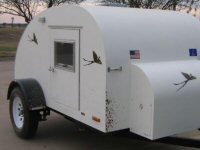
Hi all:
Pardon me for taking a while to respond. I turned our home upside down to install hardwood flooring. So I am just now getting things plugged in again.Thanks for the interest guys. I will show you many more pictures but i am not sure about the plans. I hope that the real thing will suffice and satisfy your curiosity. I can build things quite often faster than I can draw them
Randy I have to admit I read what I wrotewas hard to understand. I'll take some close ups and hopefully that will help.
I am having a blast building this thing. Please be patient and I will post more once I have more done.
Happy trails,
Martin
The Round About
47 posts
• Page 2 of 4 • 1, 2, 3, 4
Re: Very good plans that I modified some
Hi all:
Hope your enjoying the summer. I don't know why I didn't think of this before. DUHH
The plans that where generously posted by Grant Whip and produced by great Andrew . . . sorry I don't know his last name and wonder about him as I have not read any new posts by him. . . I hope all is well with him and those close to him ? ? ?
Here is the link to to an aweswomely detailed set of the base plans which I modified:
http://www.angib.pwp.blueyonder.co.uk/t ... tear56.htm
At the bottom of this page are multiple well drawn and detailed drawings. These were easily converted by a CNC programer to get perfect profiles cut out which I started with.
CHANGE # 1:
I followed theses plans to the letter exept the rear end of my build. At the 51" hieght point I cut the cores off and extended straight back 17" maintaining the 51" hieght. This enlarges a double bed into an 80" wide bed . . . basically a king sized bed . . . for two to sleep comfortably.
CHANGE # 2:
Remember dealing with one AXIS at a time?
My roof spars are made of 1/2" Baltic birch 3" high with an inside radius of 14" and an outside radius of 17" This eliminates the need for a basement type box which allows some people to stand up in the trailer. The middle portion of the roof is flat . . . but thanks to Zak's great build info I replicated and modified his TROLLY TOP build. Nice workmanship Zak. Coming out of the roof perpendicular and rising an additional approximately 6" which we both did. I carved pieces of foam which I will clad in exterior white glue and canvas and rounding or softening the exterior look. See yellow pieces in picture.
Cheers:
Martin

Hope your enjoying the summer. I don't know why I didn't think of this before. DUHH

The plans that where generously posted by Grant Whip and produced by great Andrew . . . sorry I don't know his last name and wonder about him as I have not read any new posts by him. . . I hope all is well with him and those close to him ? ? ?
Here is the link to to an aweswomely detailed set of the base plans which I modified:
http://www.angib.pwp.blueyonder.co.uk/t ... tear56.htm
At the bottom of this page are multiple well drawn and detailed drawings. These were easily converted by a CNC programer to get perfect profiles cut out which I started with.
CHANGE # 1:
I followed theses plans to the letter exept the rear end of my build. At the 51" hieght point I cut the cores off and extended straight back 17" maintaining the 51" hieght. This enlarges a double bed into an 80" wide bed . . . basically a king sized bed . . . for two to sleep comfortably.
CHANGE # 2:
Remember dealing with one AXIS at a time?
My roof spars are made of 1/2" Baltic birch 3" high with an inside radius of 14" and an outside radius of 17" This eliminates the need for a basement type box which allows some people to stand up in the trailer. The middle portion of the roof is flat . . . but thanks to Zak's great build info I replicated and modified his TROLLY TOP build. Nice workmanship Zak. Coming out of the roof perpendicular and rising an additional approximately 6" which we both did. I carved pieces of foam which I will clad in exterior white glue and canvas and rounding or softening the exterior look. See yellow pieces in picture.
Cheers:

Martin
- Martinup
- Teardrop Master
- Posts: 115
- Images: 36
- Joined: Sun Feb 26, 2012 9:15 pm


