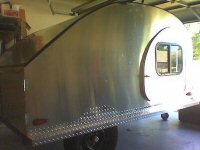
Woodrow's Build

...ask your questions in the appropriate forums BUT document your build here...preferably in a single thread...dates for updates, are appreciated....

Re: Woodrow's Build - the profile 11-26-12

Postby bjeppson » Mon Nov 26, 2012 5:34 pm

Worked on the cutting the profile over Thanksgiving. I guess it resembles a Ken-Skill though not totally.

Bob
profile.JPG
Woodrow's Profile
profile.JPG (112.55 KiB) Viewed 1205 times
bjeppson
Donating Member
 
Posts: 57
Joined: Wed Sep 26, 2012 12:22 pm
Location: Lone Jack, Mo

Re: Woodrow's Build - the profile 11-26-12

Postby Junkboy999 » Thu Nov 29, 2012 12:55 am

I like it. :thumbsup:
User avatar
Junkboy999
1000 Club
1000 Club
 
Posts: 1259
Images: 52
Joined: Fri Jul 06, 2012 9:18 pm
Location: Wichita, KS

Re: Woodrow's Build - Back at It 3-19-12

Postby bjeppson » Tue Mar 19, 2013 12:10 pm

Well it has been mui cold and build activity has been at a standstill. I now have the base glued using tite bond III and using West System g-flex for sealing the joint. It also has two coats of CPES all around. I think once I get it mounted to the trailer frame things will start moving again especially with warmer weather. I do better with cutting and fastening wood than using epoxy.

This started as a project for my daughter and it appears it will now be a wedding present for her. Got to get off of my back side and build it.


Bob

:D
bjeppson
Donating Member
 
Posts: 57
Joined: Wed Sep 26, 2012 12:22 pm
Location: Lone Jack, Mo
Top

Re: Woodrow's Build - the profile 5-4-13

Postby bjeppson » Sat May 04, 2013 4:22 pm

I fastened the 5/8" plywood to the frame once I treated it with CPEC. I made some "floor joists out of 1 1/2" material so I could use 1 1/2' rigid foam insulation in the floor then added a 1/2" subfloor leaving 3/4" around the perimeter so the side walls will have a built-in rabbet joint I used 3/4" grey pvc conduit as an electrical chase between the friont and the real of the teardrop. This will make it easy to fish the electrical lines from the battery to the power panel and the trailer wiring harness. I am using pocket screws to fasten the side wall structural "ribbing". One layed out these will be unscrewed, apply glue to the joint and re-screw the pocket screws.

Here's a photo.
beginning of sides.JPG
beginning of sides.JPG (84.24 KiB) Viewed 1005 times


Bob
bjeppson
Donating Member
 
Posts: 57
Joined: Wed Sep 26, 2012 12:22 pm
Location: Lone Jack, Mo
Top

Re: Woodrow's Build - the profile 5-4-13

Postby bjeppson » Sat May 04, 2013 4:32 pm

Picture of floor insulation.
floor insulation.JPG
floor insulation.JPG (108.69 KiB) Viewed 1005 times


The gray pvc conduit as a electrical chase is on the top edge of this sideways photo.
bjeppson
Donating Member
 
Posts: 57
Joined: Wed Sep 26, 2012 12:22 pm
Location: Lone Jack, Mo
Top

Re: Woodrow's Build - 5-15-13

Postby bjeppson » Wed May 15, 2013 3:55 pm

Here's the latest:

ac back.JPG
ac back.JPG (57.2 KiB) Viewed 963 times


floor insulation.JPG
floor insulation.JPG (82.35 KiB) Viewed 963 times


beginning of sides.JPG
beginning of sides.JPG (84.24 KiB) Viewed 963 times
bjeppson
Donating Member
 
Posts: 57
Joined: Wed Sep 26, 2012 12:22 pm
Location: Lone Jack, Mo
Top

Re: Woodrow's Build - 5-15-13b

Postby bjeppson » Wed May 15, 2013 3:58 pm

Rear bulkhead.JPG
Rear bulkhead.JPG (90.08 KiB) Viewed 963 times
bjeppson
Donating Member
 
Posts: 57
Joined: Wed Sep 26, 2012 12:22 pm
Location: Lone Jack, Mo
Top

Re: Woodrow's Build

Postby KCStudly » Wed May 15, 2013 5:32 pm

Nice wood. :thumbsup:

Quality looks good! :thumbsup: :applause:
KC
My Build: The Poet Creek Express Hybrid Foamie

Poet Creek Or Bust
Engineering the TLAR way - "That Looks About Right"
TnTTT ORIGINAL 200A LANTERN CLUB = "The 200A Gang"
Green Lantern Corpsmen
User avatar
KCStudly
Donating Member
 
Posts: 9640
Images: 8169
Joined: Mon Feb 06, 2012 10:18 pm
Location: Southeastern CT, USA
Top

Re: Woodrow's Build

Postby bjeppson » Tue May 28, 2013 4:57 pm

Built the galley hatch between yesterday and today. It wasn't as bad as I anticipated but then it still doesn't have the skin and too early to tell about leaks. One thing at a time. Titebond III and pocket screws are great.

Bob
Galley Hatch Structure.JPG
Galley Hatch Structure.JPG (78.1 KiB) Viewed 898 times
bjeppson
Donating Member
 
Posts: 57
Joined: Wed Sep 26, 2012 12:22 pm
Location: Lone Jack, Mo
Top

Re: Woodrow's Build July 14

Postby bjeppson » Wed Jul 09, 2014 1:47 pm

photo.JPG
photo.JPG (109.41 KiB) Viewed 790 times
Got motivated and have been wiring. Have 110 to cabin and galley, have 12v to cabin and galley plus interior 12v lights, porch lights, reading lights and fantastic fan.

Bob
bjeppson
Donating Member
 
Posts: 57
Joined: Wed Sep 26, 2012 12:22 pm
Location: Lone Jack, Mo
Top

Re: Woodrow's Build July 14

Postby bjeppson » Wed Jul 09, 2014 1:50 pm

Fenders arrived from Grant, I had them painted at a local body shop. They will be the last piece on though they are already fitted. You can see a piece of one of them sticking out of the end of the box in the cabin picture above.

Bob
bjeppson
Donating Member
 
Posts: 57
Joined: Wed Sep 26, 2012 12:22 pm
Location: Lone Jack, Mo
Top

Re: Woodrow's Build - July 2014

Postby bjeppson » Wed Jul 09, 2014 1:53 pm

Sides were coated with 3 coats of West System epoxy and then 4 coats of marine varnish with UV protector. Sanded between coats.

Bob
bjeppson
Donating Member
 
Posts: 57
Joined: Wed Sep 26, 2012 12:22 pm
Location: Lone Jack, Mo
Top

Re: Woodrow's Build

Postby SLUG36 » Wed Jul 09, 2014 2:56 pm

I LOVE THE WOOD SKIN ON YOUR BUILD!!
Making big pieces of wood into the wrong size..... for over 30 years....
User avatar
SLUG36
Teardrop Master
 
Posts: 212
Images: 137
Joined: Wed Mar 28, 2012 6:51 am
Location: Sabine/Neches river Delta
Top

Re: Woodrow's Build

Postby oakinteriors1 » Wed Jul 09, 2014 3:15 pm

WOW " bjeppson" you are around the corner from me....I'm in Bates City....
User avatar
oakinteriors1
Silver Donating Member
 
Posts: 297
Images: 1
Joined: Tue Sep 03, 2013 4:47 pm
Location: Bates City Mo.
Top

Re: Woodrow's Build

Postby bjeppson » Wed Jul 09, 2014 3:52 pm

Thanks,

Wood skin is 1/4" ply glued to a skeleton frame. Used 1 gal milk jugs filled with water for the clamps (8lbs/jug). The trim around the door and top is 1/8" - 3/16 cherry. Skeleton is poplar.

Bob
bjeppson
Donating Member
 
Posts: 57
Joined: Wed Sep 26, 2012 12:22 pm
Location: Lone Jack, Mo
Top

PreviousNext

Return to Build Journals

Who is online

Users browsing this forum: No registered users and 1 guest