Teardrops n Tiny Travel Trailersor t n ttt for short (tnttt.com) |
Z3R0's Budget Build
48 posts
• Page 2 of 4 • 1, 2, 3, 4
Re: Z3R0's Budget Build
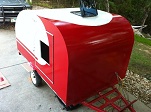
![]() by Z3R0 » Fri Nov 02, 2012 5:41 pm
by Z3R0 » Fri Nov 02, 2012 5:41 pm
Ya I'm the IT guy as well so I get some cool stuff every once in a while. When I go back to work on Monday ill get you a step file. I don't have a license file for it at my house.
- Z3R0
- Teardrop Advisor
- Posts: 65
- Images: 36
- Joined: Wed Oct 31, 2012 8:59 am
Re: Z3R0's Budget Build
![]() by Z3R0 » Fri Nov 02, 2012 5:44 pm
by Z3R0 » Fri Nov 02, 2012 5:44 pm
So just got done playing with these waterproof LED strips I got. You can splice them and add wires. 6 LEDs per section. Really bright though. Going to see if a marine dimmer will work. If not ill see if an inline resister will work.
- Z3R0
- Teardrop Advisor
- Posts: 65
- Images: 36
- Joined: Wed Oct 31, 2012 8:59 am

 ) and uses the remote to find our campsite. Figured it was a nice feature for low cost so that will also be added. I really have to get off the lighting and electrical but I find that to be the fun part, as I like lights! Hopefully I'll get these U-bolt this week and have the front end painted completely. Just a couple more cans and then I will be buying some plate to weld on the trailer. This build is going much slower than I would like. Haven't even had a chance to bring out some of my toys! Well that is all time for some

 Till then see ya guys.
 Pictures of more lights! Waiting on the side running lights. I went with clear 3/4" Grote Marker Lights for the sides. Should be here tomorrow or saturday!