Here's my van from Scratch!Aussie Style.

...ask your questions in the appropriate forums BUT document your build here...preferably in a single thread...dates for updates, are appreciated....

Re: Here's my van from Scratch!Aussie Style.

Postby Martinup » Fri Mar 08, 2013 8:50 am

Stylin CYA:

Great LQQkin welds sir Assuie. Just curious is " CYA " your first name . . . ? I too don't fit the mold :R But there are so many different builds styles here that we all fit in here . . . EHH !

Canada and Australia are very similar. We too have the GST (gouge and scratch tax) . . . Err is that New Zealand.

Keep up your great build and dazzle us with something different. Change is refreshing and there are some neat and unique RVs in Australia .

Martin

:thumbsup: :thumbsup: :thumbsup:
Martinup
Teardrop Master
 
Posts: 115
Images: 36
Joined: Sun Feb 26, 2012 9:15 pm

Re: Here's my van from Scratch!Aussie Style.

Postby lukeyslide » Wed Mar 13, 2013 7:11 am

Shadow Catcher wrote:I use weld through paint when I am working on the Saab Sonett restoration and generally unless you are welding galvanized it is no more dangerous than breathing the fumes from the weld rod or wire. Galvanized is dangerous. I only once have seen a welder suing a true respirator with proper filters in all my years of weld inspection and I know from what I used to hauk up after just being around welding it is not good for you. Sucking rubber (respirator) is not fun but seeing what gets caught in the filter made me a believer.


Shadow Catcher I understand where you are coming from, I did ask around. Everybody said don't worry about it too much. I did hock up a vacuum cleaner to suck away the fumes but with the noise I could not hear the arc as well. In my trade as a mechanic I have consumed my fair share of fumes and dust and many more to come. So hopefully this spait of welding fumes should not have too much of an impact, but thanks for your concern :thumbsup: [/quote]

Martinup wrote:Stylin CYA:

Great LQQkin welds sir Assuie. Just curious is " CYA " your first name . . . ? I too don't fit the mold :R But there are so many different builds styles here that we all fit in here . . . EHH !

Canada and Australia are very similar. We too have the GST (gouge and scratch tax) . . . Err is that New Zealand.

Keep up your great build and dazzle us with something different. Change is refreshing and there are some neat and unique RVs in Australia .

Martin

:thumbsup: :thumbsup: :thumbsup:


Thanks Martin, my first name is Luke. Lukey as a nic name."CYA" is my sign off, short for "see you later". Yep this is what is great about this site. Everyone having a go and putting their own spin on the TNTT's of the world. Canada it did feel like home a bit when I went there on holidays. Friendly people, clean air but the cold was not something I could get used too. I am from Queensland the "sunshine state" well most of time,wish this rain would nick off though. Yes we have the GST which would be ok if it was the only tax but like everyone else they tax you here and there for something. Thanks for the encouragement, not too shore if it will be too different but see how I go ;)
lukeyslide
Teardrop Builder
 
Posts: 29
Joined: Wed May 11, 2011 5:35 am
Location: Brisbane, Australia

Re: Here's my van from Scratch!Aussie Style.

Postby lukeyslide » Wed Apr 24, 2013 6:57 am

Hey everyone,

Here's some much needed update pics. Time is one thing I have not had a lot of lately but its slowly coming together. I welded the IRS angles to the chassis Now Alko recommend welding on the inside of the chassis rail like this,
Image
But all the weight of the van is then placed on the welds themselves and not the rails as such so I decided to do this
Image
I could not obtain what I wanted so I cut a piece of 100x 100 x6mm RHS at diagonals.I ran this by the suppler triple checking that it will be ok and I was assured it would be.So it looks like this
Image
Image.
And when the chassis is flipped it will be stiched welded on the inside.These measurements were from the supplier of the IRS but to my surprise this happened.
Image
Image
The IRS plate is 60 mm wide and my brackets are 35mm at the most. You can just see the elongated holes of the IRS being at the edge of the angle so there is not much meat for the bolts to go into.I then rang them back and was told it should be ok. But I want it to be right so I ended up placing a 75 x75x6 mm angle on the inside of the rail and then add a 50x 6 mm plate to join the 100 x 35 x6mm angle to make it look like this.
Image

Image

Image

Image

Image

Now I think I have gone from 'OK to Bullet Proof.
Once flipped I will stich where the plate meets the angle
Cya Lukey.
lukeyslide
Teardrop Builder
 
Posts: 29
Joined: Wed May 11, 2011 5:35 am
Location: Brisbane, Australia
Top

Re: Here's my van from Scratch!Aussie Style.

Postby Roo Dog » Wed Apr 24, 2013 7:19 am

Lukey,

Looking good.

RD
Lets do a three sixty and get out of here !
User avatar
Roo Dog
Silver Donating Member
 
Posts: 461
Images: 0
Joined: Fri Mar 22, 2013 3:12 pm
Location: Esperance Western Australia
Top

Re: Here's my van from Scratch!Aussie Style.

Postby KCStudly » Wed Apr 24, 2013 2:22 pm

Very nice looking welds.

I'm not sure I understand the issue with the axle mounting perches, or how you fixed them. Maybe a pic from a little further away would make it a little clearer?

I like to say, "It's only metal. If we can make it, we can fix it!"

:thumbsup:
KC
My Build: The Poet Creek Express Hybrid Foamie

Poet Creek Or Bust
Engineering the TLAR way - "That Looks About Right"
TnTTT ORIGINAL 200A LANTERN CLUB = "The 200A Gang"
Green Lantern Corpsmen
User avatar
KCStudly
Donating Member
 
Posts: 9640
Images: 8169
Joined: Mon Feb 06, 2012 10:18 pm
Location: Southeastern CT, USA
Top

Re: Here's my van from Scratch!Aussie Style.

Postby lukeyslide » Sun Apr 28, 2013 7:39 am

Thanks guys.
KCStudly The long and the short of it is the outside plate was not wide enough for the IRS plate to bolt into due to incorrect info. So I have placed another angle on the inside and welded a plate to that on the top and to the outside angle to increase the width of where the bottom part of the IRS plate is and then also shared the load more evenly.Gone from 6mm to 12mm in thickness.

Image

Cya Lukey
lukeyslide
Teardrop Builder
 
Posts: 29
Joined: Wed May 11, 2011 5:35 am
Location: Brisbane, Australia
Top

Re: Here's my van from Scratch!Aussie Style.

Postby KCStudly » Sun Apr 28, 2013 9:33 am

I see it now. In that last pic you hadn't welded the patch pieces in yet, but in the prior couple of pics you had already welded and ground the top extension piece in.

Solid as a rock now, agreed! :thumbsup:
KC
My Build: The Poet Creek Express Hybrid Foamie

Poet Creek Or Bust
Engineering the TLAR way - "That Looks About Right"
TnTTT ORIGINAL 200A LANTERN CLUB = "The 200A Gang"
Green Lantern Corpsmen
User avatar
KCStudly
Donating Member
 
Posts: 9640
Images: 8169
Joined: Mon Feb 06, 2012 10:18 pm
Location: Southeastern CT, USA
Top

Re: Here's my van from Scratch!Aussie Style.

Postby lukeyslide » Thu May 30, 2013 9:01 am

Hey everybody,

Sorry its been awhile but here is some more progress.

Image
Making sure the couple plate is central and square. String, ruler and a lot of little taps to get it right. Also show the cap that I made for the end

Image
Tacked in place

Image
My mig just started to run out of puff with an inch to go but it worked out in the end

Image
Inside of the V in the A frame never welded on that angle before but it worked out I think.

Image
Penetration on the inside.

Image
End cap welded in place. Bottom welds is 6mm plate to A frame then cap welded onto it.

Iam going to oil the rails and seal it up so it should last a lot longer then just painting the outside but silly me applied oil down the ends of th A frame and then welded up the other ends. Even though it looked sealed the oil found its way out. I hope when I flip it and weld the other side it will not quench the steel too much. I bit late know. Lesson learned.

Image

Other ends being capped. spot welds at diagonals to stop the cap falling in.

Image

Image
Other ends of the A frame capped. Small hole to remove the heat from inside which I'l seal up.

Cya Lukey
lukeyslide
Teardrop Builder
 
Posts: 29
Joined: Wed May 11, 2011 5:35 am
Location: Brisbane, Australia
Top

Re: Here's my van from Scratch!Aussie Style.

Postby Junkboy999 » Thu May 30, 2013 12:24 pm

Man that is some Mads Skills...Keep it up.
:thumbsup:
User avatar
Junkboy999
1000 Club
1000 Club
 
Posts: 1259
Images: 52
Joined: Fri Jul 06, 2012 9:18 pm
Location: Wichita, KS
Top

Re: Here's my van from Scratch!Aussie Style.

Postby lukeyslide » Thu May 30, 2013 8:34 pm

Thanks for the encouragement Junkboy999

Cya Lukey
lukeyslide
Teardrop Builder
 
Posts: 29
Joined: Wed May 11, 2011 5:35 am
Location: Brisbane, Australia
Top

Re: Here's my van from Scratch!Aussie Style.

Postby lukeyslide » Thu Jun 27, 2013 7:42 am

Hello everyone, its been awhile since I have had the chance to sit down and give an up date. So here is what I have been doing. I was going to mount the spare underneath the car at the back using a cars spare wheel holder. Once it was dumbied in place due to the low height of the van it was going to bottom out so I decided to mount it on the rear bumper bar which I was not planning on having either but I thought I'd better to damage the bar then the walls of the van. This is how I was going to do it.

Image

Image

Image

Image

http://imageshack.us/a/img38/2948/ya9.JPG

http://imageshack.us/a/img560/9877/0xfe.jpg

http://imageshack.us/a/img199/4325/d27e.JPG

End result
lukeyslide
Teardrop Builder
 
Posts: 29
Joined: Wed May 11, 2011 5:35 am
Location: Brisbane, Australia
Top

Re: Here's my van from Scratch!Aussie Style.

Postby E. Aaron Scott » Thu Jun 27, 2013 4:41 pm

Thank you for providing such detailed pics. We love :pictures:
So far it looks pretty outstanding and you are still on the frame, can't wait to see the rest of it come together.
-Aaron KF5VBV
User avatar
E. Aaron Scott
Teardrop Builder
 
Posts: 42
Images: 9
Joined: Wed Nov 07, 2012 3:06 pm
Location: Midwest City, OK
Top

Re: Here's my van from Scratch!Aussie Style.

Postby lukeyslide » Sun Aug 25, 2013 6:52 am

quote="E. Aaron Scott"]Thank you for providing such detailed pics. We love :pictures:
So far it looks pretty outstanding and you are still on the frame, can't wait to see the rest of it come together.[/quote]

Thanks for your encouragement makes the hours put into it worth it ;)

Hey Everyone it has been awhile since I have posted. I had a little bit of a setback which put a dampener on the project. Weeks and a lot of phone calls where put into how to fix the problem. Which I hope will work. Mind you its only metal and it can be fixed. So here was my problem. It was right in front of me and was known to my supplier of the Axle and neither of us realised it. I surpose its one of those things that happens when you build something from scratch and no experience. Can anyone else see it??

Image

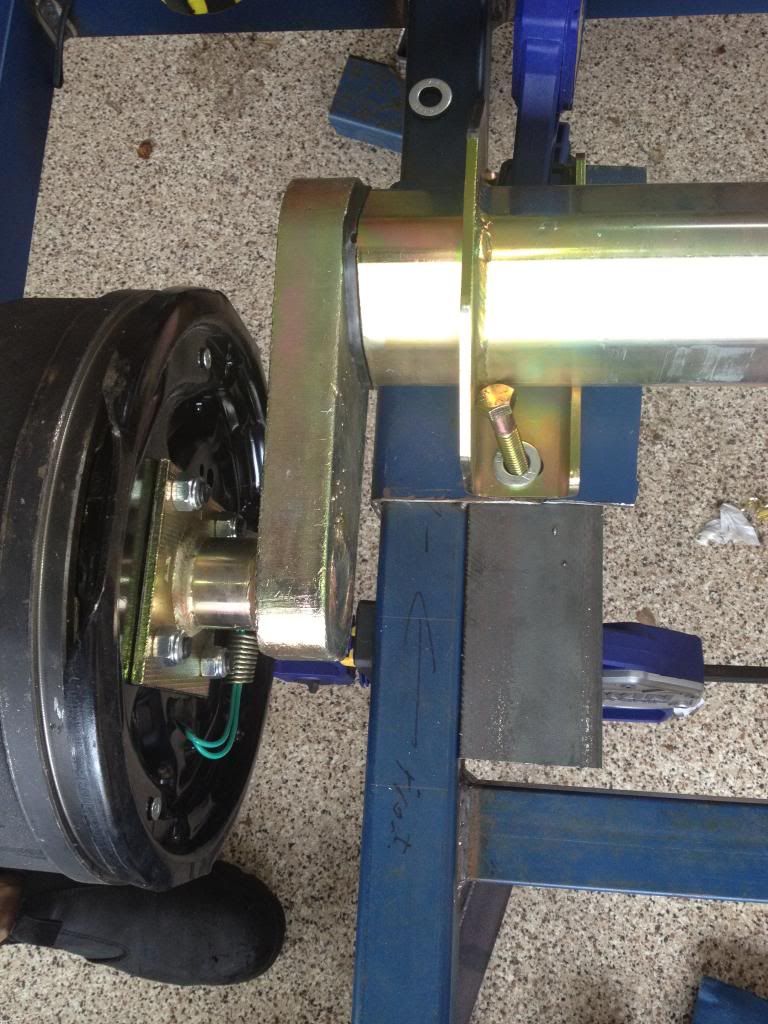
When I came to drill the holes for the bolts to hold the axle it hit me. The swing arm will hit my 6mm angle when it hits a bump or is loaded. The black rubber which is apart of the suspension sticks out 6mm and that is the same amount my angle is. Now if I had done things like everyone else, it would not be a problem as they recommend the use of the angle on the inside and the axle is bolted to that which means the weight of the van is on the welds not the chassis rails. Now if I had of known the tolerances of the swing arm where so close I would have changed my dimensions. My supplier knew I had added the angle and when I asked what dimensions he need to get the axle correct for the chassis he said I need outside rail to outside rail and inside rail to inside rail. And the axle was made to that. But I needed to know that the tolerances where so close as I would have added the 12mm to my outside measurement to have a 6mm gap from swing arm. This really ticked me but I got over it and came up with this solution. Rant over

The fix it was either chop the chassis ( not happening) order a new axle (can't afford that) or grind the plate back. I choose to do the last.

ImageUploaded with ImageShack.com
I have a 3mm gap. And 3mm plate still left
http://imageshack.us/a/img43/3991/rlmt.jpg
http://imageshack.us/a/img543/874/8ifo.jpg
5 grinding discs

http://imageshack.us/a/img90/7929/nicp.jpg
And heres the pile of metal.

Once done and I was happy with my solution, I drilled the holes. So off the hardware I go. $50 later for 3 drill bits I quickly learnt how to sharpen them. Drilling though 12mm of steel blunts them very quickly.

Now the axle was mounted (roughly) I as able see where the handbrake cable would go and I found this happened.
http://imageshack.us/a/img824/7030/p4fj.jpg
http://imageshack.us/a/img15/3171/d5yg.jpg
The cables will rub on the rails. Nothing major but from the vans I have looked at over time rub through the chassis rails and may weaken them. So my solution was this.

http://imageshack.us/a/img46/8959/i9pi.jpg

A bit of fiddling was involved to get this right but it worked.
http://imageshack.us/a/img16/8115/nxvu.jpg
http://imageshack.us/a/img407/9932/vbfq.jpg
http://imageshack.us/a/img856/8962/8753.jpg
Now it wont rub :)

Cya Lukey
lukeyslide
Teardrop Builder
 
Posts: 29
Joined: Wed May 11, 2011 5:35 am
Location: Brisbane, Australia
Top

Re: Here's my van from Scratch!Aussie Style.

Postby grizz » Fri Aug 30, 2013 10:52 am

APPROVED !!
Greetings from England.

Rian.


Hoping to get it all done in time.
User avatar
grizz
1000 Club
1000 Club
 
Posts: 1210
Images: 29
Joined: Mon Sep 21, 2009 2:37 pm
Location: Rochester, Kent, UK
Top

Re: Here's my van from Scratch!Aussie Style.

Postby lukeyslide » Thu Sep 12, 2013 6:48 am

grizz wrote:APPROVED !!


Thanks :)


Here's a bit more of what I've been up to.The wall will not be mounted on the floor. Instead I've choosen to mount them on angle around all sides. This will hide the chassis a lot better and hopefully will give the walls more support.
ImageUploaded with ImageShack.com
This is upside down and front wall. 25mm off the A frame so no flex is placed on the wall. I also reduced the pixel size sorry for making the previous uploads so big.

ImageUploaded with ImageShack.com
I did not really think this one though. The back wall support was going to be flush with the base of the chassis but like the front I forgot about the flex from the bumper bar so I raised it 25mm for clearance

Image
Back wall will have more weight then the front so I made these little angles to help out. Very hard to cut with a drop saw but quicker then a hack saw.

Cya Lukey
lukeyslide
Teardrop Builder
 
Posts: 29
Joined: Wed May 11, 2011 5:35 am
Location: Brisbane, Australia
Top

Previous

Return to Build Journals

Who is online

Users browsing this forum: No registered users and 11 guests