1946 Kit rebuild

...ask your questions in the appropriate forums BUT document your build here...preferably in a single thread...dates for updates, are appreciated....

Re: 1946 Kit rebuild

Postby Shadow Catcher » Mon Feb 18, 2013 5:39 pm

Looking forward to seeing it at CRA.
User avatar
Shadow Catcher
Donating Member
 
Posts: 6008
Images: 234
Joined: Sat Apr 11, 2009 8:26 pm
Location: Metamora, OH

Re: 1946 Kit rebuild

Postby Lonnie Mac » Mon Feb 18, 2013 5:47 pm

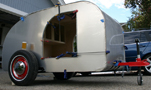
prohandyman wrote:Got some of the faux rivet work done today. Aluminum twist nails, driven in very tightly with silicone sealant. May add another row or two.
102285


This is looking GREAT Dan!!!

May I ask as to where, and which windows you purchased. Looks like I am going with these crank outs for my Benroy, but dang if I can only find black anodized, I want the aluminum color that you have installed.

More pics!!
Lonnie Mac!
AleNuts Radio and home of Brutus "Ten"!
President of the Brutus Ten Cult...

Build Thread (Almost): http://www.tnttt.com/viewtopic.php?f=50&t=53596
User avatar
Lonnie Mac
Teardrop Advisor
 
Posts: 95
Joined: Tue Sep 25, 2012 8:15 pm
Location: Bacliff, TX

Re: 1946 Kit rebuild

Postby prohandyman » Mon Feb 18, 2013 8:54 pm

Lonnie
Ancient Chinese secret....but I will divulge it only here...I sanded and painted over the black. I too had to have the aluminum look! May I Forever be banned from the secret keepers club!
Dan
155200 Facebook group 164774163701
User avatar
prohandyman
Super Lifetime Member
 
Posts: 1919
Images: 785
Joined: Fri Dec 22, 2006 3:21 pm
Location: Greenwood, IN
Top

Re: 1946 Kit rebuild

Postby Lonnie Mac » Mon Feb 18, 2013 8:58 pm

prohandyman wrote:Lonnie
Ancient Chinese secret....but I will divulge it only here...I sanded and painted over the black. I too had to have the aluminum look! May I Forever be banned from the secret keepers club!


Ha! Thanks my friend! You sure fooled me! Looks great. I thought I may have to do the same lest some drops a couple of Woodlin's in my lap.
Lonnie Mac!
AleNuts Radio and home of Brutus "Ten"!
President of the Brutus Ten Cult...

Build Thread (Almost): http://www.tnttt.com/viewtopic.php?f=50&t=53596
User avatar
Lonnie Mac
Teardrop Advisor
 
Posts: 95
Joined: Tue Sep 25, 2012 8:15 pm
Location: Bacliff, TX
Top

Re: 1946 Kit rebuild

Postby prohandyman » Tue Feb 19, 2013 3:06 pm

I decided I needed more rivets to complete the look so I added twice as many. Also mounted the eye brows, gutter, awning rail and water fill port. I forgot to install the new screening in the windows...ever try to do this while the window is installed??!! Wasn't that a joy!
102340102341
Dan
155200 Facebook group 164774163701
User avatar
prohandyman
Super Lifetime Member
 
Posts: 1919
Images: 785
Joined: Fri Dec 22, 2006 3:21 pm
Location: Greenwood, IN
Top

Re: 1946 Kit rebuild

Postby prohandyman » Tue Feb 19, 2013 3:18 pm

Alright help me out here...my prospective buyer likes this look...
102332
But he has not give me a deposit...and he likes the wings...but once I mount the facsimiles the holes are there even if I don't use them. So....thoughts? I am on the fence...never put wings on a teardrop before! I am leaning towards making them, but not mounting them until I get a buyer!
102342
Dan
155200 Facebook group 164774163701
User avatar
prohandyman
Super Lifetime Member
 
Posts: 1919
Images: 785
Joined: Fri Dec 22, 2006 3:21 pm
Location: Greenwood, IN
Top

Re: 1946 Kit rebuild

Postby sid » Tue Feb 19, 2013 4:35 pm

Dan, that's not a look I would want.... that looks like a big foot print. Maybe a different design, something a little swoopier...

I would be sure and get the deposit, and maybe a little more before I mounted that permanently.

See ya in May.

Mark and Pat
sid n side
Image
"If you're going through hell, keep going......" Winston Churchhill

Side by Side - completed October 2008
User avatar
sid
Donating Member
 
Posts: 889
Images: 194
Joined: Wed Nov 09, 2005 3:17 pm
Location: TN, Smyrna
Top

Re: 1946 Kit rebuild

Postby sid » Tue Feb 19, 2013 4:37 pm

Looking at it again, If you mount it there, I hope you set it out from the body enough so it's not a water trap.... :thinking:
sid n side
Image
"If you're going through hell, keep going......" Winston Churchhill

Side by Side - completed October 2008
User avatar
sid
Donating Member
 
Posts: 889
Images: 194
Joined: Wed Nov 09, 2005 3:17 pm
Location: TN, Smyrna
Top

Re: 1946 Kit rebuild

Postby prohandyman » Tue Feb 19, 2013 5:40 pm

Yes I was thinking swoopier also.
Dan
155200 Facebook group 164774163701
User avatar
prohandyman
Super Lifetime Member
 
Posts: 1919
Images: 785
Joined: Fri Dec 22, 2006 3:21 pm
Location: Greenwood, IN
Top

Re: 1946 Kit rebuild

Postby doug hodder » Wed Feb 20, 2013 10:19 am

I'd make him cough up the dough before you drill holes in it. Tell him you have another customer that doesn't want them. Look at the Spartan trailers for the wing swoop thing...much more streamlined than the Shasta look. Doug
doug hodder
*Snoop Dougie Doug
 
Posts: 12625
Images: 562
Joined: Tue Dec 14, 2004 11:20 pm
Top

Re: 1946 Kit rebuild

Postby TRP » Wed Feb 20, 2013 2:21 pm

Plus one to what Doug suggested. Simply state that without a deposit you're hesitant to make personal customizations. You trust him as a customer, but one mans wings are another mans wart.

Best of luck,
Ted
User avatar
TRP
Silver Donating Member
 
Posts: 316
Images: 341
Joined: Wed Jun 27, 2012 2:50 pm
Location: Morgan Hill, CA
Top

Re: 1946 Kit rebuild

Postby prohandyman » Wed Feb 20, 2013 5:51 pm

Took the old front bumper from my '48 Chevy truck, cut it down and mounted it on the back of the Kit
102391102390
Soldering new bulb sockets and re-wiring the original glass lense galley and cabin lights today. Will take a few pics tomorrow. Will hide a small rechargeable battery in the cabinet somewhere to power. One of my other Kits had a checker board painted on the inside of the rear cabinet door, barely visible from fading, so I am going to re-produce one on this door as well. Also on that same camper the cabinet walls were lined with old magazine covers so I took a bunch of Popular Mechanics mag covers and pasted them in there. Will take pics of them also.
Dan
155200 Facebook group 164774163701
User avatar
prohandyman
Super Lifetime Member
 
Posts: 1919
Images: 785
Joined: Fri Dec 22, 2006 3:21 pm
Location: Greenwood, IN
Top

Re: 1946 Kit rebuild

Postby prohandyman » Fri Mar 08, 2013 7:03 am

Got quite a bit done this week on the Kit...still waiting on white wall tires. Added a few decorating items. Galley and hatch completed, ice box finished
103061103060103059103058
Dan
155200 Facebook group 164774163701
User avatar
prohandyman
Super Lifetime Member
 
Posts: 1919
Images: 785
Joined: Fri Dec 22, 2006 3:21 pm
Location: Greenwood, IN
Top

Re: 1946 Kit rebuild

Postby KCStudly » Sat Mar 09, 2013 10:29 am

Those retro touches are really nice. I especially like the fishing gear inside the cabin.

Nice job! :thumbsup:
KC
My Build: The Poet Creek Express Hybrid Foamie

Poet Creek Or Bust
Engineering the TLAR way - "That Looks About Right"
TnTTT ORIGINAL 200A LANTERN CLUB = "The 200A Gang"
Green Lantern Corpsmen
User avatar
KCStudly
Donating Member
 
Posts: 9640
Images: 8169
Joined: Mon Feb 06, 2012 10:18 pm
Location: Southeastern CT, USA
Top

Re: 1946 Kit rebuild

Postby Junkboy999 » Sat Mar 09, 2013 8:02 pm

My take of making custom parts.


Your work is great and you can always sell the TD to another buyer. As long as it is a standard TD. If the
guy wants a custom part made you need to charge him for it. If he bails of the full TD sell, you can sell the
TD to another, but at least he paid for making the wings and can hang them on his wall. If he wants the wings
attach at the time of payment you can attach them at the end of the build.
User avatar
Junkboy999
1000 Club
1000 Club
 
Posts: 1259
Images: 52
Joined: Fri Jul 06, 2012 9:18 pm
Location: Wichita, KS
Top

PreviousNext

Return to Build Journals

Who is online

Users browsing this forum: No registered users and 15 guests