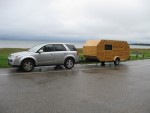
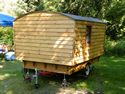
The Cedar Shack - 95% done!

...ask your questions in the appropriate forums BUT document your build here...preferably in a single thread...dates for updates, are appreciated....

Re: The Cedar Shack - making progress!

Postby Chuckles » Mon Jul 15, 2013 12:37 am

Finally got the walls up today. 8)
109893109894

After they were up I spent a few hours cutting all the epoxy drips off the back side of the walls with a chisel. A few minutes masking them off before I applied the epoxy would have been a good idea :roll:
I routed out the door and windows and drew in the galley cabinets. This next week will be spent getting the cabinets roughed in and putting a roof on it.

I still have the goal of camping in it in two weeks :? At this point having it closed in, a chunk of scrap plywood for a counter top, and a few LED battery operated puck lights will be good enough :lol:

These guys are no help at all.
109895
User avatar
Chuckles
Teardrop Master
 
Posts: 141
Images: 48
Joined: Thu Jan 26, 2012 10:42 pm
Location: NE Wisconsin

Re: The Cedar Shack - walls are up!!

Postby rebapuck » Mon Jul 15, 2013 8:07 pm

It's hard to find good help.
Judy
1966 VW camper
1967 VW singlecab
Image
User avatar
rebapuck
.
 
Posts: 2243
Images: 1
Joined: Thu May 14, 2009 1:55 pm
Location: Chapel Hill NC

Re: The Cedar Shack - walls are up!!

Postby Chuckles » Tue Jul 16, 2013 12:53 am

rebapuck wrote:It's hard to find good help.


Every now and then one of them lets me trip over them but that's about the limit of their contribution!

Also, the black one loves to hide in the tall grass along the driveway then rush out and blow by me in the dark as I'm walking back to the house... thereby scaring the #@*$&! out of me :frightened:

Short night tonight (@$#^@# day job) so I didn't get much done...I cut all the roof spars and glued up the mitered spars for the corners. I also got the spar for the galley hinge point installed. I'm hoping to frame in the ends tomorrow and plank them on Wednesday. The flat part of the roof will just be plywood.
User avatar
Chuckles
Teardrop Master
 
Posts: 141
Images: 48
Joined: Thu Jan 26, 2012 10:42 pm
Location: NE Wisconsin
Top

Re: The Cedar Shack - maiden voyage!!

Postby Chuckles » Tue Aug 06, 2013 11:15 pm

Well I made it :D . From trailer frame to camping in 40 days. Here she is on her maiden voyage
110743
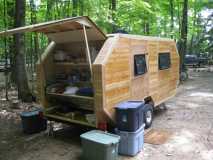
Cabinets are not done and it has a temporary door but it kept us dry and comfortable for a week!

I haven't posted in a while because I was working on the trailer until one or two in the morning every day for the last three weeks. With two weeks to go I had the walls up (glassed and epoxied) and was busy installing the roof, front, and hatch. Enclosing the back was a real pain in the you know where! especially the transition between the angled sides and the straight hatch opening
110741
One week before camp-day I finally rolled here out of the shop. Here my brother is welding the tongue on
110742
I didn't have room in my shop so I moved her down the road to a friends place to glass the ends. I glassed the ends, lapping around the corners onto the side walls. The roof was glassed at the corners only since the flat top is plywood and I figured epoxy alone was enough.

I did the filler coat of epoxy on Wednesday, glassed the ends and hatch lid on Friday morning, then rolled her out and installed the windows and doors on Saturday afternoon. I only had time for the single coat of epoxy and the weave of the glass was still visible. Of course it rained all saturday night and most of Sunday (the day we left). I ran out of time and made a temporary side door Saturday night... installed on Sunday morning :? .

Sunday evening when the camper finally dried out the two day old epoxy was all cloudy and looked awful :frightened: Apparently 30 hours of curing time is not enough to handle two days of rain. I was pretty worried but kept telling myself it would be OK... since the water wet it out I figured a fresh coat of epoxy would do the same!

When we got home on Saturday I rolled her right into the shop and pulled the hatch off. After a good sanding and fresh coat of epoxy about 90% of the problem was resolved. There is still a little haze in some areas and a some of the nail dimples are kind of white. It looks great from 20 feet! Good enough isn't a term I use often when it comes to my woodworking projects but I dread the thought of sanding off all that glass and starting over. I'm going to do the same to the front (the roof will be painted)... it will have to be good enough.

I'll post some more pics as I get the cabinets installed and finish the final epoxy and varnish coats.

Chuck
User avatar
Chuckles
Teardrop Master
 
Posts: 141
Images: 48
Joined: Thu Jan 26, 2012 10:42 pm
Location: NE Wisconsin
Top

Re: The Cedar Shack - maiden voyage!!

Postby stonykill » Wed Aug 07, 2013 6:07 am

looking great. You and I built at about the same rate so I feel your pain :lol: .
User avatar
stonykill
Teardrop Master
 
Posts: 173
Joined: Mon Sep 05, 2011 12:28 pm
Location: Canaan NY
Top

Re: The Cedar Shack - maiden voyage!!

Postby Chuckles » Thu Aug 08, 2013 10:04 pm

stonykill wrote:looking great. You and I built at about the same rate so I feel your pain :lol: .


I was following your vardo build and you definitely beat me in the speed department. I love the look as well.

I plan on taking my time with the cabinets and fenders.
User avatar
Chuckles
Teardrop Master
 
Posts: 141
Images: 48
Joined: Thu Jan 26, 2012 10:42 pm
Location: NE Wisconsin
Top

Re: The Cedar Shack - maiden voyage!!

Postby stonykill » Fri Aug 09, 2013 5:44 am

Chuckles wrote:
stonykill wrote:looking great. You and I built at about the same rate so I feel your pain :lol: .


I was following your vardo build and you definitely beat me in the speed department. I love the look as well.

I plan on taking my time with the cabinets and fenders.

same here. The rest of my build will be at a much more normal pace. For now camping init is FAR more important
User avatar
stonykill
Teardrop Master
 
Posts: 173
Joined: Mon Sep 05, 2011 12:28 pm
Location: Canaan NY
Top

Re: The Cedar Shack - walls are up!!

Postby Mdrinnon » Fri Aug 09, 2013 2:46 pm

Chuckles wrote:
rebapuck wrote:It's hard to find good help.


Every now and then one of them lets me trip over them but that's about the limit of their contribution!

Also, the black one loves to hide in the tall grass along the driveway then rush out and blow by me in the dark as I'm walking back to the house... thereby scaring the #@*$&! out of me :frightened:

Short night tonight (@$#^@# day job) so I didn't get much done...I cut all the roof spars and glued up the mitered spars for the corners. I also got the spar for the galley hinge point installed. I'm hoping to frame in the ends tomorrow and plank them on Wednesday. The flat part of the roof will just be plywood.


My girls picked up a line from one of their kid's books. They tell me my dog's job is to perform odors and get tripped over lol :lol:
User avatar
Mdrinnon
Teardrop Builder
 
Posts: 29
Images: 37
Joined: Mon Jul 22, 2013 3:27 pm
Top

Re: The Cedar Shack - maiden voyage!!

Postby rebapuck » Fri Aug 16, 2013 10:54 pm

Looks great enough. Just camp in it and be proud.
Judy
1966 VW camper
1967 VW singlecab
Image
User avatar
rebapuck
.
 
Posts: 2243
Images: 1
Joined: Thu May 14, 2009 1:55 pm
Location: Chapel Hill NC
Top

Re: The Cedar Shack - Back to work again!

Postby Chuckles » Sat Jul 19, 2014 9:17 pm

Well after a year I'm finally back at it... I wanted to start earlier this summer but the mosquitoes have been so bad here its difficult to work outside at all.
I'm making progress on the galley and hope to have it done by the end of next week.
122592
Since I built it with the galley lid inset I can't just build the cabinets and slide them in. I have to piece them together using cleats for the boxes and pocket screwing the face frames. If I ever build this style again I'll put the cabinets in before I add the roof and end walls.

As you can see there is lots of galley storage :) The face frames are ash. The door frames, drawer fronts, and shelf edging will be cherry. the raised panels in the doors will be ash. The counter top will be some sort of formica.

I plan on getting the interior cabinets, fenders, and tounge tray done this fall
User avatar
Chuckles
Teardrop Master
 
Posts: 141
Images: 48
Joined: Thu Jan 26, 2012 10:42 pm
Location: NE Wisconsin
Top

Re: The Cedar Shack - back to work again

Postby rebapuck » Sun Jul 20, 2014 1:56 pm

Keep us posted.

I agree about the mosquitoes. I've hardly been outside this summer because they love me.
Judy
1966 VW camper
1967 VW singlecab
Image
User avatar
rebapuck
.
 
Posts: 2243
Images: 1
Joined: Thu May 14, 2009 1:55 pm
Location: Chapel Hill NC
Top

Re: The Cedar Shack - back to work again

Postby JLPettimore » Wed Jul 23, 2014 9:17 pm

This is a very nice looking build, thanks for sharing. love the cedar and ash.
User avatar
JLPettimore
Teardrop Inspector
 
Posts: 11
Joined: Thu Jul 03, 2014 6:51 am
Location: West Tennessee
Top

Re: The Cedar Shack - back to work again

Postby Chuckles » Thu Jul 24, 2014 12:59 am

Thanks for the compliments. I got the cabinet doors glued up tonight so I can sand and put on the first coat of finish tomorrow... then all I have to do is dovetail the drawers, a couple more coats of finish, and install everything. No problem at all. ;) Still hoping to get them all installed on Saturday since we leave for camping on Sunday :wine:

i also got my LED lights in the mail the other day so maybe I can install them in the galley in my down time :lol:

Should have pics by Saturday!

Chuck
User avatar
Chuckles
Teardrop Master
 
Posts: 141
Images: 48
Joined: Thu Jan 26, 2012 10:42 pm
Location: NE Wisconsin
Top

Re: The Cedar Shack - back to work again

Postby Chuckles » Sat Aug 09, 2014 6:48 pm

Here is a picture of the Galley cabinets. We went camping last week near Eagle River,WI. Had lots of visitors looking at the camper including a park ranger who made a special trip when he heard about it from the on-duty ranger. We even got a thumbs up from a group of bikers on the road. :thumbsup:

123164


Cabinets are ash. Doors are bookmatched ash panels in cherry frames. Drawer fronts are cherry. I still need to find a suitable counter top laminate, trim out around the bottom frames and build a box to hide the fuse panel that is under the upper cabinet overhang.

The wife already has me working on a knife block for one side wall and a spice rack for the other. We are also thinking about moving the back wall of the upper center cubby-hole in towards the galley to leave a 4-inch deep cubby. That will leave an 8-inch deep cubby hole in the bulkhead wall for the interior of the camper. It would make a nice place to put a small stereo and speakers.

Interior cabinets will be the same style.

Chuck
User avatar
Chuckles
Teardrop Master
 
Posts: 141
Images: 48
Joined: Thu Jan 26, 2012 10:42 pm
Location: NE Wisconsin
Top

Re: The Cedar Shack - back to work again

Postby stonykill » Sat Aug 09, 2014 6:53 pm

looks great! Yup it wouldn't be a camping tri[p for us if a Ranger didn't stop in to check out our Vardo. Being they see campers day in and out I always take that as a huge compliment!
User avatar
stonykill
Teardrop Master
 
Posts: 173
Joined: Mon Sep 05, 2011 12:28 pm
Location: Canaan NY
Top

PreviousNext

Return to Build Journals

Who is online

Users browsing this forum: No registered users and 3 guests