My teardrop build

...ask your questions in the appropriate forums BUT document your build here...preferably in a single thread...dates for updates, are appreciated....

Re: My teardrop build

Postby working on it » Sun Jun 15, 2014 9:18 pm

Josh J wrote:Progress pics:
Image
I like the way you use your tailgate as a worktable...some of my best work is done on mine.In this thread, Construction Tables http://www.tnttt.com/viewtopic.php?f=6&t=59191#p1078441 I said I had used tailgates 50% of the time...I suspect that that figure has risen....10815298252
2013 HHRv "squareback/squaredrop", rugged, 4x8 TTT, 2225 lbs
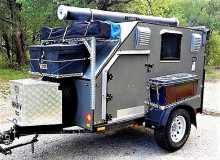
  • *3500 lb Dexter EZ-Lube braked axle, 3000 lb.springs, active-progressive bumpstop suspension
  • *27 x 8.5-14LT AT tires (x 3) *Weight Distribution system for single-beam tongue
  • *100% LED's & GFCI outlets, 3x fans, AM/FM/CD/Aux. *A/C & heat, Optima AGM, inverter & charger(s)
  • *extended-run, on-board, 2500w generator *Coleman dual-fuel stove & lantern, Ikea grill, vintage skillet
  • *zinc/stainless front & side racks *98"L x 6" diameter rod & reel carrier tube on roof
173193172890148599
User avatar
working on it
2000 Club
2000 Club
 
Posts: 2189
Images: 457
Joined: Tue Oct 04, 2011 9:05 pm
Location: DFW Texas

Re: My teardrop build

Postby Josh J » Sun Jun 15, 2014 9:46 pm

That's what tailgates are for! :beer:
Josh J
Teardrop Inspector
 
Posts: 23
Joined: Thu Nov 14, 2013 6:31 pm

Re: My teardrop build

Postby Josh J » Fri Jul 04, 2014 5:33 pm

Big update, things are starting to really take shape!

We got the ceiling installed, and the inside of the ceiling primed and painted. This part will all be covered up and should never get wet, but just in case I figured it wouldn't hurt to seal it all up.

I added a divider for the two storage compartments, and a fresh air vent to the front, so I can have the side windows closed and fresh air will draw in or go out through one of the storage compartments.

We also primed and put a coat of paint in the galley, and got most of the electrical cut out, as well as the hole cut for the AC unit.

Next up is the wiring, I have some goodies coming from amazon and etrailer this week.

Pics!

Image

Image

Image

Image

Image

Image

Image

Image

Image

Image
Josh J
Teardrop Inspector
 
Posts: 23
Joined: Thu Nov 14, 2013 6:31 pm
Top

Re: My teardrop build

Postby Josh J » Sat Jul 12, 2014 9:27 pm

More progress today, I picked up some foil sided foam and cut it all into the right sizes for the ceiling.

I cut out the vent hole on the inside.

I also ran all of the 12v and 110v wiring, hooked up the 12v fuse panel and re-installed the old work boxes that will house the 110v outlets

next step is to pick up some aluminum composite panels for the exterior sides and roof.. the side panels will go on first, then the inside will be primed/painted and the electrical installed and all tested. I also need to build the hatch, I started cutting the ribs and my jigsaw gave up. I got another one but havent worked on the hatch for a while.

there is plenty of work left, but I think another good weekend or two and I will be pretty close to having a usable camper.

pics:

Image

Image

Image

Image

Image

Image

Image

Image

Image

Image

Image

Image
Josh J
Teardrop Inspector
 
Posts: 23
Joined: Thu Nov 14, 2013 6:31 pm
Top

Re: My teardrop build

Postby Josh J » Thu Jul 17, 2014 9:55 pm

Ok, some more progress this week, I picked up the aluminum composite panels and started installing them on the outside of the walls.. these panels are very tough, with a really nice finish on the outside. I decided to be boring and got white panels, mostly because they wouldn't soak up any sun.

Next up is finishing the walls and installing some lights and whatnot.. and building the galley hatch.

Pics:

Image

Image

Image

Image

Image

Image

Image

Image

Image
Josh J
Teardrop Inspector
 
Posts: 23
Joined: Thu Nov 14, 2013 6:31 pm
Top

Re: My teardrop build

Postby Josh J » Thu Jul 24, 2014 10:00 pm

This week we got the front finished up and started putting the roof on.. 2 panels so far, the 3rd panel will go on some time this weekend.

The front and rear marker lights are installed and wired in, and the 12v plug-ins are wired on the front dash and ready to be installed.

Also, the frame for the hatch is built, but I forgot to grab some pics of that and the installed lights.. I'll add those on the next update :)

Pics:

Image

Image

Image

Image

Image

Image
Josh J
Teardrop Inspector
 
Posts: 23
Joined: Thu Nov 14, 2013 6:31 pm
Top

Re: My teardrop build

Postby S. Heisley » Tue Jul 29, 2014 10:11 pm

You're doing a good job, Josh.
Sometimes we need to encourage and comment more than we do; but, know that we are here.
If there is any doubt of that, just look at the number of views you've had on your build thread and you'll know.
We're watching! :SG
User avatar
S. Heisley
Super Lifetime Member
 
Posts: 8869
Images: 495
Joined: Mon Sep 17, 2007 10:02 am
Location: No. California
Top

Re: My teardrop build

Postby Bantam » Wed Jul 30, 2014 1:48 am

Hi Josh,

Like your style and how you have built this. Keep it up.
Bantam
Teardrop Advisor
 
Posts: 51
Images: 6
Joined: Tue Feb 11, 2014 6:42 pm
Location: Auckland, New Zealand
Top

Re: My teardrop build

Postby rooihaas » Wed Jul 30, 2014 3:07 am

Watching from South Africa, but our officials is a litle full of s... when it comes to people building their own trailers. But this looks good. Loving the "oddness" of the teardrop.
rooihaas
Teardrop Inspector
 
Posts: 2
Joined: Thu Jul 17, 2014 4:49 pm
Top

Re: My teardrop build

Postby bdosborn » Wed Jul 30, 2014 8:00 am

Tell us more about the siding. Is it shiny metal under a protective coating or do you paint it? It looks super easy to work with, was it expensive? What sizes does it come it?

Bruce
2009 6.5'X11' TTT - Boxcar
All it takes is a speck of faith and a few kilowatts of sweat and grace.
Image
Boxcar Build
aVANger Build
User avatar
bdosborn
Donating Member
 
Posts: 5595
Images: 806
Joined: Wed May 05, 2004 11:10 pm
Location: CO, Littleton
Top

Re: My teardrop build

Postby noseoil » Wed Jul 30, 2014 2:05 pm

I'm looking at this stuff for my build. Here's the spec sheet. http://www.nglantz.com/PDF_DOCs/beBond_Specs.pdf

The 3mm 4x10 panel is about $100 per sheet and should weigh about 66# per sheet(?) if my calcs are correct. Pre-finished white is what I was quoted on.
Build log: viewtopic.php?f=50&t=60248
The time you spend planning is more important than the time you spend building.........

137905
User avatar
noseoil
1000 Club
1000 Club
 
Posts: 1822
Images: 670
Joined: Sun Apr 27, 2014 8:46 am
Location: Raton, New Mexico, living the good life!
Top

Re: My teardrop build

Postby Josh J » Wed Jul 30, 2014 8:30 pm

the roof is in place now, and ready for the trim to be installed.

the hatch frame is ready to be primed and then the panel will be attached before the interior of the galley is painted.

the big list of things that needs to be done is getting smaller every day :twisted:

I pulled the protective film off and couldn't resist posting a couple of pics:

Image

Image
Josh J
Teardrop Inspector
 
Posts: 23
Joined: Thu Nov 14, 2013 6:31 pm
Top

Re: My teardrop build

Postby Josh J » Fri Aug 08, 2014 8:08 am

We have been working pretty hard to get this camper usable, and we've been taking lots of pictures.. so I thought an update was in order.

We are 1 week out from a camping trip to Grand Marais, MN, and I think we're gonna make it.

The interior is all primed, and some is painted

The electrical is all hooked up in the back, battery tender is installed and all of the 110v is wired. We have decided not to install the AC quite yet, although it will not be too much work when we do install it.

All of the interior electrical, lighting, etc are waiting on the paint :)

The hatch has been built, primed and skinned, and fitted onto the rear. The hurricane hinge was a breeze to install and everything just ended up lining up great. The hatch fits a bit tight, but with some more strategic sanding it should open and close just fine.

I picked up fenders and all of the other materials that we need to get it campable. We got a 5" feather bed from a friend in his garage sale, and we are going to use that with the mattress from the futon that we have in our 2nd bedroom.

The pics tell most of the story:

Image

Image

Image

Image

Image

Image

Image

Image

Image

Image

Image

Image

Image

Image

Image

Image
Josh J
Teardrop Inspector
 
Posts: 23
Joined: Thu Nov 14, 2013 6:31 pm
Top

Re: My teardrop build

Postby Josh J » Sat Aug 09, 2014 10:34 pm

Getting close, got all of the painting done today inside and out.. next is a big day of assembly and installation.

The fantastic vent also got installed today, although I still have to cut and install the trim ring.

pics:

Image

Image

Image

Image

Image

Image

Image

Image
Josh J
Teardrop Inspector
 
Posts: 23
Joined: Thu Nov 14, 2013 6:31 pm
Top

PreviousNext

Return to Build Journals

Who is online

Users browsing this forum: No registered users and 1 guest