J & B's Modified Grumman Teardrop Build

...ask your questions in the appropriate forums BUT document your build here...preferably in a single thread...dates for updates, are appreciated....

Re: J & B's Modified Grumman Teardrop Build

Postby KCStudly » Thu Jul 24, 2014 10:28 am

So I'm not clear on what you are planning for the bottom of the wall and how it will be different from your test piece. Is that part that will hang down just going to be the 1/4 inch outer skin, and the 1x framing will be stepped to sit on both the frame and the floor?

If that is the case I would do as you mentioned for the walls to floor; PL and treated deck screws. For the flap hanging down over the frame I would seriously consider just sealing the gap with a good bead of caulk (I like the paintable exterior kind, not silicone based). My rationale is that this will form an adequate bond, avoids putting holes in the frame, and would be much easier to slice thru in the unlikely event that you ever have to separate the cabin from the chassis.

Be sure to seal the edges of your ply very well (epoxy, varnish, paint, The Mix, whatever).
KC
My Build: The Poet Creek Express Hybrid Foamie

Poet Creek Or Bust
Engineering the TLAR way - "That Looks About Right"
TnTTT ORIGINAL 200A LANTERN CLUB = "The 200A Gang"
Green Lantern Corpsmen
User avatar
KCStudly
Donating Member
 
Posts: 9640
Images: 8169
Joined: Mon Feb 06, 2012 10:18 pm
Location: Southeastern CT, USA

Re: J & B's Modified Grumman Teardrop Build

Postby jandbsteardrop » Thu Jul 24, 2014 10:48 am

Hi KC,

Yes, thanks for the reply! The test piece is exactly what we're going to do as it's 3/4" wide and we're using 3/4" plywood...that is mortised out 1/2"...leaving 1/4" hanging. OK...no screws in the frame sounds good and I like the idea of caulking it. We will also epoxy the edges! However, there is also going to be 1/8" birch or luan skin over the top of this as well, which we will glue to the plywood. Lastly, I was thinking of running trim over this entire length on the bottom. Does that sound about right? Thank you for your input!

Jack
jandbsteardrop
Teardrop Advisor
 
Posts: 59
Images: 1
Joined: Thu Nov 28, 2013 8:28 am
Location: Encino, CA

Re: J & B's Modified Grumman Teardrop Build

Postby KCStudly » Thu Jul 24, 2014 11:14 am

A lot of people add trim along the bottom, and it's pretty much mandatory when using aluminum outer skin.

My concern is that this could be a collection point and adds more penetrations, increasing the possibility of water intrusion. IMO Aggie79's/Tom's Silver Beatle build is "the" definitive example of how to seal aluminum clad TD skin and trim.

I am going another way to avoid all of that and will use a painted canvas outer skin … no aluminum, no trim, minimal penetrations, fully sealed. In my case it is canvas over foam, but many people have had very good results with canvas over ply, too. Look at the foamie section if you would like to learn more.
KC
My Build: The Poet Creek Express Hybrid Foamie

Poet Creek Or Bust
Engineering the TLAR way - "That Looks About Right"
TnTTT ORIGINAL 200A LANTERN CLUB = "The 200A Gang"
Green Lantern Corpsmen
User avatar
KCStudly
Donating Member
 
Posts: 9640
Images: 8169
Joined: Mon Feb 06, 2012 10:18 pm
Location: Southeastern CT, USA
Top

Re: J & B's Modified Grumman Teardrop Build

Postby jandbsteardrop » Fri Jul 25, 2014 9:26 am

building pattern.JPG
routed edges.
building pattern.JPG (106.17 KiB) Viewed 1970 times
Next up we wanted to build our pattern/template for the side walls. Since our side walls are 4.5ft tall and 9 ft long, we purchased 3/4" plywood in two 5x9' sheets....expensive! For our pattern, we used 3/8" 4x8 plywood and mortised them together using Steve Frederick's manual (yes this helps a ton). First, we needed to transfer the profile from our SketchUp to the plywood, so we made 3" x 3" squares and then we marked where the profile hit each line and used small trim and brad nails to scribe our line.
Attachments
marking grid on pattern.JPG
help from the wife and baby marking up the pattern!
marking grid on pattern.JPG (131.66 KiB) Viewed 1970 times
gluing plywood together.JPG
gluing and clamping plywood mortised together to make pattern big enough for profile.
gluing plywood together.JPG (96.72 KiB) Viewed 1970 times
jandbsteardrop
Teardrop Advisor
 
Posts: 59
Images: 1
Joined: Thu Nov 28, 2013 8:28 am
Location: Encino, CA
Top

Re: J & B's Modified Grumman Teardrop Build

Postby jandbsteardrop » Fri Jul 25, 2014 9:31 am

Here is the pattern plywood all glued together. Now it's time to cut it out!
pattern not cut yet.JPG
pattern not cut yet.JPG (120.88 KiB) Viewed 1969 times
jandbsteardrop
Teardrop Advisor
 
Posts: 59
Images: 1
Joined: Thu Nov 28, 2013 8:28 am
Location: Encino, CA
Top

Re: J & B's Modified Grumman Teardrop Build

Postby jandbsteardrop » Fri Jul 25, 2014 9:37 am

Our doors arrived! After much debate and discussions, along with tons of research, we decided to buy our doors. We found that after you buy all the hardware and supplies for building your own door, windows, etc. (not to mention the amount of time spent making the doors) we decided that it was a "wash" between building vs. buying....(at least for us) so we just bought the doors. They were $600 total. We are more confident of a "tight fit, no-leak" door if we bought them. We also decided to buy a porthole....just one...as our daughter will have a bunk in the TD and this will be fun for her to look out.
doors arrived.JPG
doors arrived.JPG (118.94 KiB) Viewed 1996 times


Here is the pattern cut out and door fitted. Exciting!! Good thing we are doing all our work on a pattern first as the door was a little bit loose. We'll make sure to focus on this when cutting the doors out of the 3/4" plywood.
Attachments
pattern cut out and door fitted.JPG
pattern cut out and door fitted.JPG (120.42 KiB) Viewed 1996 times
Last edited by jandbsteardrop on Mon Jul 28, 2014 1:24 pm, edited 1 time in total.
jandbsteardrop
Teardrop Advisor
 
Posts: 59
Images: 1
Joined: Thu Nov 28, 2013 8:28 am
Location: Encino, CA
Top

Re: J & B's Modified Grumman Teardrop Build

Postby jandbsteardrop » Fri Jul 25, 2014 9:45 am

pattern test.JPG
pattern test.JPG (114.32 KiB) Viewed 1995 times
pattern up on side 3.JPG
pattern up on side 3.JPG (123.53 KiB) Viewed 1995 times
pattern up on side2.JPG
pattern up on side2.JPG (112.62 KiB) Viewed 1995 times
pattern test.JPG
pattern test.JPG (114.32 KiB) Viewed 1995 times
We wanted to test out the profile look on the frame so we clamped it up....looking good!
jandbsteardrop
Teardrop Advisor
 
Posts: 59
Images: 1
Joined: Thu Nov 28, 2013 8:28 am
Location: Encino, CA
Top

Re: J & B's Modified Grumman Teardrop Build

Postby jandbsteardrop » Sun Jul 27, 2014 10:53 pm

epoxy edge of pattern.JPG
epoxy edge of pattern.JPG (101.57 KiB) Viewed 1962 times
Next we have to epoxy the edges of the pattern. This is very important so you can save the edges of your pattern. Also, we're using this as a template to route our sides so fill in any gaps in the plywood. We learned the hard way on the first side. Needless to say, they did come out ok.
Attachments
cutting out 3 8th hatch relief.JPG
cutting out 3 8th hatch relief.JPG (156.97 KiB) Viewed 1962 times
first routing of side wall.JPG
first routing of side wall.JPG (103.31 KiB) Viewed 1962 times
jandbsteardrop
Teardrop Advisor
 
Posts: 59
Images: 1
Joined: Thu Nov 28, 2013 8:28 am
Location: Encino, CA
Top

Re: J & B's Modified Grumman Teardrop Build

Postby jandbsteardrop » Sun Jul 27, 2014 10:59 pm

jack routing.JPG
the side has been routed out!
jack routing.JPG (111.47 KiB) Viewed 1960 times
plunge cutting out doors.JPG
plunge cutting out the doors. use a straight edge!
plunge cutting out doors.JPG (136.84 KiB) Viewed 1960 times
More pics.
Attachments
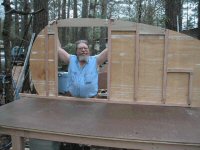
jack and kaia door cut out.JPG
the door fits perfectly!
jack and kaia door cut out.JPG (143.1 KiB) Viewed 1960 times
jandbsteardrop
Teardrop Advisor
 
Posts: 59
Images: 1
Joined: Thu Nov 28, 2013 8:28 am
Location: Encino, CA
Top

Re: J & B's Modified Grumman Teardrop Build

Postby jandbsteardrop » Sun Jul 27, 2014 11:04 pm

Here's a picture just messing around thinking about what to do at the bottom of our hatch. I think I have an idea....but still working it through. (it's not this picture).
Attachments
bottom of hatch brainstorming.JPG
bottom of hatch brainstorming.JPG (105.68 KiB) Viewed 1957 times
jandbsteardrop
Teardrop Advisor
 
Posts: 59
Images: 1
Joined: Thu Nov 28, 2013 8:28 am
Location: Encino, CA
Top

Re: J & B's Modified Grumman Teardrop Build

Postby jandbsteardrop » Mon Jul 28, 2014 10:12 am

We've been going back and forth with what we want in the galley...a pullout stove, gravity water, place for a cooler? We decided to definitely do the pullout stove and gravity water, but not sure about a cooler space...we may just keep that in back of the car. We'll see. Here we are laying it out and playing around with ideas. We thought the gravity water on a roll-out drawer above the sink would be a good idea...less plumbing and easy to swap out 5 gallon water jugs. Our only concern with the water pull-out is will the gas struts get in the way (if we end up using gas struts). We don't want the water to be able to pull out more than 6 inches...so maybe this wouldn't be an issue.
Attachments
sink.JPG
sink.JPG (95.25 KiB) Viewed 1923 times
galley stuff brainstorming layout.JPG
galley stuff brainstorming layout.JPG (111.16 KiB) Viewed 1923 times
galley ideas.JPG
galley ideas.JPG (108.7 KiB) Viewed 1923 times
jandbsteardrop
Teardrop Advisor
 
Posts: 59
Images: 1
Joined: Thu Nov 28, 2013 8:28 am
Location: Encino, CA
Top

Re: J & B's Modified Grumman Teardrop Build

Postby jandbsteardrop » Mon Jul 28, 2014 10:15 am

Here we are laying out the cabinet locations on our pattern. We're still up in the air with how we are going to build our cabinets....we'll definitely need help from the forum with this part!
Attachments
sketching cabinets on pattern brainstorm.JPG
sketching cabinets on pattern brainstorm.JPG (110.14 KiB) Viewed 1923 times
jandbsteardrop
Teardrop Advisor
 
Posts: 59
Images: 1
Joined: Thu Nov 28, 2013 8:28 am
Location: Encino, CA
Top

Re: J & B's Modified Grumman Teardrop Build

Postby jandbsteardrop » Mon Jul 28, 2014 7:23 pm

Next up we started to mortise the bottom edge of the side walls so we could cover the frame of the trailer. We routed out 1/2" from the 3/4" plywood...only leaving 1/4" to cover the frame. We will also be putting on 1/8" birch or lauan on the outside. This was a major job...and a dirty one. We used a straight edge (another piece of plywood) and clamped and screwed it in place. Then the routing began.....I was not looking forward to this.
Attachments
routing bottom edge of sidewall.JPG
routing bottom edge of sidewall.JPG (100 KiB) Viewed 1896 times
routing bottom edge of sidewall 2.JPG
routing bottom edge of sidewall 2.JPG (114.39 KiB) Viewed 1896 times
jack routing bottom edge.JPG
jack routing bottom edge.JPG (122.4 KiB) Viewed 1896 times
jandbsteardrop
Teardrop Advisor
 
Posts: 59
Images: 1
Joined: Thu Nov 28, 2013 8:28 am
Location: Encino, CA
Top

Re: J & B's Modified Grumman Teardrop Build

Postby jandbsteardrop » Mon Jul 28, 2014 7:24 pm

Dirty work! It's been a hot summer in the San Fernando Valley - it was in the low 90's this day...as every other day this summer. Note the umbrella for shade!
Attachments
bottom edge routing done.JPG
bottom edge routing done.JPG (125.38 KiB) Viewed 1896 times
routing fun.JPG
routing fun.JPG (116.54 KiB) Viewed 1896 times
jandbsteardrop
Teardrop Advisor
 
Posts: 59
Images: 1
Joined: Thu Nov 28, 2013 8:28 am
Location: Encino, CA
Top

Re: J & B's Modified Grumman Teardrop Build

Postby jandbsteardrop » Tue Jul 29, 2014 11:35 am

Next up, routing the top edge of side walls at 1 5/8". We will sit the 1/8" birch headliner on this ledge and then put in our 2x2 spars. This should create a nice solid framing. Again - tons of routing and tons of sawdust! I'm so happy to be done with this part. We cut down our template pattern so we could route right against it. This time we epoxied the edge of the pattern before doing anything else. Then we clamped and screwed it into place.
pattern cut to now route the top for spars and headliner ledge.JPG
pattern cut to now route the top for spars and headliner ledge.JPG (123.17 KiB) Viewed 1853 times
Attachments
top routed for spars and headliner ledge.JPG
top routed for spars and headliner ledge.JPG (121.65 KiB) Viewed 1853 times
top edge routed.JPG
top edge routed.JPG (116.63 KiB) Viewed 1853 times
jandbsteardrop
Teardrop Advisor
 
Posts: 59
Images: 1
Joined: Thu Nov 28, 2013 8:28 am
Location: Encino, CA
Top

PreviousNext

Return to Build Journals

Who is online

Users browsing this forum: No registered users and 1 guest