Aero Standie Build Log

...ask your questions in the appropriate forums BUT document your build here...preferably in a single thread...dates for updates, are appreciated....

Re: Aero Standie Build Log

Postby alaska teardrop » Mon Feb 16, 2015 12:25 pm

rgambord wrote:Sure thing. I'm using a program called Autodesk Flow Design. It's free, as a student. I didn't have to prove I was a student (although I am). It allows you to import autodesk/autocad files and test them in a virtual wind tunnel. It's pretty basic, essentially what you see in the screenshot. The installation was a total nightmare, so if anyone has trouble, I might be able to help out.

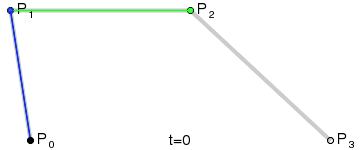
As for the curve, I don't know if you're familiar with bezier curves, but I'm using a quadratic bezier, which is defined by two line segments, which share a point:

Image

A nice feature is that the start point of the curve is tangent to the first line segment, and the end point is tangent to the second line segment. This allows me to model a perfectly smooth transition from the 90 degree front wall, to a 22 degree roof slope at the terminus. 22 degrees is widely cited in ecomodder as the "maximum" angle that maintains laminar airflow. From looking at my computer model, that does not appear to be accurate, so I'm playing around with values as I see fit.


I'm wondering if you could get a shape that 'streamlines' the front as well as providing for a less than 15 degree slope by using four waypoints, rather than three, the fourth point (P3) being at the top rear corner.

Image

The installation was a total nightmare, so if anyone has trouble, I might be able to help out.


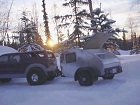
I'll take you up on that, if I may. Can you enter this picture in to your program including the wicker at the back?
Image
Image
There is an explanation of the design shape in this thread: viewtopic.php?f=27&t=51991&start=15 It would be interesting to see the results from your program.

Thank you, Fred

BTW Do you have a first name? :thumbsup:
Northern Lite Traveler design: viewtopic.php?f=27&t=51991
Minimalist torsion axle frame: viewtopic.php?f=35&t=12220
Alaska Teardrop photo gallery: http://tnttt.com/gallery/album.php?album_id=2014
Glampette photo gallery; gallery/album.php?album_id=2983&sk=t&sd=d&st=0
User avatar
alaska teardrop
Platinum Donating Member
 
Posts: 1113
Images: 177
Joined: Wed Aug 24, 2005 1:41 pm
Location: Greenville, Michigan

Re: Aero Standie Build Log

Postby rgambord » Mon Feb 16, 2015 3:09 pm

Yep, my name is Ryan.

Looks like the tail is hurting you slightly. Looks like you drive a jeep, so I stuck a 2008 cherokee in front of it. I pulled some of the dimensions from your build log. Click the images twice to see full-resolution.


No tail cD = 0.66
Image
Image

Tail cD = 0.70
Image
Image
User avatar
rgambord
Teardrop Builder
 
Posts: 46
Joined: Sun Feb 01, 2015 4:54 am
Location: Iowa

Re: Aero Standie Build Log

Postby wagondude » Tue Feb 17, 2015 8:37 am

Maybe it is just an optical illusion, but your modeling with the Subaru looks like the car is floating about a foot off the ground compared to the trailer. The model you did for Alaska Teardrop shows the Jeep on the same plane. I would think the floating vehicle would corrupt your data. Am I missing something?
Bill

TnTTT ORIGIONAL 200A LANTERN CLUB
101137
User avatar
wagondude
1000 Club
1000 Club
 
Posts: 1535
Images: 35
Joined: Sun Jan 16, 2011 7:41 pm
Location: Land of the Jayhawks
Top

Re: Aero Standie Build Log

Postby rgambord » Tue Feb 17, 2015 12:48 pm

wagondude wrote:Maybe it is just an optical illusion, but your modeling with the Subaru looks like the car is floating about a foot off the ground compared to the trailer. The model you did for Alaska Teardrop shows the Jeep on the same plane. I would think the floating vehicle would corrupt your data. Am I missing something?


I drive a crosstrek, but there are no models readily available for it, so I used a model of an impreza and raised it off the ground. A crosstrek is almost identical, except some slight changes in body layout, and it's raised ~8 inches.
User avatar
rgambord
Teardrop Builder
 
Posts: 46
Joined: Sun Feb 01, 2015 4:54 am
Location: Iowa
Top

Re: Aero Standie Build Log

Postby wagondude » Tue Feb 17, 2015 6:23 pm

OK, I figured there had to be a reason. :thumbsup:
Bill

TnTTT ORIGIONAL 200A LANTERN CLUB
101137
User avatar
wagondude
1000 Club
1000 Club
 
Posts: 1535
Images: 35
Joined: Sun Jan 16, 2011 7:41 pm
Location: Land of the Jayhawks
Top

Re: Aero Standie Build Log

Postby alaska teardrop » Wed Feb 18, 2015 12:57 pm

rgambord wrote:Yep, my name is Ryan.

Looks like the tail is hurting you slightly. Looks like you drive a jeep, so I stuck a 2008 cherokee in front of it. I pulled some of the dimensions from your build log. Click the images twice to see full-resolution.


Thanks Ryan!

I tow with a '95 Eldorado, which is much lower. The effect of the wicker (drip rail) is disappointing. I've always suspected the it should be perpendicular to the slope in order to break the boundary layer. Information on the Gurney wicker, if you're interested: http://www.formula1-dictionary.net/gurney_flap.html

Well, don't mean to hijack your thread further, but it could be fun & informative for the forum if you were to start a thread about using your program. And applying it to various teardrop shapes.

BTW Can you apply the program showing a top view?

Thanks again, Fred :thumbsup:
Northern Lite Traveler design: viewtopic.php?f=27&t=51991
Minimalist torsion axle frame: viewtopic.php?f=35&t=12220
Alaska Teardrop photo gallery: http://tnttt.com/gallery/album.php?album_id=2014
Glampette photo gallery; gallery/album.php?album_id=2983&sk=t&sd=d&st=0
User avatar
alaska teardrop
Platinum Donating Member
 
Posts: 1113
Images: 177
Joined: Wed Aug 24, 2005 1:41 pm
Location: Greenville, Michigan
Top

Re: Aero Standie Build Log

Postby rgambord » Wed Feb 18, 2015 3:18 pm

alaska teardrop wrote:
rgambord wrote:Yep, my name is Ryan.

Looks like the tail is hurting you slightly. Looks like you drive a jeep, so I stuck a 2008 cherokee in front of it. I pulled some of the dimensions from your build log. Click the images twice to see full-resolution.


Thanks Ryan!

I tow with a '95 Eldorado, which is much lower. The effect of the wicker (drip rail) is disappointing. I've always suspected the it should be perpendicular to the slope in order to break the boundary layer. Information on the Gurney wicker, if you're interested: http://www.formula1-dictionary.net/gurney_flap.html

Well, don't mean to hijack your thread further, but it could be fun & informative for the forum if you were to start a thread about using your program. And applying it to various teardrop shapes.

BTW Can you apply the program showing a top view?

Thanks again, Fred :thumbsup:


It's alright. I'm going to end up editing my first post with any trailer updates, so it's not a big deal if there's some hijacking. I'm currently waiting on an axle to arrive (brake add).

I didn't save a copy of the 3d model, but I did look at the top view, and it wasn't very interesting or informative. The vast majority of the flow just went around the vehicle and closed up nicely behind the trailer. As to the tail, I think the problem is that it's designed to provide downforce, which means you're taking air that wants to follow the terminal angle of the roof, and directing it upwards. This creates a force on the trailer that resists forward movement. I do wonder what effects it has on tongue weight at high speed, though.
User avatar
rgambord
Teardrop Builder
 
Posts: 46
Joined: Sun Feb 01, 2015 4:54 am
Location: Iowa
Top

Re: Aero Standie Build Log

Postby KCStudly » Wed Feb 18, 2015 4:40 pm

rgambord wrote:I'm going to end up editing my first post with any trailer updates...


I would vote against this practice. The forum has a bunch of nice features, icons that indicate when someone (including you) posts a new reply to each thread that viewers (like me) use to help us keep up on things. If you only ever go back and edit your first couple of posts many people will miss out on that and have a hard time following your progress. <edited to delete my reference to something that occurred in a different thread... gray cells cracking up>.

If you look at "View your posts" you will see a little sheet of paper icon on the left of each thread that you have participated in. If the icon is white there are no new posts since the last time you looked. If it is orange there are new posts. Edit a prior post and the icon stays white. Anyone posts a new reply and the icon turns orange.

$.02
Last edited by KCStudly on Wed Feb 18, 2015 8:55 pm, edited 1 time in total.
KC
My Build: The Poet Creek Express Hybrid Foamie

Poet Creek Or Bust
Engineering the TLAR way - "That Looks About Right"
TnTTT ORIGINAL 200A LANTERN CLUB = "The 200A Gang"
Green Lantern Corpsmen
User avatar
KCStudly
Donating Member
 
Posts: 9640
Images: 8169
Joined: Mon Feb 06, 2012 10:18 pm
Location: Southeastern CT, USA
Top

Re: Aero Standie Build Log

Postby MtnDon » Wed Feb 18, 2015 4:52 pm

I like the edit feature when used within a short time of the OP. Or to make a link or grammatical correction even later on. I agree that making big changes can lead to confusion. Just as adding illustrations or more detail to a previously posted message can be easily missed by someone who read it earlier or lead to confusion between the updated and later materials when read by a person new to the thread. Some forums limit the time period in which edits can be made for that reason.

More posts is not bad.
Our 6x12 deep vee nose cargo trailer camper conversion... viewtopic.php?f=42&t=58336

We have a small off grid cabin we built ourselves in the NM mountains; small PV solar system; 624 watts PV, Outback CC & inverter/charger ... http://countryplans.com/smf/index.php?topic=2335.0
User avatar
MtnDon
2000 Club
2000 Club
 
Posts: 2200
Images: 24
Joined: Sun Aug 19, 2012 10:57 pm
Location: New Mexico
Top

Re: Aero Standie Build Log

Postby rgambord » Wed Feb 18, 2015 5:41 pm

What I meant was that, at the end of my build, I plan on summarizing it in the first post under a heading that says "summary", so anyone interested in seeing what I did doesn't have to crawl through page after page. :beer:
User avatar
rgambord
Teardrop Builder
 
Posts: 46
Joined: Sun Feb 01, 2015 4:54 am
Location: Iowa
Top

Re: Aero Standie Build Log

Postby KCStudly » Wed Feb 18, 2015 9:00 pm

Oh, that is much different and can be a very useful thing! Thanks for clarifying. In fact, my build thread is so large I should do that, if not for the benefit of others, form myself so that I can find my own stuff! :lol:

Irony, I just realized I was confusing this thread with another and had to edit my previous post. doh. :?

Great stuff you are doing with the aero software. :thumbsup:
KC
My Build: The Poet Creek Express Hybrid Foamie

Poet Creek Or Bust
Engineering the TLAR way - "That Looks About Right"
TnTTT ORIGINAL 200A LANTERN CLUB = "The 200A Gang"
Green Lantern Corpsmen
User avatar
KCStudly
Donating Member
 
Posts: 9640
Images: 8169
Joined: Mon Feb 06, 2012 10:18 pm
Location: Southeastern CT, USA
Top

Re: Aero Standie Build Log

Postby MtnDon » Wed Feb 18, 2015 9:15 pm

Summary is good... maybe just index the key points with link to the key posrs. I've done that once.

)
Our 6x12 deep vee nose cargo trailer camper conversion... viewtopic.php?f=42&t=58336

We have a small off grid cabin we built ourselves in the NM mountains; small PV solar system; 624 watts PV, Outback CC & inverter/charger ... http://countryplans.com/smf/index.php?topic=2335.0
User avatar
MtnDon
2000 Club
2000 Club
 
Posts: 2200
Images: 24
Joined: Sun Aug 19, 2012 10:57 pm
Location: New Mexico
Top

Re: Aero Standie Build Log

Postby Bluebunny » Thu Feb 26, 2015 11:13 am

rgambord wrote:Here's a 12 degree taper. cD = 0.54. I'm not sure why the teardrops aren't doing as well... By the way, a simple 4' tall box has a cD of .79.
Image

Hello again rgambord, :eyebrows2:
yes, the drag coefficient is a little higher above than your taller model, but here it's working on a smaller cross sectional area, with the overall drag being about 3% less. There is also another significant difference; the taller rig has a nice elliptical curve at the transition, but the 12 degree downslope model has a much sharper radius at the transition. I suspect this more abrupt transition creates too drastic transition for the flow to stabilize and stay attached to the downslope? The flow is not unlike driving on an icy road; you've got to gently coax the critter to go where you want it to go (I think Bernoulli might have said it differently). I over-layed an equivalent circle on each model for comparison. You could probably drop the drag with a similar ellipse to the taller model? Of course if you want more height, the potential drag reduction is simply acedemic...

128918
off topic Stitch-and-Glue ply kayak build... https://www.facebook.com/media/set/?set ... 254&type=3
Bluebunny
Teardrop Master
 
Posts: 101
Images: 44
Joined: Fri Jan 30, 2015 4:21 pm
Location: northern illinois
Top

Re: Aero Standie Build Log

Postby rgambord » Thu Feb 26, 2015 1:10 pm

Bluebunny wrote:
rgambord wrote:Here's a 12 degree taper. cD = 0.54. I'm not sure why the teardrops aren't doing as well... By the way, a simple 4' tall box has a cD of .79.
Image

Hello again rgambord, :eyebrows2:
yes, the drag coefficient is a little higher above than your taller model, but here it's working on a smaller cross sectional area, with the overall drag being about 3% less. There is also another significant difference; the taller rig has a nice elliptical curve at the transition, but the 12 degree downslope model has a much sharper radius at the transition. I suspect this more abrupt transition creates too drastic transition for the flow to stabilize and stay attached to the downslope? The flow is not unlike driving on an icy road; you've got to gently coax the critter to go where you want it to go (I think Bernoulli might have said it differently). I over-layed an equivalent circle on each model for comparison. You could probably drop the drag with a similar ellipse to the taller model? Of course if you want more height, the potential drag reduction is simply acedemic...

128918


Wow, that's very helpful of you! I would be wary of the overall drag force numbers shown, because this program isn't properly scaling my models, and I'm not sure if it is scaling them all down by the same amount or not. The reason I've not been posting any updates is because I'm currently waiting for a replacement axle to add brakes/extend the wheels outside the body. I've actually had to severely reduce the height of the trailer because... it has to fit out the garage door. Doh! The new design is 80" tall from the ground, so head space ranges from 4'-5', and total height is less than 18" above my vehicle.

Here's the final design. The geometry of the roof is limited in that it must be 4' high at the rear, and less than 80" at its maximum. The front bulge can be varied, but I found this current shape to be pretty aerodynamic.

Image

Sadly, this gets a drag force of 0.317 vs 0.175 for the car without a trailer, so it looks like it's going to need 80% more fuel... However, my car model is actually an impreza which I just resized and raised off the ground a bit, so maybe that throws the calculations off. I hope.


EDIT: I realised the crosstrek was slightly off-center in the last analysis. I re-centered it and ran again, and drag dropped to 0.25 vs 0.175 for the car alone. This is in line with my calculations, using estimated frontal areas from the model. I don't know why flow analysis scales my models down to ~ 0.005 m = 6 ft, but whatever.
User avatar
rgambord
Teardrop Builder
 
Posts: 46
Joined: Sun Feb 01, 2015 4:54 am
Location: Iowa
Top

Re: Aero Standie Build Log

Postby Bluebunny » Thu Feb 26, 2015 3:23 pm

Hey! That looks pretty good! It looks like you have the roof line pretty well optimized for aero. Your profile curve is very attractive... Remember that from a top view, it is still just a brick. If the tow is wide enough, the brick acts as a filler for the tow wake, so penalty is less. And your box shows very tight to the tow, which helps the aero. Maybe watch out for tight turns tho. You'll get some more gains if you smooth the under belly...
off topic Stitch-and-Glue ply kayak build... https://www.facebook.com/media/set/?set ... 254&type=3
Bluebunny
Teardrop Master
 
Posts: 101
Images: 44
Joined: Fri Jan 30, 2015 4:21 pm
Location: northern illinois
Top

PreviousNext

Return to Build Journals

Who is online

Users browsing this forum: No registered users and 6 guests