The Lovie Build

...ask your questions in the appropriate forums BUT document your build here...preferably in a single thread...dates for updates, are appreciated....

Re: The Lovie Build

Postby lrrowe » Tue Jan 19, 2016 12:35 pm

All the posts that are like this one show very neat gaps between the door and frame. I wish I could use the router that well.
Nice job
:thumbsup:
Bob

First Post on Purchase of Trailer: http://www.tnttt.com/viewtopic.php?f=42&t=60722
Hot water infloor and radiator heating project:[url]http://www.tnttt.com/posting.php?mode=reply&f=54&t=62327[/

Image Image
User avatar
lrrowe
Donating Member
 
Posts: 3285
Images: 439
Joined: Sun Feb 10, 2013 5:54 am
Location: SW Virigina

Re: The Lovie Build

Postby jlovell25 » Thu Jan 21, 2016 3:34 pm

lrrowe wrote:All the posts that are like this one show very neat gaps between the door and frame. I wish I could use the router that well.
Nice job
:thumbsup:


Thanks Bob... The trick is to take a lot of time with the setup. I spent an entire Saturday laying out and cutting my first door. The second one was a little easier. Routers are amazing with guides.

Jim.
jlovell25
Teardrop Inspector
 
Posts: 19
Images: 34
Joined: Wed Oct 14, 2015 5:25 pm

Wall Skins

Postby jlovell25 » Tue Mar 29, 2016 10:01 am

I got the inner wall skins glued and trimmed. I could only get 4x4 sheets of birch locally so I had to try to hide the seem as much as possible.

Image

Image

Image
jlovell25
Teardrop Inspector
 
Posts: 19
Images: 34
Joined: Wed Oct 14, 2015 5:25 pm
Top

Router tear-out

Postby jlovell25 » Tue Mar 29, 2016 10:56 am

I made a mistake when I first started to flush cut the door openings after attaching the inner wall skins. I had a spiral upcut flush trim bit in my router and had some ugly tear-out. After I realized what was happening I switched to a normal flush cut bit and it was much better. I was looking at making an inner door jam so I could use a double seal on the doors. Guess this tear-out issue makes the decision for me. I think I'll build a inner door jam out of oak that matches the curve of the doors and overhangs about 1/2" for the inner door seal.

Image

Image
jlovell25
Teardrop Inspector
 
Posts: 19
Images: 34
Joined: Wed Oct 14, 2015 5:25 pm
Top

Finishing the inner walls

Postby jlovell25 » Tue Mar 29, 2016 11:43 am

After a lot of reading and some testing I decided to go with (Satin) MinWax Helmsman Spar Urethane for all of my interior wood finish. The main reason I went this route was the fact that I live in Florida and we have high humidity and condensation/mold is something that will happen here. I am doing the standard three coats with a foam brush and sanding with 220 grit between each coat. The finish is not quite as hard as I had hoped but I was sort of expecting that.

Image

Image

Image
jlovell25
Teardrop Inspector
 
Posts: 19
Images: 34
Joined: Wed Oct 14, 2015 5:25 pm
Top

Walls are up!!

Postby jlovell25 » Tue Mar 29, 2016 11:59 am

Got the walls and the rear bulkhead installed on the frame. For the glue I used PL Premium construction adhesive because I had already coated the attaching surfaces with spar urethane. I also used 2 inch coated deck screws along the floor line and again with the bulkhead. I used Kreg jig pocket screws to attach the rear bulkhead to the floor. The back side of the rear bulkhead will be inside the galley cabinets so I painted it with white interior trim paint. I will be painting all of the interiors of the cabinets with white trim paint to make them brighter inside and easier to clean.

Image

Image

Image
jlovell25
Teardrop Inspector
 
Posts: 19
Images: 34
Joined: Wed Oct 14, 2015 5:25 pm
Top

Re: The Lovie Build

Postby ELM » Tue Mar 29, 2016 12:23 pm

As my Dad always told me for 40 years. (The trim will hide it)


.
My Build journal. viewtopic.php?f=50&t=65395
User avatar
ELM
Teardrop Master
 
Posts: 277
Images: 176
Joined: Thu Nov 26, 2015 5:49 am
Location: Sutter Creek CA
Top

Galley Countertop

Postby jlovell25 » Tue Mar 29, 2016 1:01 pm
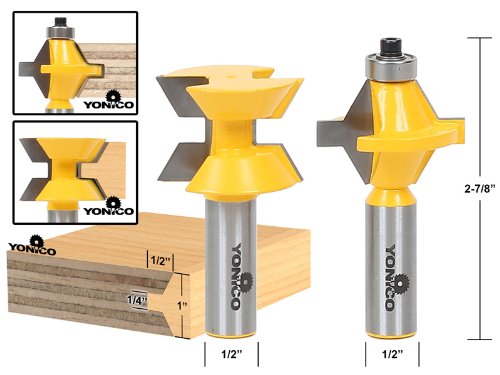
I got the counter top for the galley put together. I used 3/4" plywood with some off the shelf laminate from Lowes. For the edge I attached a piece of oak using a tongue and grove router bit set. After gluing up the laminate I put a small bevel on the edge with a 45 degree router bit and then applied some spar urethane to the oak. A portion of the counter will extend forward into the main cabin and become the bottom of the interior cabinets. I went ahead and laminated the entire thing. I figure having laminate on the bottom of the interior cabinets will work well.

Image

Image

Image
Last edited by jlovell25 on Tue Mar 29, 2016 2:28 pm, edited 1 time in total.
jlovell25
Teardrop Inspector
 
Posts: 19
Images: 34
Joined: Wed Oct 14, 2015 5:25 pm
Top

Re: The Lovie Build

Postby KCStudly » Tue Mar 29, 2016 1:09 pm

Looking good! :thumbsup: :applause:
KC
My Build: The Poet Creek Express Hybrid Foamie

Poet Creek Or Bust
Engineering the TLAR way - "That Looks About Right"
TnTTT ORIGINAL 200A LANTERN CLUB = "The 200A Gang"
Green Lantern Corpsmen
User avatar
KCStudly
Donating Member
 
Posts: 9640
Images: 8169
Joined: Mon Feb 06, 2012 10:18 pm
Location: Southeastern CT, USA
Top

Re: The Lovie Build

Postby azgreg » Tue Mar 29, 2016 4:46 pm

Love the shape of the doors.
User avatar
azgreg
Donating Member
 
Posts: 135
Joined: Mon Jan 21, 2008 10:30 pm
Top

Re: The Lovie Build

Postby TheOtherSean » Tue Mar 29, 2016 9:45 pm

Nice job! Keep up the great work.
User avatar
TheOtherSean
The 300 Club
 
Posts: 407
Images: 111
Joined: Sun May 11, 2008 9:42 pm
Location: Ohio
Top

Re: The Lovie Build

Postby S. Heisley » Tue Mar 29, 2016 10:42 pm

It's going to be a beauty! :thumbsup:
User avatar
S. Heisley
Super Lifetime Member
 
Posts: 8866
Images: 495
Joined: Mon Sep 17, 2007 10:02 am
Location: No. California
Top

Previous

Return to Build Journals

Who is online

Users browsing this forum: No registered users and 16 guests