Dusty Mark's 5 x 10 Build

...ask your questions in the appropriate forums BUT document your build here...preferably in a single thread...dates for updates, are appreciated....

Started Building the Cabinets

Postby Dusty Mark » Thu Apr 14, 2016 9:07 pm

I started cutting out 1/2" Baltic birch for all of the cabinets and the galley countertop last night. I realized that it would be best to dry assemble everything before gluing it for final assembly. This will lower the "drama" potential of having to resize a panel during the middle of a glue-up. It looks like my estimate of four sheets of 1/2" plywood is accurate.

We rode our tandem bike after work and took a break from camper building this evening. We'll be back to cutting and fitting on Friday and hopefully dry assembly on Saturday! We'll finally get a better idea of what this teardrop is going to look like...
Dusty Mark
Teardrop Master
 
Posts: 210
Images: 395
Joined: Mon Feb 29, 2016 6:57 pm

Cutting Walls and Cabinet Parts

Postby Dusty Mark » Mon Apr 18, 2016 10:09 pm

I'm deep into the final decisions stage of the build as I cut the walls and cabinet parts. This is more painstaking than I anticipated, but our marriage is surviving the process!

Image

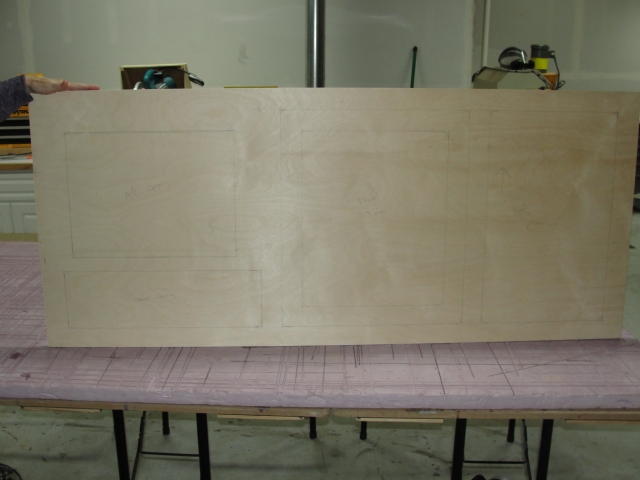
The main cabin bulkhead face frame that houses the dog kennel, air conditioner, and a small storage space.

Image

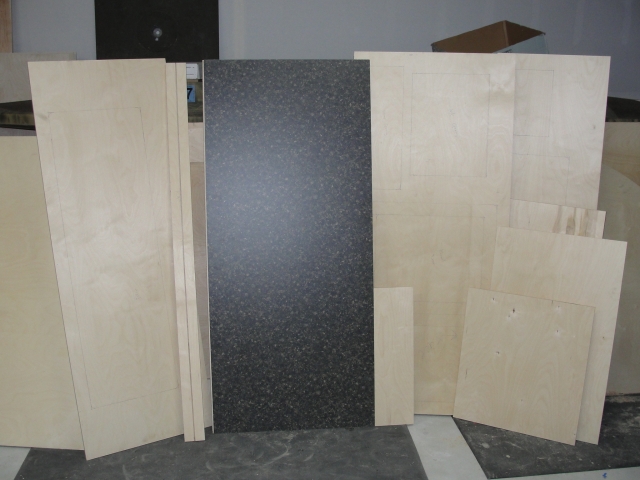
Here are the bulkheads/walls for the galley and the cabin cut and fitted. I have all of the secondary cuts marked out and am pausing to be sure this is the layout before proceeding. I still need to cut some cabinet floors and the galley upper cabinets. Notice that I've already laminated the Formica to the galley countertop.

I took the next two days off to work the final fitting to include all of the cleats. We'll see how close I get it to being ready for final assembly...
Dusty Mark
Teardrop Master
 
Posts: 210
Images: 395
Joined: Mon Feb 29, 2016 6:57 pm

Fitted the Lower Galley and Headboard

Postby Dusty Mark » Tue Apr 19, 2016 10:12 pm

I made good progress today fitting the lower galley, headboard, and some of the cabin bulkhead parts.

Image

My build is not symmetrical in the galley/cabin bulkhead area and that is proving to be quite the "mind-bender!" No major mistakes so far though.

Image

I'm using a combination of dadoes in the walls, cleats, and pocket screws to assemble the cabinets and walls. Definitely looking forward to final assembly!
Dusty Mark
Teardrop Master
 
Posts: 210
Images: 395
Joined: Mon Feb 29, 2016 6:57 pm
Top

Two Walls Up for Test Fit!

Postby Dusty Mark » Wed Apr 20, 2016 11:00 pm

I made great progress today and found out that all of my walls and panels are fitting together nicely! This is the exciting part of the build where it goes from two-dimensional to three-dimensional.

Image

Image

Upper left=air conditioner. Below a/c=storage compartment. Entire upper right side=dog kennel. Below kennel=battery storage, power control, and a couple of outlets.

Image

Left side=oven/stove on heavy duty slides. Middle=drawer and cupboard. Right=Yeti 65 cooler on heavy duty slides.

Image

I need to build out the air conditioning compartment and then I'll take it all apart to finish out installing cleats and drilling pocket holes. I'm leaning towards varnishing a lot of it prior to assembly...
Dusty Mark
Teardrop Master
 
Posts: 210
Images: 395
Joined: Mon Feb 29, 2016 6:57 pm
Top

Re: Dusty Mark's 5 x 10 Build

Postby KCStudly » Wed Apr 20, 2016 11:16 pm

Coming along nicely and looking good. :thumbsup:
KC
My Build: The Poet Creek Express Hybrid Foamie

Poet Creek Or Bust
Engineering the TLAR way - "That Looks About Right"
TnTTT ORIGINAL 200A LANTERN CLUB = "The 200A Gang"
Green Lantern Corpsmen
User avatar
KCStudly
Donating Member
 
Posts: 9617
Images: 8169
Joined: Mon Feb 06, 2012 10:18 pm
Location: Southeastern CT, USA
Top

Re: Dusty Mark's 5 x 10 Build

Postby Dusty Mark » Thu Apr 21, 2016 7:16 am

Thanks! Hoping to be done in the first week of June.
Dusty Mark
Teardrop Master
 
Posts: 210
Images: 395
Joined: Mon Feb 29, 2016 6:57 pm
Top

Progress on Front Storage Module

Postby Dusty Mark » Sat Apr 23, 2016 10:55 pm

I made some progress on the front storage module accessible through the headboard. This module is essential to us since we sacrificed almost all of our cabin bulkhead storage in favor of a 6 cubic foot dog kennel. We'll install a vertical divider and a single shelf inside the module to more neatly stack our clothes.

Image

There is 17 degree bevel on the leading edge of the trailer floor that I had to match. I'm using cleats to attach the sides to the back side of the headboard.

Image

I'm insulating the top of the storage module in the same way that I'll insulate the roof of the camper. This required a 1 5/8" ledge to support the ceiling and the roof spars. I used a 1" carbide router bit and it worked much cleaner and faster than the 1/2" spiral upcut bit I had used on the main camper walls.

Image

Here is the base of the module with cleats to attach the sides securely and a cleat to support the ceiling as it hits the floor. Notice the five 5/16" bolts that attach this module securely to the leading edge of the camper. It is also held down with two carriage bolts attached to welded tabs on the trailer frame.
Dusty Mark
Teardrop Master
 
Posts: 210
Images: 395
Joined: Mon Feb 29, 2016 6:57 pm
Top

Re: Dusty Mark's 5 x 10 Build

Postby KCStudly » Sun Apr 24, 2016 9:26 am

Looks good! :thumbsup:
KC
My Build: The Poet Creek Express Hybrid Foamie

Poet Creek Or Bust
Engineering the TLAR way - "That Looks About Right"
TnTTT ORIGINAL 200A LANTERN CLUB = "The 200A Gang"
Green Lantern Corpsmen
User avatar
KCStudly
Donating Member
 
Posts: 9617
Images: 8169
Joined: Mon Feb 06, 2012 10:18 pm
Location: Southeastern CT, USA
Top

Front Storage Module Sides Fitted

Postby Dusty Mark » Sun Apr 24, 2016 11:50 am

I fitted the front storage module sides.

Image

This is the final side profile. I like the lines...
Dusty Mark
Teardrop Master
 
Posts: 210
Images: 395
Joined: Mon Feb 29, 2016 6:57 pm
Top

Re: Dusty Mark's 5 x 10 Build

Postby TheOtherSean » Sun Apr 24, 2016 4:01 pm

Is that the supervisor in the photo? :)
User avatar
TheOtherSean
The 300 Club
 
Posts: 407
Images: 111
Joined: Sun May 11, 2008 9:42 pm
Location: Ohio
Top

The "Supervisor"

Postby Dusty Mark » Sun Apr 24, 2016 4:45 pm

Yep, Copper explored inside the camper for the first time last night. I would have had him jump into his spacious kennel, but the floor isn't fastened securely yet!

Image

Here's Copper tucked into a 14"x28" space in one of the three layout boats I built last year...
Dusty Mark
Teardrop Master
 
Posts: 210
Images: 395
Joined: Mon Feb 29, 2016 6:57 pm
Top

Storage Module Nearly Complete

Postby Dusty Mark » Mon Apr 25, 2016 10:01 pm

I skinned out the storage module, fabricated door tracks, and fitted doors and a vertical divider on the front storage module.

Image

Mary checking out the progress.

Image

I used plywood spacers to keep the door tracks parallel to each other while gluing them to the back of the headboard.

Image

View from the inside.

Image

I still need to attach the vertical divider and fit a shelf for each side.

Image

Needs some sanding, but pleased with the functionality and look of the module.
Dusty Mark
Teardrop Master
 
Posts: 210
Images: 395
Joined: Mon Feb 29, 2016 6:57 pm
Top

Air Conditioning Compartment

Postby Dusty Mark » Thu Apr 28, 2016 7:05 am

I completed some my last bit of cleating in preparation for final assembly. The dog kennel, air conditioning compartment, and small bulkhead storage compartment are ready. I also prepared the drain for the air conditioner.

Image

The dog hops up into the kennel without trouble even from the underfloor storage compartment.

Image

Here's my drain configuration. Start with a shower drain then 2" to 1" adapter, 1" to 3/4" adapter, 3/4" threaded to 3/4" sleeve adapter.

Image

I routed this freehand and am quite pleased with how it turned out. I'll seal the whole area with epoxy.

Image

I dropped the floor of the compartment 1" from front to back to facilitate drainage.

Image

I'll route the drain pipe through the ceiling of the cooler compartment, through the lower side of the kennel, into the battery compartment and out through the floor.
Dusty Mark
Teardrop Master
 
Posts: 210
Images: 395
Joined: Mon Feb 29, 2016 6:57 pm
Top

Re: Dusty Mark's 5 x 10 Build

Postby noseoil » Thu Apr 28, 2016 7:22 am

Really enjoying your build, looks very good so far & well planned.
Build log: viewtopic.php?f=50&t=60248
The time you spend planning is more important than the time you spend building.........

137905
User avatar
noseoil
1000 Club
1000 Club
 
Posts: 1820
Images: 669
Joined: Sun Apr 27, 2014 8:46 am
Location: Raton, New Mexico, living the good life!
Top

Re: Dusty Mark's 5 x 10 Build

Postby Dusty Mark » Thu Apr 28, 2016 8:18 am

Thanks! My early layout sketches have helped me stay on track, but the detailed how-to parts have been by trial and error and researching other people's builds. I'm finding Oregon Trailer's web site quite helpful.
Dusty Mark
Teardrop Master
 
Posts: 210
Images: 395
Joined: Mon Feb 29, 2016 6:57 pm
Top

PreviousNext

Return to Build Journals

Who is online

Users browsing this forum: No registered users and 26 guests