SIERRA NOMAD 1/31/11 did the mag. rack

...ask your questions in the appropriate forums BUT document your build here...preferably in a single thread...dates for updates, are appreciated....

Postby doug hodder » Sat Dec 26, 2009 3:40 pm

John...it's a flexiride axle so is fixed to the frame bottom, only the end spindles rotate.

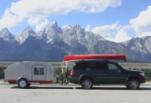
I dragged it out this morning and got a good look from the side. Here's where I was with it, (pic one). But after clowning around with it and really raising it a lot when I went to remove the tire, I could get it out if I went with my original plan on the outline.

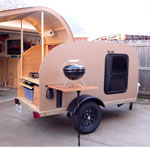
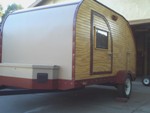
I painted it up so that the new profile could be seen better as it's a collection of arcs and pieces cut 1 at a time ( taped together) and then removed the wheel till I got to a point that I couldn't get it out. I've had the wheel off and on about 8 times this morning and I can do it with the profile in white without touching the sides......but it ain't easy. It does look more Scottiesque however. I look at it this way. If I go with the 2nd one, I can always cut away at it later, much easier than adding material. Just aft of the wheel on this side, there will be an access door to storage under the bed and battery. Doug

Image


Image
doug hodder
*Snoop Dougie Doug
 
Posts: 12625
Images: 562
Joined: Tue Dec 14, 2004 11:20 pm

Postby jhb » Sat Dec 26, 2009 4:29 pm

Now that you have a better side view (and keep in mind I'm far more engineer than artist), in your second picture, I'd start leaving the (tire white wall) circle about 2 oclock and arc forward toward the original cutout. That might give you just a scooch more room to angle the tire up into the wheel well. And like you say, it will be easier to remove material than add it if you keep that in mind when laying it out.

I went and looked up the flexride, if my leaf springs give me any more trouble I might just cut them off and go that route, it will work with the way I built my frame.
John B.
I'd rather be camping.
User avatar
jhb
Gold Donating Member
 
Posts: 516
Images: 4
Joined: Sun Sep 09, 2007 7:36 pm
Location: Los Osos, CA

Postby caseydog » Sat Dec 26, 2009 4:46 pm

doug hodder wrote:It's not my real favorite...but that's what the practice stuff is for. I had an earlier version made, but the wheel couldn't be removed without fighting it. With it the way it is now. I can just make up more templates (smaller) and stack them over the existing opening and play with the look. Scotties had a little sharp point on the front of the opening. I need to clank around some vintage trailer sites and get some more ideas on the opening. Doug


I tend to agree that the big round cutout looks out of character.

You wouldn't have to make it just like a Scotty. What about something similar to the old Ford Fairlane wheel arches...

Image

The start round, and have a "fastback" finish to them. :thinking:

CD
Image

My build journal is HERE
User avatar
caseydog
Platinum Donating Member
 
Posts: 12420
Images: 515
Joined: Tue Jan 16, 2007 1:44 pm
Top

Postby halfdome, Danny » Sat Dec 26, 2009 9:46 pm

Doug how about making a removable fender flare to fill in your wheel opening. Like maybe a 3/4" piece to your desired shape with bullnose edges. Use something like hanger bolts with wing nuts to remove it in the event of a flat. It could be a design element that you could paint with your accent color. It would give your sides some definition instead of flat walls.:D Danny
ImageImage
"Conditions are never just right. People who delay action until all factors are favorable do nothing". William Feather
Don't accept "It's Good Enough" build to the best of your abilities.
Image
Teardroppers Of Oregon & WashingtonImage
User avatar
halfdome, Danny
*Happy Camper
 
Posts: 5894
Images: 252
Joined: Sun Aug 14, 2005 11:02 pm
Location: Washington , Pew-al-up
Top

Postby bdosborn » Sat Dec 26, 2009 10:01 pm

Doug,

Looks great! I like the inside-out build approach. I don't know why but I don't get email updates on your thread even though I'm watching it. I'll have to remember to check back in more often as your builds are always a favorite of mine.

Bruce
2009 6.5'X11' TTT - Boxcar
All it takes is a speck of faith and a few kilowatts of sweat and grace.
Image
Boxcar Build
aVANger Build
User avatar
bdosborn
Donating Member
 
Posts: 5594
Images: 806
Joined: Wed May 05, 2004 11:10 pm
Location: CO, Littleton
Top

Postby teardrop_focus » Sun Dec 27, 2009 11:05 am

doug hodder

Image


Image


By Jove! I think he's got it!

:pipe:
.
Image

"There is something about these little trailers that brings out the best in people." - BigAl, Scotland, 2010

"Climb the mountains and get their good tidings. Nature's peace will flow into you as sunshine flows into the trees...
The winds will blow their own freshness into you and the storms their energy, while cares will drop away like autumn leaves..." - John Muir, 1898


Chris Squier / teardrop_focus :-)~
User avatar
teardrop_focus
Donating Member
 
Posts: 5975
Images: 127
Joined: Sat Apr 11, 2009 3:18 pm
Location: SoCal
Top

Postby Miriam C. » Sun Dec 27, 2009 9:02 pm

teardrop_focus wrote:
doug hodder

Image


Image


By Jove! I think he's got it!

:pipe:


:thumbsup: :applause: Much better!
“Forgiveness means giving up all hope for a better past.â€
User avatar
Miriam C.
our Aunti M
 
Posts: 19675
Images: 148
Joined: Wed Feb 15, 2006 3:14 pm
Location: Southwest MO
Top

Postby satch » Sun Dec 27, 2009 11:54 pm

Image
I like this better :D
If it itches. scratch it
Rick
User avatar
satch
Donating Member
 
Posts: 1198
Images: 63
Joined: Thu Feb 07, 2008 9:46 pm
Location: the arm pit of Cali
Top

Postby jhb » Mon Dec 28, 2009 12:21 am

satch wrote:I like this better :D
That doesn't look like Doug... :lol:
John B.
I'd rather be camping.
User avatar
jhb
Gold Donating Member
 
Posts: 516
Images: 4
Joined: Sun Sep 09, 2007 7:36 pm
Location: Los Osos, CA
Top

Postby Chip » Mon Dec 28, 2009 8:51 am

NOOOOOOOOOOOOO!!!! I think ya just ruined campin for me for life,,,,
Living large,,,travling small !!!
54"x9'4" tear
4'x8' tear
Serro Scotty rebuild(in progress)
User avatar
Chip
2000 Club
2000 Club
 
Posts: 2534
Images: 49
Joined: Sat Apr 17, 2004 7:33 pm
Location: Greenville, S.C.
Top

Postby doug hodder » Thu Dec 31, 2009 11:07 pm

I picked up the side ply the other day and tonight got it all cut into pieces and glued up. I splined it together and glued it with epoxy. Dimensions are 6'4" x 11'. Plan is to get them cut to shape tomorrow and trial fit up. Then paint. I wasn't too careful with the epoxy on the face of them since they get painted anyway and used a squeegee to take care of the squish.

Image
doug hodder
*Snoop Dougie Doug
 
Posts: 12625
Images: 562
Joined: Tue Dec 14, 2004 11:20 pm
Top

Postby prohandyman » Fri Jan 01, 2010 7:59 am

Doug
Where did you get your profile drawing from?
Dan
155200 Facebook group 164774163701
User avatar
prohandyman
Super Lifetime Member
 
Posts: 1919
Images: 785
Joined: Fri Dec 22, 2006 3:21 pm
Location: Greenwood, IN
Top

Postby doug hodder » Fri Jan 01, 2010 10:41 am

Dan, I have a friend with a Scotty that I took some side pics of to help, but my profile is mostly one that I cooked up. Doug
doug hodder
*Snoop Dougie Doug
 
Posts: 12625
Images: 562
Joined: Tue Dec 14, 2004 11:20 pm
Top

Postby John T. Hodgen » Sun Jan 03, 2010 10:03 am

Hey Doug,
I just caught up with your build! I knew you was building and seen the first thought thread and color boomerang stuff. The Nomad? I love the trailer and color, my thought of that is--where is the pinstripping?? It would get the Troops on their knees checking it out! Love the whole concept, keep up the great work and I really like your "Diner Rail"!!!
Til later by the fire--John T. & Linda
8) Kewl Stuff!!!!!
User avatar
John T. Hodgen
The 300 Club
 
Posts: 415
Images: 8
Joined: Thu Jul 24, 2008 5:50 am
Location: Summersville, West Virginia
Top

Postby doug hodder » Sun Jan 03, 2010 7:00 pm

Here's the Sunday update: Steve E came by and helped me wrestle the sides around and we spent most of one day measuring and creating the profile, lots of armwaving, discussion and yucks. We plotted the coordinates, but after they were on the side, we decided to take a piece of lexan and use it as a template to smooth them all out a bit.

We trial fit the door side that day. That night I did the final cut on the profile, cut the doors and windows, flopped the other side down and traced it out and cut it also. A pick hook on the ceiling helps jockeying them around by myself.

Puttied up any visible crack from the splining, primed/ painted and got them speckled this morning. Mid afternoon, we got them up on the side and braced off across the top. I'm so glad to get this portion done. Big heavy sheets of goods are a drag to clown around with. I was so thankful that Steve came by to help on the first day and again today to help set them. I would have been sunk without another person. Thanks Steve!

The windows will be painted on the outer edge so they don't look so massive. They will also have all the corners raidused on them.

In case anyone is wondering....NO...it won't fit out the door as it sits, I'm shy about an inch. I'll wait till it comes time to pull it out to paint the roof material and at that point I'll have a better idea on how it's really going to sit as most all the weight will be on it then. I'm thinking of making the trim piece on the header of the garage removable. Cut it, and hinge it so that it will swing out of the way. I'd like to not have to drop it any lower, but can on the flexiride, maybe 1 spline.

Next step, build the upper portion of the galley and the front seats/table. Doug

Image

Image

Image
doug hodder
*Snoop Dougie Doug
 
Posts: 12625
Images: 562
Joined: Tue Dec 14, 2004 11:20 pm
Top

PreviousNext

Return to Build Journals

Who is online

Users browsing this forum: No registered users and 19 guests