Regal Eagle Done! Video Tour 6/29/15

...ask your questions in the appropriate forums BUT document your build here...preferably in a single thread...dates for updates, are appreciated....

Re: Regal Eagle for 4- 1/15/15 Trim Started

Postby Gunguy05 » Thu Jan 15, 2015 12:47 pm

S. Heisley wrote:Brian, this is just an idea and I may be way off base; but, it looks to me like you're going to have to put some sort of wooden framework around each window, on the inside. :thinking:

So, what I would try to do is, first, cut out that wood framework out of some fairly sturdy wall-matching wood or plywood, making it reasonably thick and wide so that it will be at least twice as wide as the depth of your window's lip area and will have stable room for a few screws. (Second explanation: It should be wide enough so that the inside of the framework curve will be in the shape of your outside window opening but the outside of the framework curve will overlap the edge of the inside wood wall far enough to be able to secure it with screws.) Once this has been cut to shape, steam or otherwise curve the framework to match the curve of the window opening. Next, put the weather stripping around the edge of the window "glass", instead of in the window opening. If that works, you should be able to push the lightly warmed window, with the weather stripping around it, into the opening and secure it in place with the wooden window framework. If this works, you should be able to undo the window framework and take out the window and weather strip so that you can add a beading of an RV sealant of your choice and then re-install it all. What do you think? Wouldn't that work?

If you want to try it, I think I would make a separate little prototype window/wall and try a small version on that first, instead of on your actual cabin, just to be on the safe side.


I will see how it goes. I have been going over this, and some other possibilities in my head. Putting it on hold until the end of the build. Thanks for the input. It's always good to see other ideas.

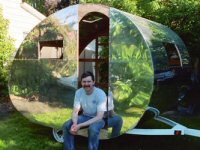
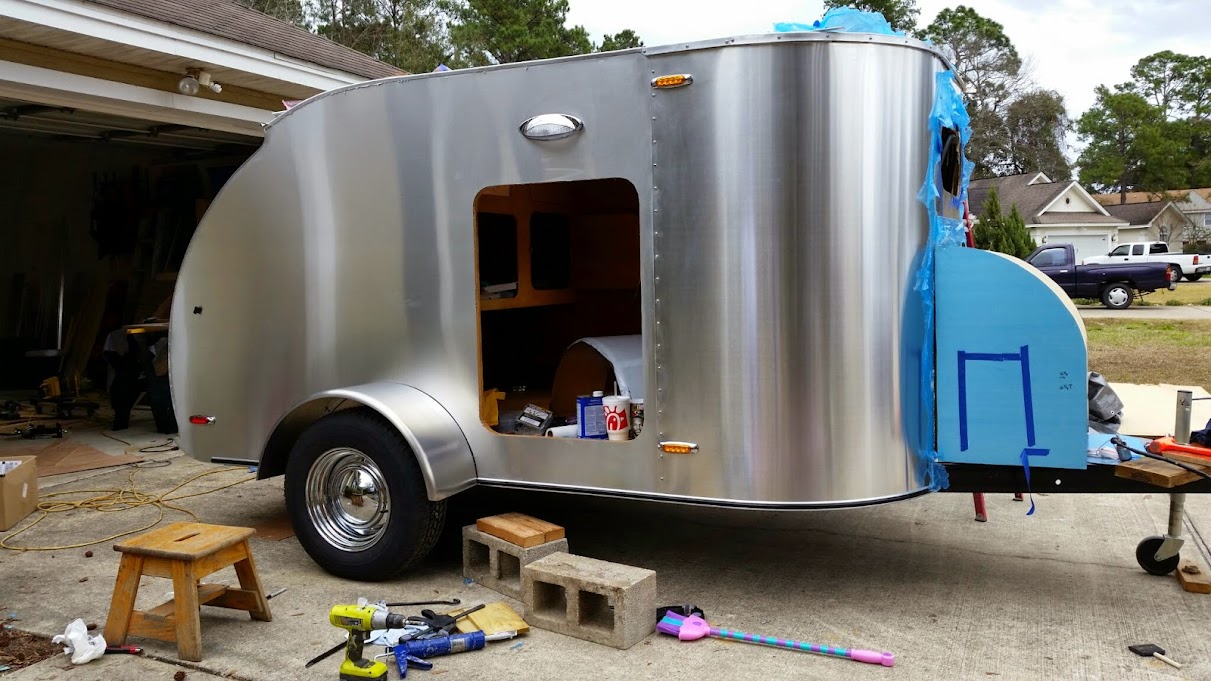
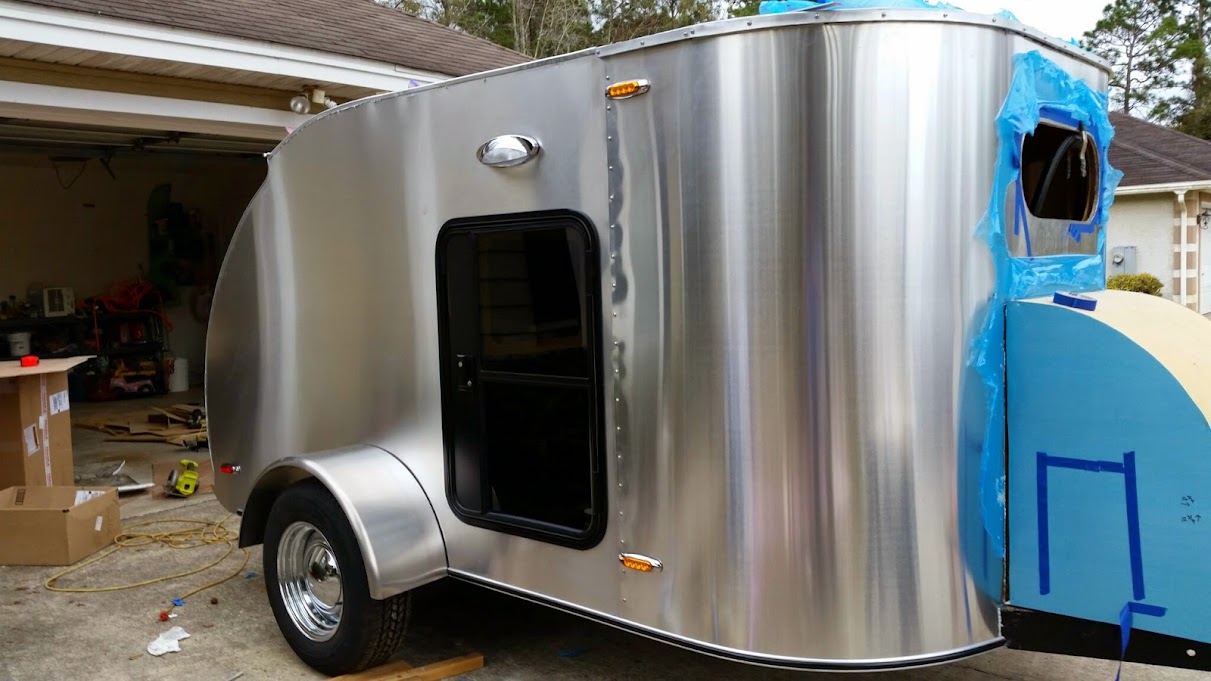
Pressing onward. We got in most if not all of the parts that we need to get things campable for our now planned FEB 6th camping trip!!
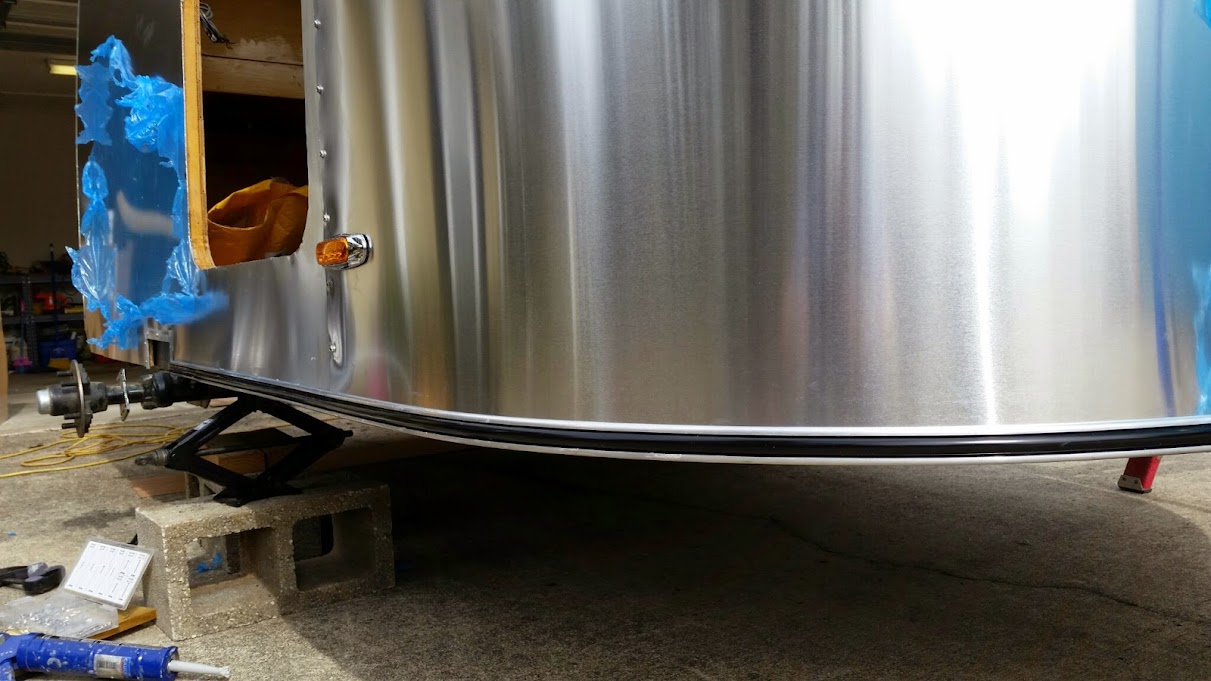
Trim

Image

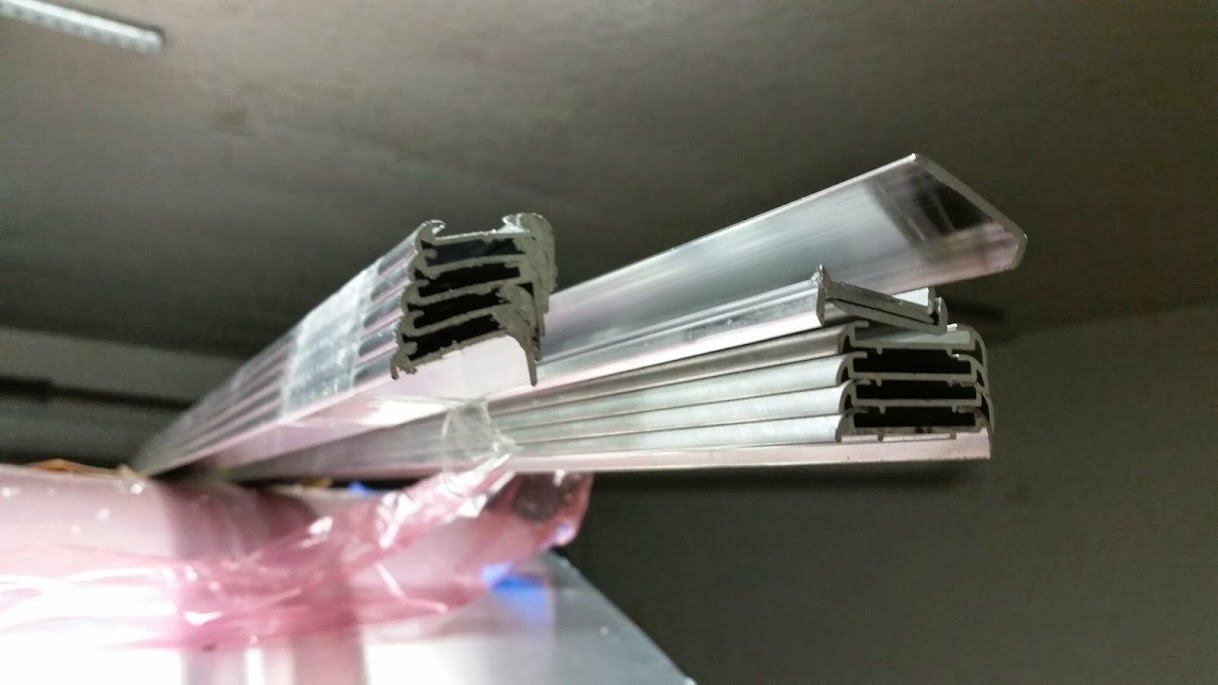
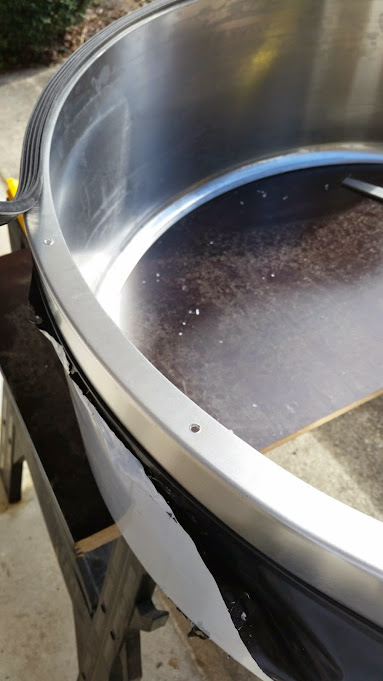
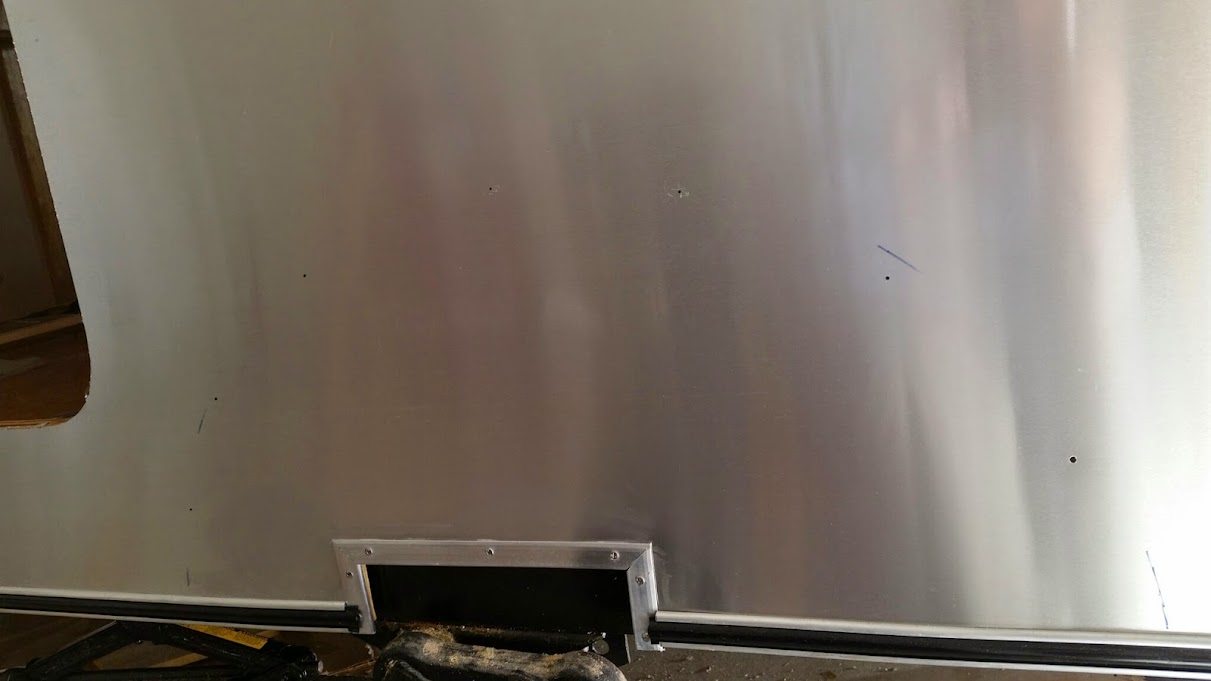
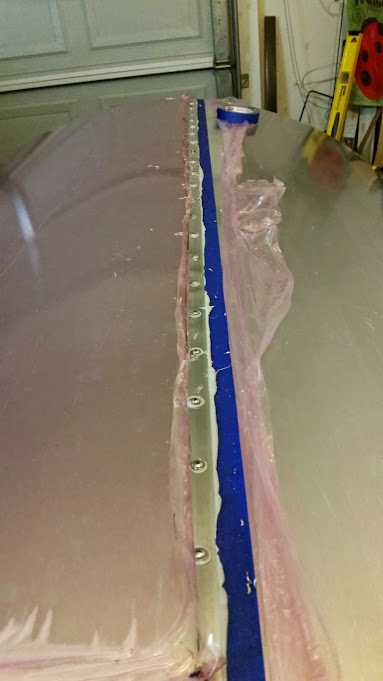
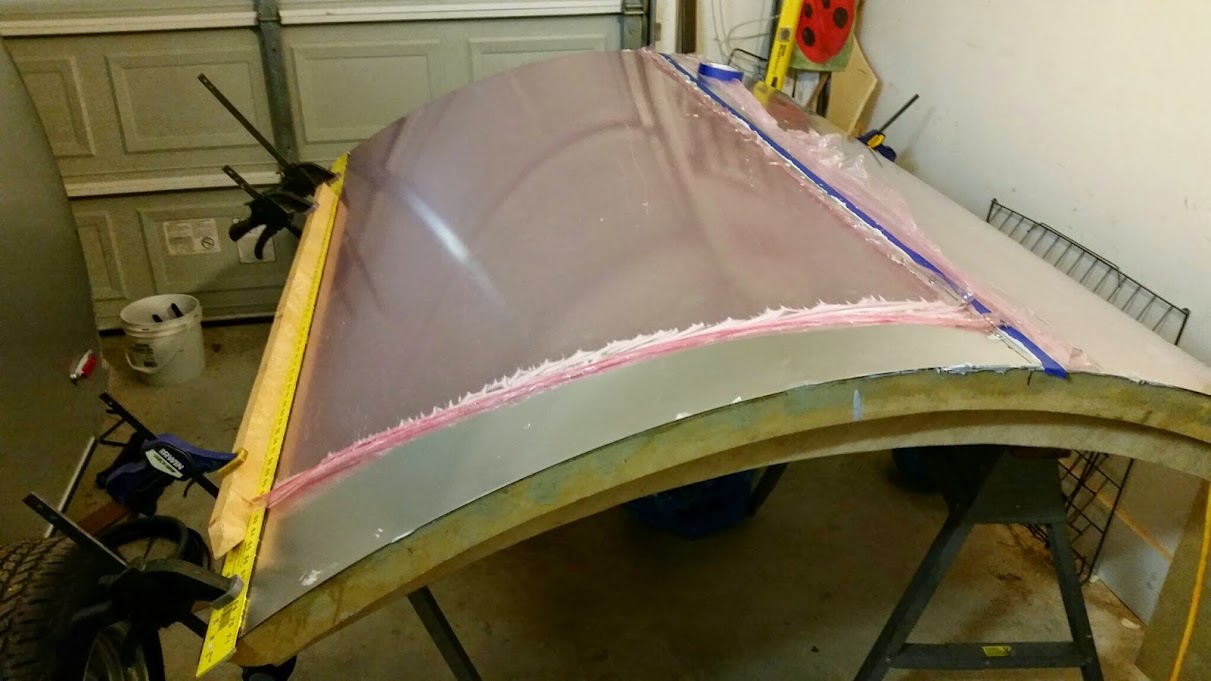
I painted the seal area with black bed liner paint that I got from harbor freight . The same stuff that I used on the bottom of the box. This, along with the CPES underneath it, should keep the wood protected, and make things finish off nice. Still have to bend and fit the aluminum edge trim here, but no photo of that right now.

Image

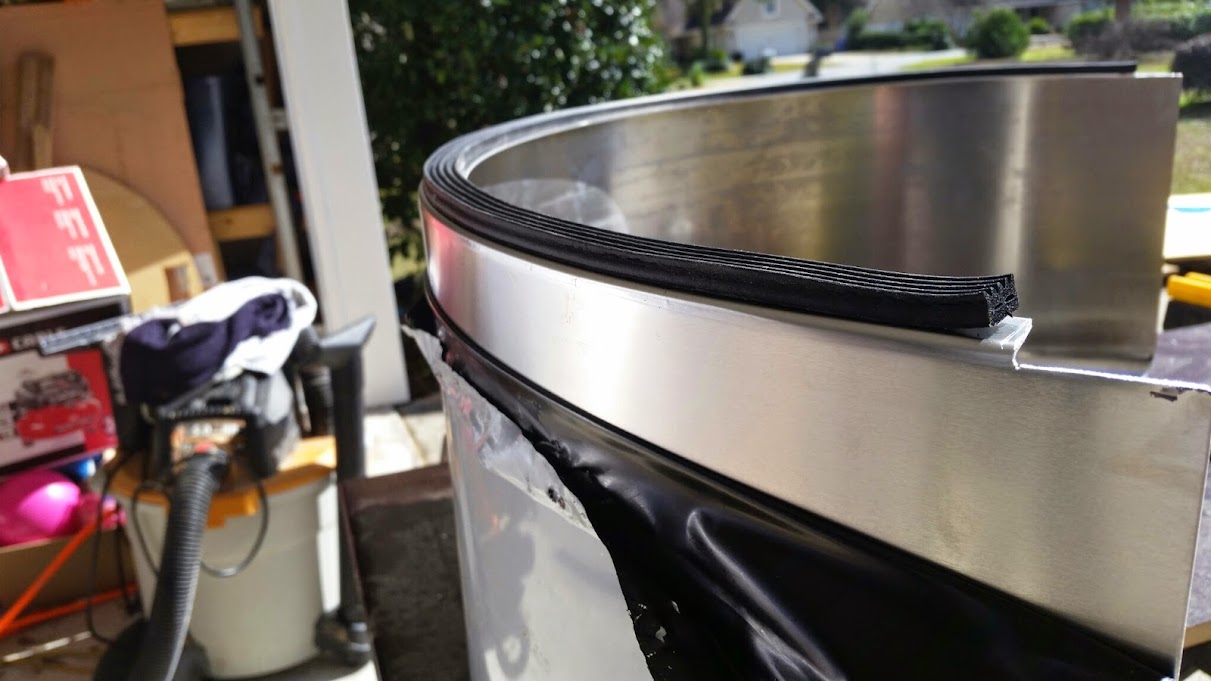
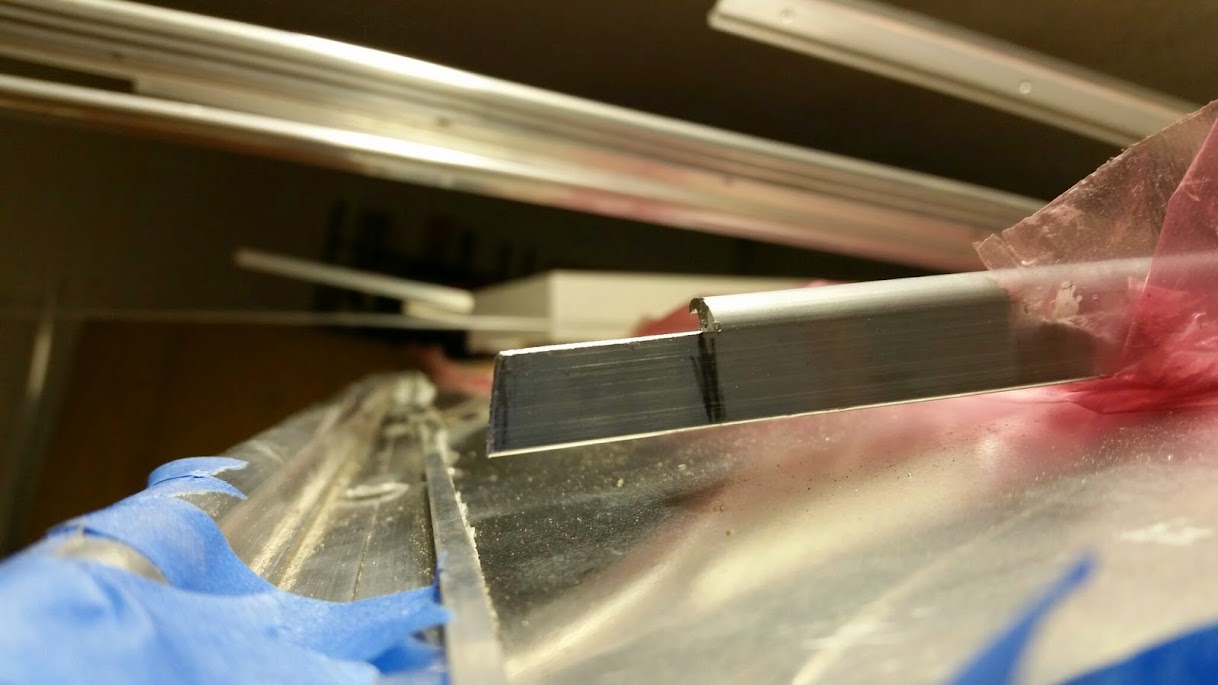
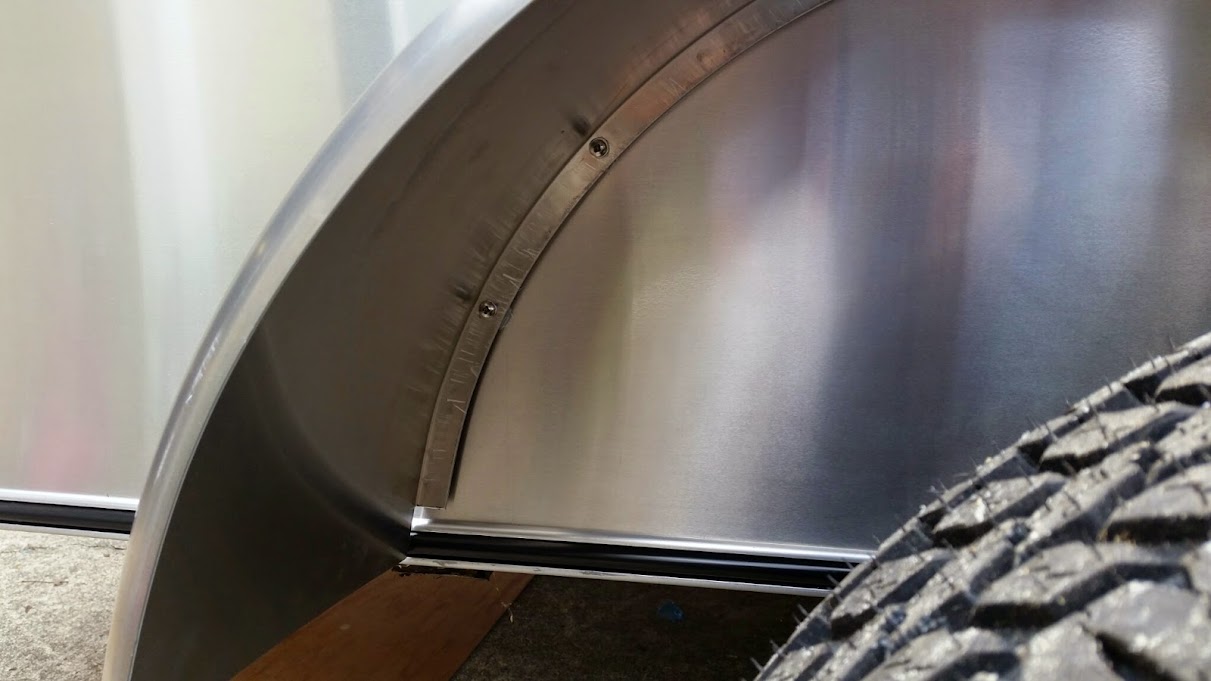
Decided to try and fit in the top edge piece on the flat part of the side. Pretty straight forward.

Image

Image

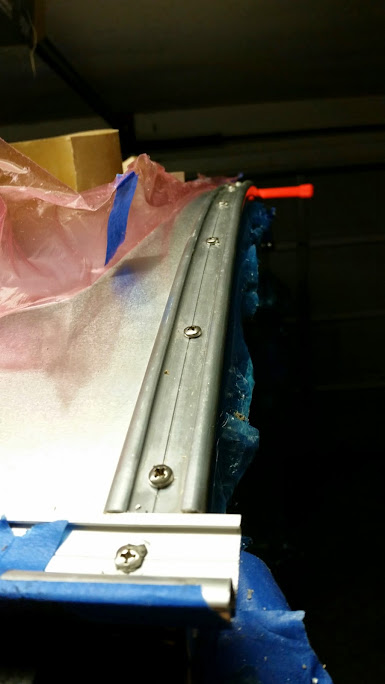
Did a little more work last night. Got one of the side seal trim pieces done, also attached the roll pan and both rear running lights (the wires had to be ran through the roll pan after it was attached).

Should have a lot of time on Sat and Sunday afternoon, and some Monday to work. Want to get most of trim and hatch done this next week.. we will see. :shock: :shock:

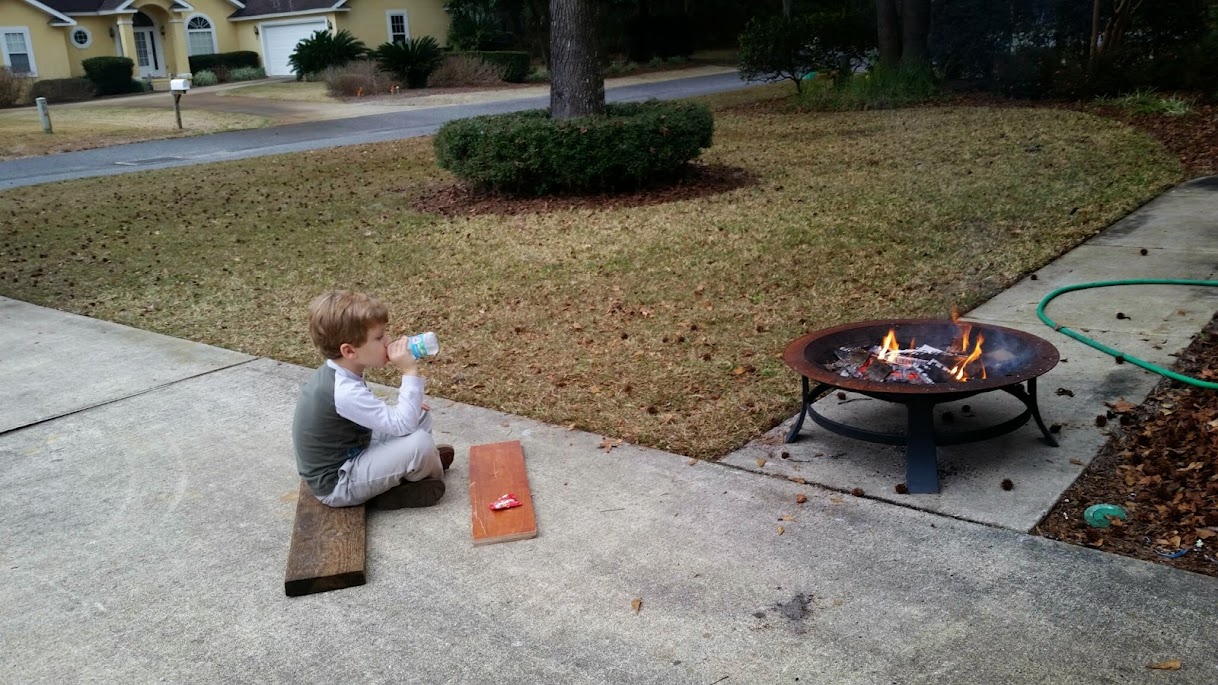
And lastly what do you do while dad is working on the camper? Go sit by the fire with some skittles and water. I joined him later for a little pre-camping campfire :thumbsup: :thumbsup:

Image
Brian


Checkout my buildThe Regal Eagle Bow front for 4
Image
Also my teardrop updates from blog on Dad Rambles
User avatar
Gunguy05
The 300 Club
 
Posts: 385
Images: 6
Joined: Mon Dec 02, 2013 4:45 pm
Location: South GA

Re: Regal Eagle UPDATE 1/15/15 Trim Started

Postby KCStudly » Thu Jan 15, 2015 2:20 pm

Nice work. Kid sure looks ready!
KC
My Build: The Poet Creek Express Hybrid Foamie

Poet Creek Or Bust
Engineering the TLAR way - "That Looks About Right"
TnTTT ORIGINAL 200A LANTERN CLUB = "The 200A Gang"
Green Lantern Corpsmen
User avatar
KCStudly
Donating Member
 
Posts: 9616
Images: 8169
Joined: Mon Feb 06, 2012 10:18 pm
Location: Southeastern CT, USA

Re: Regal Eagle UPDATE 1/15/15 Trim Started

Postby Gunguy05 » Mon Jan 19, 2015 12:18 am

Had a good bit of time to work on things this weekend!

First. Got the trim pieces done along the bottom. We went back and forth on this, but decided that the insert trim at the bottom would set things off a bit. Since the camper is so big, I don't think it took anything away from it. We had cutouts where the axle met the side wall, so we framed those out first since everything on the side would bump up to them.

Image

Next was to run the pieces just forward of, and rearward of the axle. Pretty simple. Just bend, measure 5 times, and cut. The screw, screw, screw it into place. After that we added the insert trim (black), and stood back for a shot.. MAN that's good stuff right there. 8) 8) :D

Image

Next was to attach the fenders. When I framed the walls up, we put 1x4's in the walls to serve as backing for these. You can see in the 1st photo above my scribble marks as to where they were at. We measured off of those for the screw spacing, and then screwed them into place. I used a small stain can (3" high) as my spacing off of the top of the tire. This is what dexter recommends as the bump clearance above the tire. Just set the on top of the can, mark around the edges, then remove the tire, mark holes in the back flange, drill and then mark holes in camper wall and pre drill.

I went back and forth as to how to attach these. I have seen numerous people attach them with carriage bolts through the walls. This would have worked just fine, but I didn't feel like we really needed that. I asked around and got as may suggestions as responses, but at the end of the day decided to got with #10 x 1" SS screws and washers. Just seemed simple to me, and the heads won't show inside. The Aluminum fenders are really light too.. probably only 3-4 lbs apiece.

At the end of the day, I can stand on the fenders if I want and won't worry about it. If these babies fall off I have other (bigger) issues.

I didn't get a photo, but on the back of the fenders I attached rubber gasket material that I'm using for my hatch seal as well. It made a nice (squeak free) seal to the side of the trailer. I also sealed all of the screws in the walls by dipping them in OSI sealant before screwing them in. We were going to paint the fenders, but now I'm glad we didn't. I guess if they get scratched up we can at a later date. BUT I really like the clean simple look of the aluminum fenders.

Image

Image

Next up was the doors. I had to pre drill ( I think I saw someone else here mention it) the V channels where the screws bite into the door frames. I still snapped the head off of one screw, but otherwise it went well.

Image.

Next up was the hatch. Using 2 pieces of 6 ft wide aluminum here. Will have a seam just above the lights. Finished it off just like the rest, sealant, screws/washers. Spaced them 3" apart. Going to let this dry for tonight, them maybe a little more tomorrow as I'm off work and should have a little "camper time". :thumbsup: :shock: :D :D

Image

Image
Brian


Checkout my buildThe Regal Eagle Bow front for 4
Image
Also my teardrop updates from blog on Dad Rambles
User avatar
Gunguy05
The 300 Club
 
Posts: 385
Images: 6
Joined: Mon Dec 02, 2013 4:45 pm
Location: South GA
Top

Re: Regal Eagle UPDATE 1/15/15 Trim Started

Postby S. Heisley » Mon Jan 19, 2015 12:33 am

It's going to be gorgeous.....It already is! :thumbsup:
User avatar
S. Heisley
Super Lifetime Member
 
Posts: 8774
Images: 495
Joined: Mon Sep 17, 2007 10:02 am
Location: No. California
Top

Re: Regal Eagle UPDATE 1/15/15 Trim Started

Postby dales133 » Mon Jan 19, 2015 12:38 am

Looking fantastic great shape and attention to details awsum
User avatar
dales133
4000 Club
4000 Club
 
Posts: 4605
Images: 1
Joined: Mon Oct 13, 2014 5:26 pm
Top

Re: Regal Eagle UPDATE 1/15/15 Trim Started

Postby KCStudly » Mon Jan 19, 2015 12:39 am

That insert molding along the bottom was not at all a bad way to go. It looks great with the fenders on!!!

:thumbsup:

So close now.
KC
My Build: The Poet Creek Express Hybrid Foamie

Poet Creek Or Bust
Engineering the TLAR way - "That Looks About Right"
TnTTT ORIGINAL 200A LANTERN CLUB = "The 200A Gang"
Green Lantern Corpsmen
User avatar
KCStudly
Donating Member
 
Posts: 9616
Images: 8169
Joined: Mon Feb 06, 2012 10:18 pm
Location: Southeastern CT, USA
Top

Re: Regal Eagle UPDATE 1/15/15 Trim Started

Postby Sheddie » Mon Jan 19, 2015 2:07 am

Great work Brian, looking really good. :applause: :thumbsup:
User avatar
Sheddie
1000 Club
1000 Club
 
Posts: 1499
Images: 1129
Joined: Mon Jul 01, 2013 3:26 pm
Location: Whangarei, New Zealand
Top

Re: Regal Eagle UPDATE 1/15/15 Trim Started

Postby felixx » Mon Jan 19, 2015 5:57 am

beautiful trailer!
Well done, I hope mine looks as smart
felixx
Donating Member
 
Posts: 644
Images: 22
Joined: Sun Nov 30, 2014 3:01 pm
Location: Christchurch, New Zealand
Top

Re: Regal Eagle UPDATE 1/15/15 Trim Started

Postby ryuandwings » Mon Jan 19, 2015 8:51 am

Great work!! :thumbsup: :applause:
I really like the fender, trims, aluminum skin..., ok, I like all of them!

Almost there! :D
User avatar
ryuandwings
Teardrop Master
 
Posts: 187
Images: 61
Joined: Wed Feb 13, 2013 5:22 am
Location: West Tennessee
Top

Re: Regal Eagle UPDATE 1/15/15 Trim Started

Postby aggie79 » Mon Jan 19, 2015 10:53 am

Brian,

Your teardrop and work is jaw-droppingly gorgeous! :applause: :thumbsup: :applause: The aluminum looks fantastic!

Take care,
Tom
Tom (& Linda)
For build info on our former Silver Beatle teardrop:
Build Thread

93503
User avatar
aggie79
Super Duper Lifetime Member
 
Posts: 5405
Images: 686
Joined: Tue Aug 07, 2007 5:42 pm
Location: Watauga, Texas
Top

Re: Regal Eagle UPDATE 1/15/15 Trim Started

Postby Gunguy05 » Mon Jan 19, 2015 11:02 am

S. Heisley wrote:It's going to be gorgeous.....It already is!

Thank you!
dales133 wrote:Looking fantastic great shape and attention to details awsum

Thank you. I think the details are bringing it all together.
KCStudly wrote:That insert molding along the bottom was not at all a bad way to go. It looks great with the fenders on!!!


So close now.

Thanks KC. We went back and forth weather to cut the fenders or the trim to make it sit correctly. Glad we notched the fenders!
Sheddie wrote:Great work Brian, looking really good. :applause:

Thank you!
felixx wrote:beautiful trailer!
Well done, I hope mine looks as smart

The you felixx. I'm sure it will just keep chugging away.
ryuandwings wrote:Great work!! :applause:
I really like the fender, trims, aluminum skin..., ok, I like all of them!

Almost there! :D

Thank you! It's nice to see it all out together.
aggie79 wrote:Brian,

Your teardrop and work is jaw-droppingly gorgeous! :applause: :applause: The aluminum looks fantastic!

Take care,
Tom

Thank you Tom. I'm sure you recognize certain aspects of the design .

PS we are planning a trip that will end up in TX for later in the summer. Might have to come checkout th SB in person.
Brian


Checkout my buildThe Regal Eagle Bow front for 4
Image
Also my teardrop updates from blog on Dad Rambles
User avatar
Gunguy05
The 300 Club
 
Posts: 385
Images: 6
Joined: Mon Dec 02, 2013 4:45 pm
Location: South GA
Top

Re: Regal Eagle UPDATE 1/15/15 Trim Started

Postby tony.latham » Tue Jan 20, 2015 12:44 am

Tom says, Jaw-dropping. I think it's closer to smoking-jaw-dropping. :thumbsup: :pictures: :beer:

T
User avatar
tony.latham
Gold Donating Member
 
Posts: 6916
Images: 17
Joined: Mon Jul 08, 2013 4:03 pm
Location: Middle of Idaho on the edge of nowhere
Top

Re: Regal Eagle UPDATE 1/15/15 Trim Started

Postby Gunguy05 » Tue Jan 20, 2015 4:21 pm

tony.latham wrote:Tom says, Jaw-dropping. I think it's closer to smoking-jaw-dropping. :thumbsup: :pictures: :beer:

T


Thank you Tony. You help has been greatly appreciated throughout the build as well.
Brian


Checkout my buildThe Regal Eagle Bow front for 4
Image
Also my teardrop updates from blog on Dad Rambles
User avatar
Gunguy05
The 300 Club
 
Posts: 385
Images: 6
Joined: Mon Dec 02, 2013 4:45 pm
Location: South GA
Top

Re: Regal Eagle UPDATE 1/15/15 Trim Started

Postby teardropcastle » Sat Jan 24, 2015 8:48 am

Wow! That is a superb looking teardrop. I sure appreciate all the pictures...gives me some ideas for my (HOPEFULLY SOON) build.
v/r
jd

Camping with kids is fun and crazy -- love it while it lasts...
User avatar
teardropcastle
Teardrop Inspector
 
Posts: 4
Joined: Sat Jan 04, 2014 6:03 am
Top

Re: Regal Eagle UPDATE 1/15/15 Trim Started

Postby Gunguy05 » Sat Jan 24, 2015 11:30 pm

teardropcastle wrote:Wow! That is a superb looking teardrop. I sure appreciate all the pictures...gives me some ideas for my (HOPEFULLY SOON) build.


Thank you!. I have learned A LOT from reading through numerous build threads on tnttt. Great info here. Good luck on staring your build.

We worked today on the other fender, and getting a prop system in place for the hatch. Originally we were going to install gas struts (and still may at some point), but simplicity is the name of the game right now.

We decided to place a cleat on each of the sides of the galley counter that would accept a 1x3 oak board as a prop. The hatch is a BEAST so we wanted to make sure it was sturdy. If it falls, it could impart serious, serious harm on anyone under it.

We make the cleats out of 1x6 oak and screwed them into place. We will plug and varnish the holes soon.

Image

At the top (hatch side) of things we cut a notch in the 1x3 oak so that it would lock into the board.

Image

Put it all together, and repeat for the other side, AND rounded the edges of the board over with a router, and viola!

Image

The hatch weighs I would guess 75 lbs. It was 55 before the aluminum, so I think 75 is a fair guess at this point.

IT IS STURDY! I would easily be able to do pull ups on it, and I can rock the trailer side to side quite a bit just by pulling on the rear tongue of the hatch. This baby ain't going anywhere.

Also, we put the other fender on. Figured I would detail that a little bit.

We spaced them 3 in off the top of the tires, and drilled holes about every 6in around the arc of the inner flange. Turns out a small (sample size) paint can is right at 3" tall and works great to set them on.

Image

Marked those holes and predrilled. Also, we notched both the front and back sides to allow the trim to pass through.
Image

Used some of the same gasket material as we are using on the hatch seals for the welting. It isn't what it is designed for, but it was local, and it seemed to work quite well. I used a soldering iron to burn through the predrilled holes. This lessened the twisting of the gasket material by the screws as it was screwed down against the side of the trailer.

Image

Image

Image


Used #10 1" screws and flat washers to install them. Also, didn't get a photo, but we put a shot of OSI quad in each one of the screw holes before installation to keep water out
Brian


Checkout my buildThe Regal Eagle Bow front for 4
Image
Also my teardrop updates from blog on Dad Rambles
User avatar
Gunguy05
The 300 Club
 
Posts: 385
Images: 6
Joined: Mon Dec 02, 2013 4:45 pm
Location: South GA
Top

PreviousNext

Return to Build Journals

Who is online

Users browsing this forum: No registered users and 9 guests