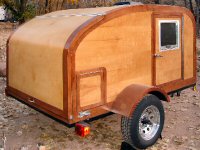
The LT... Thomas' Luxury Tent

...ask your questions in the appropriate forums BUT document your build here...preferably in a single thread...dates for updates, are appreciated....

Postby jdarkoregon » Sun Nov 16, 2008 5:22 pm

BUT OMG, its beautiful

John
Last edited by jdarkoregon on Wed Nov 19, 2008 8:45 pm, edited 1 time in total.
Innovation is essential
The world can be better
ImageImage
User avatar
jdarkoregon
Donating Member
 
Posts: 1237
Images: 47
Joined: Mon Aug 22, 2005 7:07 pm
Location: Oregon, Sublimity

Postby rhltechie » Sun Nov 16, 2008 5:37 pm

:applause: awesome thomas!! It looks really good. Is that aluminum sheets or what? Keep on truckin brutha!! :thumbsup:
User avatar
rhltechie
The 300 Club
 
Posts: 378
Images: 49
Joined: Sat Aug 16, 2008 9:11 am
Location: South Carolina

Postby 2bits » Sun Nov 16, 2008 8:25 pm

Thanks alot guys!

Yeah, I think I might remove the racing stripes too :lol:

Yup it is .040 black aluminum, it bends really well. I am not too worried about the black being too hot. Since this is Texas, so when it is hot, it is hot no matter where you are or what color you are in , :cry: I don't plan on doing any camping when it is really hot anyway. I got a smokin deal on the sheets ($40 ea) and yes it looks awesome. My truck is black too, so they match and I got Air Conditioning in both! :thumbsup:

I did the annealing on the trim at first, and it took a LONG time using a propane torch and I apparantly missed a couple of spots where it was bending at different rates. When I did the other side, I put it on top and started working it down, and figured once it started to get tough, I would stop bending and anneal from there down, but I kept going and going and going until it was all bent! I didn't need to anneal the other side at all! I liked it so much being how smooth it was, I put the first one I did up on the shelf and got a new piece and just bent it fresh without any annealing and it bent all the way down just fine too, so that was cool. I was sure with my radius I would need to, but I didn't. I still might need to on the hatch but we will see when I get to that. I liked that it was all one piece too.

I am really glad I got this trim with the screw covering vinyl insert. It really makes it easier since you don't have to worry about your screws being perfectly straight, and the black insert looks cool against the black top.

More pics...

Trim:
Image

Leaving 3/16 on each side for expansion under the Texas heat~Thanks Gage
Image

Over lapping the sheets~ Thanks Grant
The black lines are to let me know where the nails are that hold down the masonite so I can screw around them!
Image

Looking forward to seeing that sunroof installed! Thanks for all the comments!
Thomas

Image
User avatar
2bits
2bit Member
 
Posts: 5132
Images: 8
Joined: Thu Dec 27, 2007 6:04 pm
Location: Lake Tawakoni, TX
Top

Postby cdfnchico » Sun Nov 16, 2008 8:37 pm

Thomas,
Have really enjoyed watching your progress. It looks beautiful!
Cathy
Build thread - Just Chillin'
http://www.tnttt.com/viewtopic.php?t=25151

Image
User avatar
cdfnchico
Donating Member
 
Posts: 371
Images: 140
Joined: Mon Jul 14, 2008 9:40 pm
Location: Chico, CA
Top

Postby Ivar the Red » Sun Nov 16, 2008 9:10 pm

Way cool Thomas. :thumbsup: 8)
Johnny
BUILD THREAD
Winning is not a sometime thing; it's an all time thing. You don't win once in a while, you don't do things right once in a while, you do them right all the time. Winning is habit. Unfortunately, so is losing. - Vince Lombardi
ImageImageImage
User avatar
Ivar the Red
HOME RUN TILT
 
Posts: 19376
Images: 373
Joined: Thu Aug 16, 2007 2:32 pm
Location: Duncan,OK(The dark side of the moon)
Top

Postby aggie79 » Mon Nov 17, 2008 9:10 am

:applause: :applause: :applause:

Wow! The black really looks good with the woodgrain.
Tom (& Linda)
For build info on our former Silver Beatle teardrop:
Build Thread

93503
User avatar
aggie79
Super Duper Lifetime Member
 
Posts: 5405
Images: 686
Joined: Tue Aug 07, 2007 5:42 pm
Location: Watauga, Texas
Top

Postby Miriam C. » Mon Nov 17, 2008 9:22 am

:applause: :applause: :thumbsup: Absolutely awsome! Love the black alum. and trim. You really are almost there :thumbsup:

Image
“Forgiveness means giving up all hope for a better past.â€
User avatar
Miriam C.
our Aunti M
 
Posts: 19675
Images: 148
Joined: Wed Feb 15, 2006 3:14 pm
Location: Southwest MO
Top

Postby 2bits » Tue Nov 18, 2008 12:20 am

Dropped in a couple more screws and took the straps and the rest of the plastic off.

Note to others, make sure to leave a little space to slide the front trim in across the bottom. The masonite and aluminum is laying right up on the top of the frame and I am probably going to end up having to chisel out a 16th of an inch of the wood to be able to slide the angle in.

HAD to take a picture of how cool it looks tho :twisted:

Image
Thomas

Image
User avatar
2bits
2bit Member
 
Posts: 5132
Images: 8
Joined: Thu Dec 27, 2007 6:04 pm
Location: Lake Tawakoni, TX
Top

Postby S. Heisley » Tue Nov 18, 2008 9:00 am

WOW! Good job! :thumbsup:
I can hardly wait to see how/what color you finish the sides with!
User avatar
S. Heisley
Super Lifetime Member
 
Posts: 8873
Images: 495
Joined: Mon Sep 17, 2007 10:02 am
Location: No. California
Top

Postby Rigsby » Tue Nov 18, 2008 5:14 pm

Just two words---F*****G SEXY!! 8)
DOOIN IT THE YAARKSHA WAY--FA NOWT, THA NUS !!
User avatar
Rigsby
500 Club
 
Posts: 587
Joined: Sun Aug 31, 2008 12:21 pm
Location: Doncaster, England
Top

Postby Marck » Tue Nov 18, 2008 7:36 pm

Very beautiful build you have going there, it will definatly be a very nice piece of craftsmanship when completed :thumbsup: :applause:
You want to build WHAT?????

40 isn't middle aged....
IT'S YOUTH PART II
User avatar
Marck
500 Club
 
Posts: 527
Images: 64
Joined: Sun Aug 29, 2004 8:13 pm
Location: Harding Pa
Top

Postby 2bits » Tue Nov 18, 2008 9:08 pm

Thank you as always!

Sharon, I think for the edge trim on the sides I am going to get a 4x8 piece of good 1/8" plywood, round over the edges and cut it out about 2-3" wide all the way around, and stain and poly it the exact same color as the rest of the walls. I think it might stick out too much color wise to go to a different color on that area. Being a sheet of plywood, there will be no joints and the grain will be continuous all the way back to the hatch. Since it is only 1/8" thick and rounded over I am not too concerned about the end grain looking bad, of course I will test it first, but it looked pretty good on my 1/2" cabinets.

Here is a pic of how the other part of the trim for the sides is going to lay out. Probably 1/8" hardwood of some sort. This trim WILL be a different color although that is yet to be determined, probably lighter like it looks here...

Image
Thomas

Image
User avatar
2bits
2bit Member
 
Posts: 5132
Images: 8
Joined: Thu Dec 27, 2007 6:04 pm
Location: Lake Tawakoni, TX
Top

Postby S. Heisley » Tue Nov 18, 2008 9:25 pm

Ohhhh! That should look nice! :thumbsup: With the dark roof, you could get away with an ebony-type stain on those strips, if you decide not to go light. :thinking:
User avatar
S. Heisley
Super Lifetime Member
 
Posts: 8873
Images: 495
Joined: Mon Sep 17, 2007 10:02 am
Location: No. California
Top

Postby 2bits » Tue Nov 18, 2008 11:49 pm

:thinking: Yeah, I need to mull that dark roof combo Sharon, thank you! I think I will be spending some time in Photoshop on that one.

On another note, I cut the holes for the sunroof and roof vent tonight. I haven't glued and screwed them yet, but they look real good sitting in there finally!

Preparing the cut, drilled pilot holes from the inside out then played connect the dots. Masking tape to protect the surface. I freehanded the corner curves:
Image

Say bye bye Jenay...
Image

Yeah, it looks great!
Image

Why stop there, I cut the hole for the vent next!
Image

A shot with the flash:
Image

A shot without the flash, blurrier but nicer looking, I am seeing stars now:
Image
Thomas

Image
User avatar
2bits
2bit Member
 
Posts: 5132
Images: 8
Joined: Thu Dec 27, 2007 6:04 pm
Location: Lake Tawakoni, TX
Top

Postby jdarkoregon » Wed Nov 19, 2008 8:46 pm

Way Cool
Innovation is essential
The world can be better
ImageImage
User avatar
jdarkoregon
Donating Member
 
Posts: 1237
Images: 47
Joined: Mon Aug 22, 2005 7:07 pm
Location: Oregon, Sublimity
Top

PreviousNext

Return to Build Journals

Who is online

Users browsing this forum: No registered users and 12 guests