TwilightLane Cubbie Build

...ask your questions in the appropriate forums BUT document your build here...preferably in a single thread...dates for updates, are appreciated....

Postby TwilightLane » Sun Dec 05, 2010 9:33 pm

Here is a before picture - what the trailer looked like before I placed the headliner.

Image

Image

Image

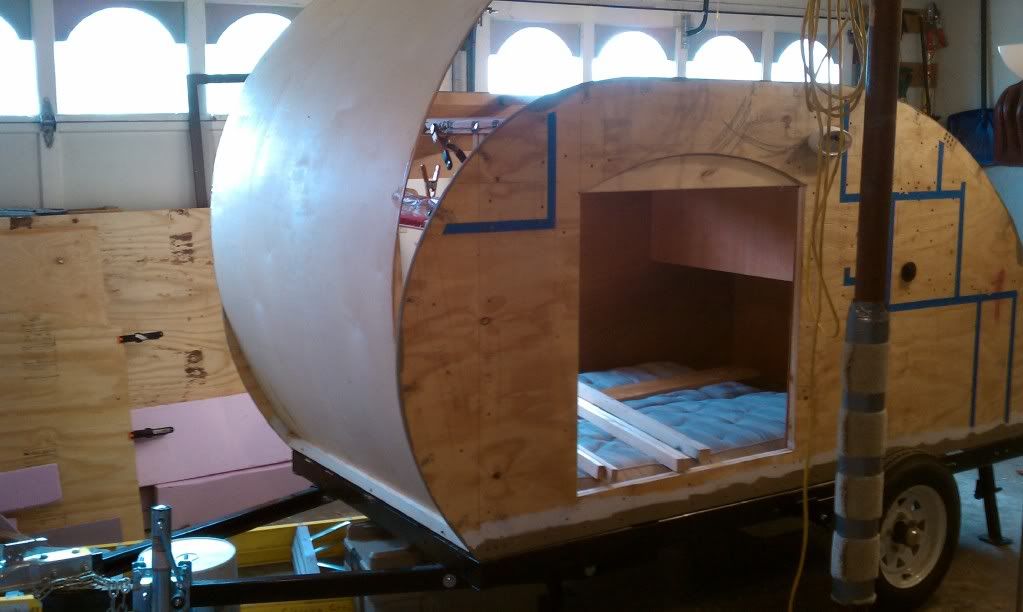
Getting in position:

Image
Last edited by TwilightLane on Sun Dec 05, 2010 9:43 pm, edited 1 time in total.
Rob & Lori
Aspen & Tundra
My Instructable: http://www.instructables.com/id/Teardro ... l-Trailer/
User avatar
TwilightLane
The 300 Club
 
Posts: 484
Joined: Thu May 14, 2009 4:59 pm

Postby TwilightLane » Sun Dec 05, 2010 9:35 pm

The first step was to put a cross piece across the face of floor. This creates a notch for the headliner to slide into:

Image

Testing the fit:

Image

Image
Rob & Lori
Aspen & Tundra
My Instructable: http://www.instructables.com/id/Teardro ... l-Trailer/
User avatar
TwilightLane
The 300 Club
 
Posts: 484
Joined: Thu May 14, 2009 4:59 pm

Postby TwilightLane » Sun Dec 05, 2010 9:41 pm

Testing. I fit the spar, tested the fit. I had snugged it down, but that made it tough to fit in the sheet. I backed it off and that seemed to work.

Testing:

Image

Image
Rob & Lori
Aspen & Tundra
My Instructable: http://www.instructables.com/id/Teardro ... l-Trailer/
User avatar
TwilightLane
The 300 Club
 
Posts: 484
Joined: Thu May 14, 2009 4:59 pm
Top

Postby TwilightLane » Sun Dec 05, 2010 9:46 pm

The sheet slid nicely into the gap between the spars and the lip on each wall.

Image

Image

Once the plywood was squarely set in place, I snugged down the spar and it really clamped the plywood in place. I was pleased how it really 'pinched' the ply and held it tightly in place.
Last edited by TwilightLane on Sun Dec 05, 2010 10:07 pm, edited 2 times in total.
Rob & Lori
Aspen & Tundra
My Instructable: http://www.instructables.com/id/Teardro ... l-Trailer/
User avatar
TwilightLane
The 300 Club
 
Posts: 484
Joined: Thu May 14, 2009 4:59 pm
Top

Postby TwilightLane » Sun Dec 05, 2010 9:47 pm

The overview. This is working:

Image

8)
Rob & Lori
Aspen & Tundra
My Instructable: http://www.instructables.com/id/Teardro ... l-Trailer/
User avatar
TwilightLane
The 300 Club
 
Posts: 484
Joined: Thu May 14, 2009 4:59 pm
Top

Postby TwilightLane » Sun Dec 05, 2010 9:51 pm

Now to line up the holes for the wires...

Image

I drilled holes and brought the wires through. You can see them poking out here.

Image
Rob & Lori
Aspen & Tundra
My Instructable: http://www.instructables.com/id/Teardro ... l-Trailer/
User avatar
TwilightLane
The 300 Club
 
Posts: 484
Joined: Thu May 14, 2009 4:59 pm
Top

Postby TwilightLane » Sun Dec 05, 2010 9:52 pm

Adding spars:

Image

More:

Image

It's hard to see it, but I ran a stripe of TB II glue along each spar. I had planned to brad nail too, but it didnt seem necessary. Too many spars? I have no idea. I wanted to make sure I supported the curve, both inside and outside.

I used 1x2s for most spars on the curve. But for the bottom two I used 2x2s. I plan to add a piece of diamond plate once the outer skin is on, and this will give me the material to fasten to.

And that is the stock fender doing double duty to help hold that top spar in place while the glue dries.
Last edited by TwilightLane on Sun Dec 05, 2010 10:03 pm, edited 2 times in total.
Rob & Lori
Aspen & Tundra
My Instructable: http://www.instructables.com/id/Teardro ... l-Trailer/
User avatar
TwilightLane
The 300 Club
 
Posts: 484
Joined: Thu May 14, 2009 4:59 pm
Top

Postby TwilightLane » Sun Dec 05, 2010 10:00 pm

And finally, what I've been dying to see:

Image

Image

It's hard to express how roomy it feels. When I laid inside, the headliner reaching away made it feel really 'open' inside.
Rob & Lori
Aspen & Tundra
My Instructable: http://www.instructables.com/id/Teardro ... l-Trailer/
User avatar
TwilightLane
The 300 Club
 
Posts: 484
Joined: Thu May 14, 2009 4:59 pm
Top

Postby TwilightLane » Sun Dec 05, 2010 10:05 pm

Side note: this is the plywood I used from Lowes. It's just what they had in stock for 5mm.

Image
Rob & Lori
Aspen & Tundra
My Instructable: http://www.instructables.com/id/Teardro ... l-Trailer/
User avatar
TwilightLane
The 300 Club
 
Posts: 484
Joined: Thu May 14, 2009 4:59 pm
Top

Postby pete42 » Sun Dec 05, 2010 11:10 pm

Rob nice job "they" make a fitting called a pulling elbow that alows you to make a 90 degree turn it has a lid held on with screws you unscrew the screws push the wires completely through one pipe then feed it down thru the other pipe pull wires so they fit inside the pul-el replace the screws all done and looks neat.
User avatar
pete42
Super Lifetime Member
 
Posts: 2203
Images: 13
Joined: Sat Nov 07, 2009 11:52 am
Location: SouthWest Ohio
Top

Postby TwilightLane » Sun Dec 05, 2010 11:44 pm

Thanks Pete! I wound up just using some JB Weld to connect the those two pieces of pipe. It worked out well. I'll have to get a pic.
Rob & Lori
Aspen & Tundra
My Instructable: http://www.instructables.com/id/Teardro ... l-Trailer/
User avatar
TwilightLane
The 300 Club
 
Posts: 484
Joined: Thu May 14, 2009 4:59 pm
Top

Postby YuGun » Mon Dec 06, 2010 12:42 am

:applause: İt looks good,
User avatar
YuGun
The 300 Club
 
Posts: 445
Joined: Sun Apr 11, 2010 1:25 pm
Location: Turkey
Top

Postby absolutsnwbrdr » Mon Dec 06, 2010 10:42 am

The wood you used for the headliner and cabinets looks great!
Zach
Coming Soon...
Image Image
User avatar
absolutsnwbrdr
Donating Member
 
Posts: 2657
Images: 412
Joined: Mon Jan 25, 2010 6:10 pm
Location: Hanover, PA
Top

Postby mcspin50 » Mon Dec 06, 2010 3:02 pm

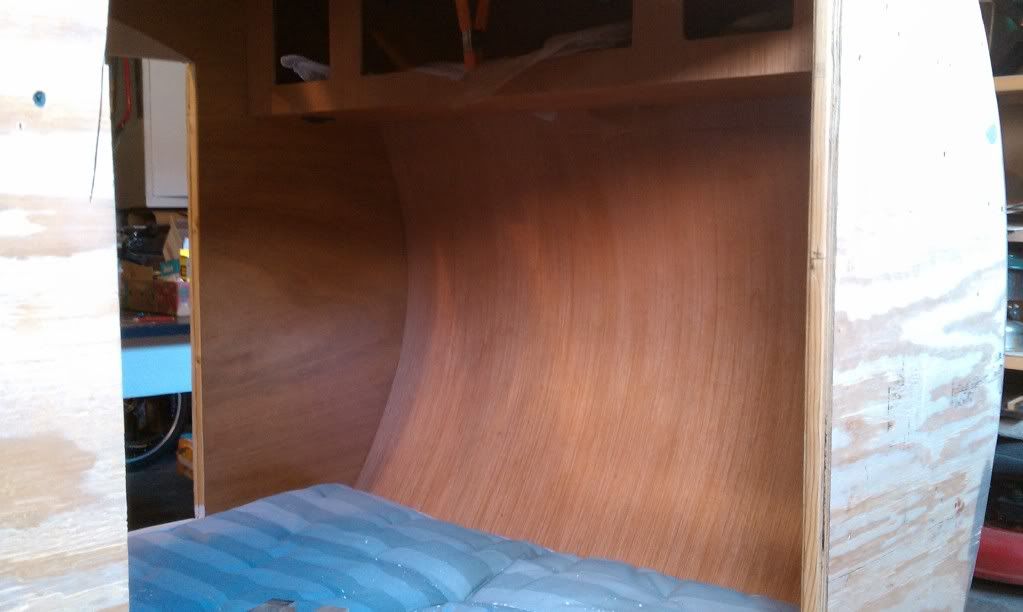
absolutsnwbrdr wrote:The wood you used for the headliner and cabinets looks great!


I agree! Looks almost like zebra wood. :thumbsup:
Lil M.
In every walk with nature, one receives far more than he seeks. - John Muir
Generic Benroy Build Journal here - My LilScamper Update Journal here
The Lily Pad...Image My LilScamper...Image Image
User avatar
mcspin50
Gold Donating Member
 
Posts: 488
Images: 158
Joined: Mon Oct 12, 2009 6:35 pm
Location: Perham, MN
Top

Postby DogStar » Mon Dec 06, 2010 5:52 pm

I just studied this from start to finish. Learned a LOT.

Thanks for the thoroughness!
Great build.

Eric
Always with my thanks,
Eric

(aka DogStar & ELDogStar)
User avatar
DogStar
Donating Member
 
Posts: 91
Images: 5
Joined: Fri Apr 09, 2010 4:21 pm
Top

PreviousNext

Return to Build Journals

Who is online

Users browsing this forum: No registered users and 12 guests