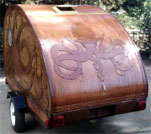
Cross Bow / trolley / renamed little blue trolley

...ask your questions in the appropriate forums BUT document your build here...preferably in a single thread...dates for updates, are appreciated....

Re: Cross Bow

Postby Ron Dickey » Mon Feb 10, 2014 12:26 pm

I am also tempted to keep it close to the back yard for back yard picnics :twisted:

I got some pens of different colors and am going to draw the trailer and the saddle with lines in different colors so I can best see what goes where.

I will photograph them and post them when done. I have that google scetching program but find it takes me for ever to make it work. I use to use Mac draw and more advanced programs but most cost to much for me.

Ron
121377......134179
Inside almost done--Trolly top has opening windows & roof.doors need assembling--pictured above waley windows..galley 1/3 done
Cross Bow in Build Journals....http://www.tnttt.com/viewtopic.php?f=50&t=54108
User avatar
Ron Dickey
Silver Donating Member
 
Posts: 3078
Images: 711
Joined: Tue Apr 20, 2004 5:56 pm
Location: Central Coast, CA

Re: Cross Bow

Postby Ron Dickey » Mon Feb 10, 2014 7:01 pm

:goodmorning: The hinge came :P :awesome: Thanks Grant... :shake hands:

now I can start putting it all together ...... :scratchthinking: ah now I am not feeling any pressure here after all I said.... :baby:

now I know where to cut the roof and make room for the hinge .... I added a little more wood to support the roof, behind the hinge.

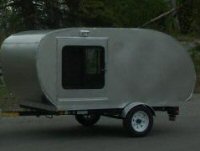
I have to put the window on the trolley first....got it sanded so it is not so rough. Practiced drilling holes worked fine no cracks. Got to get some screws that will fit. Then I can silicone it around the windows, and outside edges. Then I can insert the trolley sides in the roof and attach the ribs or studs to the trolley sides, roof, and cross bow cabin wall frame.

I am not feeling any pressure :rainy: about this none!! :embarassed: I'll be just fine :oops: in fact ... hey wait what are you doing... :MLAS

a voice from above said.....Just get er done Ron!!
121377......134179
Inside almost done--Trolly top has opening windows & roof.doors need assembling--pictured above waley windows..galley 1/3 done
Cross Bow in Build Journals....http://www.tnttt.com/viewtopic.php?f=50&t=54108
User avatar
Ron Dickey
Silver Donating Member
 
Posts: 3078
Images: 711
Joined: Tue Apr 20, 2004 5:56 pm
Location: Central Coast, CA

Re: Cross Bow

Postby Ron Dickey » Tue Feb 11, 2014 1:48 am

Sorry I got carried away, but do have fun with those little smiles guys. :cry:

116702

here is the hinge Grant sent. it is said to be water proof. I think I will still put some sort of block before it just in case.
here is a site where Grant did some experiments on the hinge. :thumbsup:
viewtopic.php?f=2&t=57503

Even if it is dry up in Northern California now, in the past We have been in some really hard rain falls.

I picked up some brass screws to day for the Trolley top windows. Because I live 1/2 mile from the ocean things rust here less then farther in land. I will need to cut holes and plan to grind out room for the heads with my dremel.
Image like this pc.

Ron
121377......134179
Inside almost done--Trolly top has opening windows & roof.doors need assembling--pictured above waley windows..galley 1/3 done
Cross Bow in Build Journals....http://www.tnttt.com/viewtopic.php?f=50&t=54108
User avatar
Ron Dickey
Silver Donating Member
 
Posts: 3078
Images: 711
Joined: Tue Apr 20, 2004 5:56 pm
Location: Central Coast, CA
Top

Re: Cross Bow

Postby KCStudly » Tue Feb 11, 2014 7:28 am

Use a drill point countersink to drill your holes and countersink in the same operation. A stone will clog and wear unevenly, and will not center on the hole automatically.

Second choice (but much more affordable new) is a regular countersinking bit like this one (for 82 deg flat head screws): http://www.grainger.com/product/WESTWARD-Countersink-21ML29?s_pp=false&sgAttributes=
(check to be sure you get the correct one for the size screw you intend to use).
KC
My Build: The Poet Creek Express Hybrid Foamie

Poet Creek Or Bust
Engineering the TLAR way - "That Looks About Right"
TnTTT ORIGINAL 200A LANTERN CLUB = "The 200A Gang"
Green Lantern Corpsmen
User avatar
KCStudly
Donating Member
 
Posts: 9617
Images: 8169
Joined: Mon Feb 06, 2012 10:18 pm
Location: Southeastern CT, USA
Top

Re: Cross Bow

Postby Ron Dickey » Tue Feb 11, 2014 10:23 pm

KCStudly wrote:Use a drill point countersink to drill your holes and countersink in the same operation. A stone will clog and wear unevenly, and will not center on the hole automatically.

Second choice (but much more affordable new) is a regular countersinking bit like this one (for 82 deg flat head screws): http://www.grainger.com/product/WESTWARD-Countersink-21ML29?s_pp=false&sgAttributes=
(check to be sure you get the correct one for the size screw you intend to use).


will this work on Plexiglass with out cracking it. that was why I came up with the grinder idea.
I need a counter sink for other parts. thanks for the info.
121377......134179
Inside almost done--Trolly top has opening windows & roof.doors need assembling--pictured above waley windows..galley 1/3 done
Cross Bow in Build Journals....http://www.tnttt.com/viewtopic.php?f=50&t=54108
User avatar
Ron Dickey
Silver Donating Member
 
Posts: 3078
Images: 711
Joined: Tue Apr 20, 2004 5:56 pm
Location: Central Coast, CA
Top

Re: Cross Bow

Postby KCStudly » Tue Feb 11, 2014 11:06 pm

I thought you were talking about drilling the hurricane hing.

I think the trick to drilling plexi is to not push too hard. Let the drill bit do the work and run the drill on high speed. Don't try to drill too close to the edge.

The stone will clog and does not have the correct shape, or any way to center it reliably.
KC
My Build: The Poet Creek Express Hybrid Foamie

Poet Creek Or Bust
Engineering the TLAR way - "That Looks About Right"
TnTTT ORIGINAL 200A LANTERN CLUB = "The 200A Gang"
Green Lantern Corpsmen
User avatar
KCStudly
Donating Member
 
Posts: 9617
Images: 8169
Joined: Mon Feb 06, 2012 10:18 pm
Location: Southeastern CT, USA
Top

Re: Cross Bow

Postby RandyG » Wed Feb 12, 2014 12:19 am

There are a few tricks to drilling and CSing plexi.
1. Run the drill backwards, the flutes of the bits won't catch but will still remove material.
2. Grind your drill bits to a sharp point, but leave enough so you can get the correct hole size.
3. There are special bits made for it but why bother if you only need it once in a blue moon.
4. For counter sinking, a ball file or cone shaped routery file will work.
5. Sometimes the dullest bit of the bunch is the one you should use.
Take your time and don't force it or push too hard, it will crack without warning. How thick is your material?
Randy
Aircraft fabricator, novice carpenter, electrical apprentice, audio engineer dropout.
Build thread - http://www.tnttt.com/viewtopic.php?f=50&t=54126
User avatar
RandyG
500 Club
 
Posts: 695
Images: 115
Joined: Thu May 10, 2012 6:52 pm
Top

Re: Cross Bow

Postby Ron Dickey » Wed Feb 12, 2014 10:32 pm

plexiglass from Home Depot
30 in. x 36 in. x .093 in.

http://www.homedepot.com/p/OPTIX-30-in- ... 5yc1vZbrdg

hmm backward who would have thought. It seems to drill ok on drill press but this helps in my efforts to sink the screw into the plexi. :thumbsup:
ron
121377......134179
Inside almost done--Trolly top has opening windows & roof.doors need assembling--pictured above waley windows..galley 1/3 done
Cross Bow in Build Journals....http://www.tnttt.com/viewtopic.php?f=50&t=54108
User avatar
Ron Dickey
Silver Donating Member
 
Posts: 3078
Images: 711
Joined: Tue Apr 20, 2004 5:56 pm
Location: Central Coast, CA
Top

Re: Cross Bow

Postby Ron Dickey » Sat Feb 15, 2014 2:12 am

I have the hatch hinge and cut the roof so I could fit it on.

116798
little hard to see but until the hatch gets made will it come in.

116799 116800
what it will look like closed and will look like this open but not that far .... I hope.

am working on left over plastic for how the holes in the plastic will work. Running drill backward did not seem to work but I did not try sharpening it yet.

But looks like I can drill hole for screw shaft and then use a bigger drill for the top to fit in.
Ron
121377......134179
Inside almost done--Trolly top has opening windows & roof.doors need assembling--pictured above waley windows..galley 1/3 done
Cross Bow in Build Journals....http://www.tnttt.com/viewtopic.php?f=50&t=54108
User avatar
Ron Dickey
Silver Donating Member
 
Posts: 3078
Images: 711
Joined: Tue Apr 20, 2004 5:56 pm
Location: Central Coast, CA
Top

Re: Cross Bow

Postby RandyG » Sat Feb 15, 2014 1:36 pm

There have been a few times when a door for an electronic box comes to the shop with a broken window. We take the old one out, find a replacement piece, cut it to size and start drilling. One would take it easy and then get too comfortable, then when you think you got the hang of it, CRACK! :x. Some of them we can go through 3-4 try before it's good. Then riveting the glass in is ridiculously tedious.
Randy
Aircraft fabricator, novice carpenter, electrical apprentice, audio engineer dropout.
Build thread - http://www.tnttt.com/viewtopic.php?f=50&t=54126
User avatar
RandyG
500 Club
 
Posts: 695
Images: 115
Joined: Thu May 10, 2012 6:52 pm
Top

Re: Cross Bow

Postby Ron Dickey » Sat Feb 15, 2014 9:27 pm

viewtopic.php?f=21&t=58911

I put a question in on Teardrop Construction Tips & Techniques titled " I have cut my plexiglass for my trolley top "

Looks like I can go to the next step soon. Putting all the pcs of the trolley top together!! and the roof too! :beer:

Ron
121377......134179
Inside almost done--Trolly top has opening windows & roof.doors need assembling--pictured above waley windows..galley 1/3 done
Cross Bow in Build Journals....http://www.tnttt.com/viewtopic.php?f=50&t=54108
User avatar
Ron Dickey
Silver Donating Member
 
Posts: 3078
Images: 711
Joined: Tue Apr 20, 2004 5:56 pm
Location: Central Coast, CA
Top

Re: Cross Bow

Postby Woodpecker » Sun Feb 16, 2014 12:59 pm

I've worked with a lot of Plexi and plexi like substances. A LOT. :thinking:

To drill perfect holes use a drill press and a solid wood scrap backing. Fresh for each hole, you don't want to drill into an open space.
Get a cheap drill bit the right size and drill it a little into a CBS block. This makes a great bit for drilling plexi. Don't use a new sharp bit or try to go fast.
Slow speed, lots of water. Water, water, water. Heat is the enemy of a clean hole. Olive oil works OK too and gives a nice polish inside the hole.
Sand the edges smooth and a light pass with a torch will polish them too. :beer:
User avatar
Woodpecker
Teardrop Master
 
Posts: 124
Images: 186
Joined: Mon Dec 30, 2013 6:11 pm
Top

Re: Cross Bow

Postby Ron Dickey » Tue Feb 18, 2014 1:52 pm

Mnkeeboy wrote:I've worked with a lot of Plexi and plexi like substances. A LOT. :thinking:

To drill perfect holes use a drill press and a solid wood scrap backing. Fresh for each hole, you don't want to drill into an open space.
Get a cheap drill bit the right size and drill it a little into a CBS block. This makes a great bit for drilling plexi. Don't use a new sharp bit or try to go fast.
Slow speed, lots of water. Water, water, water. Heat is the enemy of a clean hole. Olive oil works OK too and gives a nice polish inside the hole.
Sand the edges smooth and a light pass with a torch will polish them too. :beer:


Thanks for the info.

I am now thinking of putting the plexiglass on the inside.

I will only have to seal the windows and it is taking way to much time. :cry:

I live in a small town so many of things I find are hard to find locally and I do not order on the net. Many have told me they have no problems, I just don't. :shrug:
Well, I did once the card belonged to that company and could only be used there! 8)

I am thinking of routing the inside of the windows and putting in a gasket then screwing the plexiglass in. I keep reading that many of the sealing stuff could etch it. The acrylic caulk I hear will crack off after several years. I was thinking of putting mini "O" rinks in the holes. and may still to protect the plexi from the screw.

Ron
121377......134179
Inside almost done--Trolly top has opening windows & roof.doors need assembling--pictured above waley windows..galley 1/3 done
Cross Bow in Build Journals....http://www.tnttt.com/viewtopic.php?f=50&t=54108
User avatar
Ron Dickey
Silver Donating Member
 
Posts: 3078
Images: 711
Joined: Tue Apr 20, 2004 5:56 pm
Location: Central Coast, CA
Top

Re: Cross Bow

Postby KCStudly » Tue Feb 18, 2014 3:28 pm

Rather than drill thru the plexi and risk cracking it, or having a screw head crack it, why not put it in the rabbet with the gasket like you suggest, then use little toggle dogs to clamp it in with screws into the wood instead of the glass?

I'm thinking like those little clips that are used to mount a mirror on the back of a bedroom door, except flat. Or don't bother to recessthe gasket and just use them straight up surface mounted.
Those little mirror mount clips that are available at every hardware store
KC
My Build: The Poet Creek Express Hybrid Foamie

Poet Creek Or Bust
Engineering the TLAR way - "That Looks About Right"
TnTTT ORIGINAL 200A LANTERN CLUB = "The 200A Gang"
Green Lantern Corpsmen
User avatar
KCStudly
Donating Member
 
Posts: 9617
Images: 8169
Joined: Mon Feb 06, 2012 10:18 pm
Location: Southeastern CT, USA
Top

Re: Cross Bow

Postby Ron Dickey » Thu Feb 20, 2014 10:37 pm

Now I can get going :thumbsup:

I looked at all the different ways and may have to backtrack later but for now I used Gasket material like you use in plumbing.

116979
Stapled it on and hammered the staples in deeper.
116980 it comes in sheet and I just cut it with sizzzzzzers and put it together like a jig saw puzzzzzzel. :)

I clamped one with plexiglass scrap and wood and pored water on it. it stayed dry.

I am thinking later of glassing the window wood area .... but that is much later.

I am now attaching the roof ribs to the trolley and moving on.....
121377......134179
Inside almost done--Trolly top has opening windows & roof.doors need assembling--pictured above waley windows..galley 1/3 done
Cross Bow in Build Journals....http://www.tnttt.com/viewtopic.php?f=50&t=54108
User avatar
Ron Dickey
Silver Donating Member
 
Posts: 3078
Images: 711
Joined: Tue Apr 20, 2004 5:56 pm
Location: Central Coast, CA
Top

PreviousNext

Return to Build Journals

Who is online

Users browsing this forum: No registered users and 18 guests