Northwestern Build - Updated 7/4/2010 - Done!

...ask your questions in the appropriate forums BUT document your build here...preferably in a single thread...dates for updates, are appreciated....

Postby wlivesey » Wed Nov 04, 2009 10:12 pm

aggie79 wrote:Looking great Bill! :thumbsup: :applause: :thumbsup:

What are you using to cut/trim the aluminum sheeting?

Tom


Thanks Tom. I'm using an electric sheer I picked up at NorthernTool. I tried using a router (low speed) without much success. The sheers seem much easier to me.
http://www.northerntool.com/webapp/wcs/stores/servlet/product_6970_200319669_200319669
Image


starleen2 wrote:Do I detect some curved Aluminum angle for trim in this pict??
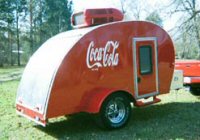
Good eye! I've successfully annealed the aluminum trim for the front curve. It's not perfect but I think it will get the job done and look good.

mikeschn wrote:
Awsome idea with the flashing. :thumbsup: :thumbsup: :thumbsup:

And you're going to seal the screws so that water doesn't get under them? :thinking:

Mike...
Thanks, Mike. But I think it was Tom that suggested doing it this way a couple pages back in the thread. I've got to give him credit... Don't worry, the screws will have sealant on them... I might even avoid putting them into the shelf itself. The fewer holes the better, I think.

Any thoughts on welding the seam of the shelf trim?
User avatar
wlivesey
The 300 Club
 
Posts: 469
Images: 283
Joined: Sun Aug 12, 2007 1:22 pm
Location: DFW, Texas

Postby High Desert » Thu Nov 05, 2009 12:35 am

just read this thread. Wow :applause: You're building a fantastic looking trailer with some great variations Bill, very inspiring for us WW hopefuls . Thanks for the great documentation :thumbsup:
Shaun

"it's not the years honey, it's the mileage"
High Desert
Platinum Donating Member
 
Posts: 8780
Images: 27
Joined: Wed Apr 08, 2009 1:46 pm
Location: SW Washington state

Postby wlivesey » Wed Nov 11, 2009 8:42 pm

High Desert wrote:just read this thread. Wow :applause: You're building a fantastic looking trailer with some great variations Bill, very inspiring for us WW hopefuls . Thanks for the great documentation :thumbsup:


Thanks for the kind words. It's been a lot of fun building my own interpretation of the WW. Hopefully you can learn from my mistakes!

Here are a couple more pics of our progress on the aluminum skin. It's just loosely clamped in place right now but it's pretty well trimmed down to size and just about ready for installation.

Image
Image
User avatar
wlivesey
The 300 Club
 
Posts: 469
Images: 283
Joined: Sun Aug 12, 2007 1:22 pm
Location: DFW, Texas
Top

Postby WesGrimes » Wed Nov 11, 2009 9:37 pm

That skin is going to look really good on there. Looks like quite a challenge to glue as well.
User avatar
WesGrimes
Teardrop Master
 
Posts: 289
Images: 31
Joined: Mon Jun 22, 2009 5:41 pm
Location: Garland, TX
Top

Postby starleen2 » Wed Nov 11, 2009 9:51 pm

Good to see the resume of the build - lookin' good Bill 8) Any plans to super polish the aluminun?
User avatar
starleen2
5th Teardrop Club
 
Posts: 16272
Images: 224
Joined: Sat May 12, 2007 8:26 pm
Location: Pea Ridge ,AR
Top

Postby planovet » Wed Nov 11, 2009 10:00 pm

starleen2 wrote:Good to see the resume of the build - lookin' good Bill 8) Any plans to super polish the aluminun?


Image
Get that WW finished and get camping! :thumbsup:
ImageMark (& Cindi)
Visit our website: Little Swiss Teardrop

I was wondering why the water balloon was getting bigger... and then it hit me.

ImageImageImageImage
User avatar
planovet
The Cat Man
 
Posts: 5583
Images: 3
Joined: Tue Nov 27, 2007 4:48 pm
Location: Plano, Texas
Top

Postby wlivesey » Wed Nov 11, 2009 10:18 pm

WesGrimes wrote:That skin is going to look really good on there. Looks like quite a challenge to glue as well.


Don't quote me on it but I don't think there I'm going to use any glue. The windows and trim should be enough to hold the skins on. From what I've read, it seems that the glue doesn't really stay bonded to the aluminum for very long anyway.

starleen2 wrote:Good to see the resume of the build - lookin' good Bill 8) Any plans to super polish the aluminun?


As a matter of fact, I do plan to super polish the skins. I just have to find the right method to do so.

planovet wrote:Get that WW finished and get camping! :thumbsup:


I'm working as fast as I can!!! (That's not very fast)
User avatar
wlivesey
The 300 Club
 
Posts: 469
Images: 283
Joined: Sun Aug 12, 2007 1:22 pm
Location: DFW, Texas
Top

Postby wlivesey » Sat Nov 21, 2009 5:32 pm

Aluminum update... We got a late start today and I spent quite a bit of time working out some ugly spots on the edge trim. It turned out pretty nice... I expect to get a lot more done tomorrow.

Image

We went for the riveted look.

Image
User avatar
wlivesey
The 300 Club
 
Posts: 469
Images: 283
Joined: Sun Aug 12, 2007 1:22 pm
Location: DFW, Texas
Top

Postby planovet » Sun Nov 22, 2009 2:15 pm

Nice! :thumbsup:
ImageMark (& Cindi)
Visit our website: Little Swiss Teardrop

I was wondering why the water balloon was getting bigger... and then it hit me.

ImageImageImageImage
User avatar
planovet
The Cat Man
 
Posts: 5583
Images: 3
Joined: Tue Nov 27, 2007 4:48 pm
Location: Plano, Texas
Top

Postby Wig » Sun Nov 22, 2009 4:41 pm

man! I can't wait to see this thing finished. :D
Scott & (Megan)
User avatar
Wig
Teardrop Master
 
Posts: 115
Images: 1
Joined: Wed Sep 09, 2009 6:31 am
Location: Greenville Tx.
Top

Postby wlivesey » Sun Nov 22, 2009 6:01 pm

Wig wrote:man! I can't wait to see this thing finished. :D


You and me both!

So I'm looking for some opinions... The aluminum is not laying down as flat as I would like it to. Because of the way the aluminum was rolled, it tends to try to bubble up. What's the best way to remedy this problem? I've got some ideas of my own but I'd like to see what all the big brains out there can come up with.
User avatar
wlivesey
The 300 Club
 
Posts: 469
Images: 283
Joined: Sun Aug 12, 2007 1:22 pm
Location: DFW, Texas
Top

Postby aggie79 » Mon Nov 23, 2009 5:29 pm

Bill,

I purchased some VHB tape because I will need to seam the aluminum panels on my teardrop's roof. VHB will definitely keep the aluminum tight to the plywood. The only problem is it is not forgiving. Once adhered, it is permanent. There's no taking it up and repositioning.

I've heard of others using outside carpet mastic. It "sticks" but is not a permanent bond.

If you want to experiment, I have some extra VHB tape. PM me and I can bring it over.

Tom
Tom (& Linda)
For build info on our former Silver Beatle teardrop:
Build Thread

93503
User avatar
aggie79
Super Duper Lifetime Member
 
Posts: 5405
Images: 686
Joined: Tue Aug 07, 2007 5:42 pm
Location: Watauga, Texas
Top

Postby wlivesey » Sun Nov 29, 2009 7:18 pm

Thanks for the VHB tape offer, Tom. I eventually decided that the riveted approach was best for me.

I got a lot done over the long Thanksgiving weekend. I managed to reinstall the leading edge trim, complete the front of the trailer, and finish about 85% of the shore side and about 25% of the curb side.

I really need to clean my garage.

Image

Image

Image
Last edited by wlivesey on Tue Dec 01, 2009 10:14 pm, edited 1 time in total.
User avatar
wlivesey
The 300 Club
 
Posts: 469
Images: 283
Joined: Sun Aug 12, 2007 1:22 pm
Location: DFW, Texas
Top

Postby aggie79 » Mon Nov 30, 2009 9:39 am

wlivesey wrote:The for the VHB tape offer, Tom. I eventually decided that the riveted approach was best for me.

I got a lot done over the long Thanksgiving weekend. I managed to reinstall the leading edge trim, complete the front of the trailer, and finish about 85% of the shore side and about 25% of the curb side.

I really need to clean my garage.


Looking great Bill! The riveted look really goes with the lines of the trailer.

I'm glad someone got something done over the holiday.
Tom (& Linda)
For build info on our former Silver Beatle teardrop:
Build Thread

93503
User avatar
aggie79
Super Duper Lifetime Member
 
Posts: 5405
Images: 686
Joined: Tue Aug 07, 2007 5:42 pm
Location: Watauga, Texas
Top

Postby wlivesey » Tue Dec 01, 2009 9:32 pm

aggie79 wrote:
Looking great Bill! The riveted look really goes with the lines of the trailer.

I'm glad someone got something done over the holiday.


Thanks, Tom. I'm really happy with how it's turning out. I have to admit though, it was kind of scary shooting the first couple of screws through the skin. There's no looking back now!
User avatar
wlivesey
The 300 Club
 
Posts: 469
Images: 283
Joined: Sun Aug 12, 2007 1:22 pm
Location: DFW, Texas
Top

PreviousNext

Return to Build Journals

Who is online

Users browsing this forum: No registered users and 17 guests