DD, on the road to LCG

...ask your questions in the appropriate forums BUT document your build here...preferably in a single thread...dates for updates, are appreciated....

Postby StPatron » Thu Aug 18, 2011 10:32 pm

I installed the roof vent today. Holes were drilled in the corners from the inside and then the router was used on top to connect the dots.

Image

Butyl sealant tape was added around the perimeter and the vent was screwed in place.

Image

Electrical connections were made, test run was successful. The framing was coated with epoxy and the trim ring was cut to fit and added. Some touch-up paint work is needed along with a few more coats of epoxy on the upper cabinet door. (I couldn't resist using the fish knob.)

Image

This fan will work for now until I can replace it with a Fantastic Fan.

The check-off list is getting shorter!
User avatar
StPatron
Donating Member
 
Posts: 748
Images: 297
Joined: Tue Dec 15, 2009 8:38 pm
Location: OK

Postby aggie79 » Fri Aug 19, 2011 9:00 am

Gary,

Looks like the fan installation went well! I know that is a pucker moment when cutting through a perfectly good roof. I like how the interior trim finishes out.

LCG looks achievable for the Diner's first appearance!

Take care,
Tom
Tom (& Linda)
For build info on our former Silver Beatle teardrop:
Build Thread

93503
User avatar
aggie79
Super Duper Lifetime Member
 
Posts: 5405
Images: 686
Joined: Tue Aug 07, 2007 5:42 pm
Location: Watauga, Texas

Postby Loader » Sat Aug 20, 2011 6:45 am

Looking good Gary! :thumbsup: Looking forward to seeing the Diner at LCG.

I agree, intentionally cutting a hole in one's roof is a stressful moment.
Earl & Kerry

"Loader"

Blue Yonder Build Thread - viewtopic.php?f=50&t=42611

ImageImage
User avatar
Loader
Platinum Donating Member
 
Posts: 1584
Images: 245
Joined: Tue Apr 26, 2005 2:33 pm
Location: Fort Worth, Texas
Top

Postby angib » Sat Aug 20, 2011 7:08 am

Seeing what is directly under the vent, I don't think I want to know what this meant:
StPatrón wrote:...test run was successful.
User avatar
angib
5000 Club
5000 Club
 
Posts: 5783
Images: 231
Joined: Fri Apr 30, 2004 2:04 pm
Location: (Olde) England
Top

Postby StPatron » Mon Aug 22, 2011 11:48 am

Tom: Yeah, I think the trade-off for the pucker factor is the ease of installation. Simply cutting a hole and dropping something in place was a welcomed task that day.

Earl: Welcome to my build thread, glad you stopped by. Looking forward to meeting you and Kerry at LCG.

Andrew: Oh no, that process you refer to has already been well designed, engineered and tested! :lol:

Let me rephrase... The fan, following installation, was still receiving power which demonstrated the electrical wiring was intact and had not been compromised by errant fastener placement. It also indicated that soldered connections were also intact. The on/off switch was in working order and the fan blades rotated in such a manner as to slowly evacuate the room atmosphere. Further testing indicated, however, that room air exchanges were insufficient and would not adequately clear the air of even a mouse fart.
User avatar
StPatron
Donating Member
 
Posts: 748
Images: 297
Joined: Tue Dec 15, 2009 8:38 pm
Location: OK
Top

Postby aggie79 » Mon Aug 22, 2011 12:02 pm

StPatrón wrote:Let me rephrase... The fan, following installation, was still receiving power which demonstrated the electrical wiring was intact and had not been compromised by errant fastener placement. It also indicated that soldered connections were also intact. The on/off switch was in working order and the fan blades rotated in such a manner as to slowly evacuate the room atmosphere. Further testing indicated, however, that room air exchanges were insufficient and would not adequately clear the air of even a mouse fart.


:roll: I don't know if I've ever heard of that type of quality assurance testing before. :lol:
Tom (& Linda)
For build info on our former Silver Beatle teardrop:
Build Thread

93503
User avatar
aggie79
Super Duper Lifetime Member
 
Posts: 5405
Images: 686
Joined: Tue Aug 07, 2007 5:42 pm
Location: Watauga, Texas
Top

Postby StPatron » Fri Aug 26, 2011 11:41 am

Painting has begun.
Image
User avatar
StPatron
Donating Member
 
Posts: 748
Images: 297
Joined: Tue Dec 15, 2009 8:38 pm
Location: OK
Top

Postby S. Heisley » Fri Aug 26, 2011 3:51 pm

:thinking: Hmmm...You're intelligent, handy with tools, and have a good sense of humor...I predict that you will build a beautiful camping trailer and not be bothered by, but rather laugh at, the gremlin snafus that throw themselves at you while building it. :thumbsup: :yes:
User avatar
S. Heisley
Super Lifetime Member
 
Posts: 8865
Images: 495
Joined: Mon Sep 17, 2007 10:02 am
Location: No. California
Top

Postby campmaster-k » Fri Aug 26, 2011 5:38 pm

The, "Mouse Fart". Is, indeed, an honored and time tested Quality Assurance guideline. It also has been the scapegoat of many a slipped flatulence. Heck the mouse fart is and has been used for many useful applications.
-Kirk

>TnTTT ORIGINAL 200A LANTERN CLUB

>CEO Coleman Recovery Inc.

>Nor Cal Camping Pinewood Racing Team


Build thread -

viewtopic.php?t=45307&postdays=0&postorder=asc&start=180

Check out my Pictures -

http://s1199.photobucket.com/albums/aa4 ... 0QQtppZZ24
User avatar
campmaster-k
Lifetime member
 
Posts: 3030
Images: 17
Joined: Fri Jun 17, 2011 5:02 pm
Location: Colusa, California
Top

Postby aggie79 » Mon Aug 29, 2011 9:51 am

Hi Gary,

The black paint really complements the wood. Does the painting mean that you're in the final stretch of your build?

Take care,
Tom
Tom (& Linda)
For build info on our former Silver Beatle teardrop:
Build Thread

93503
User avatar
aggie79
Super Duper Lifetime Member
 
Posts: 5405
Images: 686
Joined: Tue Aug 07, 2007 5:42 pm
Location: Watauga, Texas
Top

Postby StPatron » Mon Aug 29, 2011 11:55 am

S. Heisley wrote::thinking: Hmmm...You're intelligent, handy with tools, and have a good sense of humor...I predict that you will build a beautiful camping trailer and not be bothered by, but rather laugh at, the gremlin snafus that throw themselves at you while building it. :thumbsup: :yes:


Yes ... there have been quite a few laughs along the way! :lol:
User avatar
StPatron
Donating Member
 
Posts: 748
Images: 297
Joined: Tue Dec 15, 2009 8:38 pm
Location: OK
Top

Postby StPatron » Mon Aug 29, 2011 12:10 pm

aggie79 wrote:The black paint really complements the wood. Does the painting mean that you're in the final stretch of your build?


Yes, the end is finally in sight, Tom. I'm struggling with the door now, but the to-do list is short: finish hatch and clearance lights wiring, license plate holder/light, build divider shelf in desk cabinet, a few plumbing odds and ends, hang curtain and shower rods, epoxy coat table edge and a few other touch-up items. Nothing big left other than the hours and hours and hours of prep for the black gloss paint. I agree, I felt the black was a nice complement for the wood but I anticipate it being a major pain applying and maintaining.
User avatar
StPatron
Donating Member
 
Posts: 748
Images: 297
Joined: Tue Dec 15, 2009 8:38 pm
Location: OK
Top

Postby jkidd6339 » Mon Aug 29, 2011 10:50 pm

Go Go Go !! :applause: :applause:
User avatar
jkidd6339
Teardrop Master
 
Posts: 198
Images: 1
Joined: Sat Jan 24, 2009 1:16 am
Top

Postby StPatron » Thu Sep 22, 2011 12:57 am

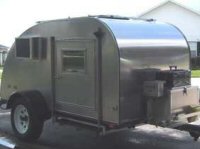
The rush is on to be ready for LCG. All wiring is now complete. A few more coats of black gloss paint yet to go, door trimming and some odds and ends and touch-up work. Here's the latest.

I hung the curtains today. The "kickplate" underneath the dining table was covered in cedar strips with the recurring design. I also replaced a piece of boring white ceiling panel trim with cedar strips and used thin cedar strips for the ceiling-to-wall trim.

Image

Curtain rod holders were made from... you guessed it.. crosscut cedar. I don't like how the curtains hang, I think I need to add some more cafe rings.
Image

The sheet vinyl flooring was covered with new tiles.
At the left is the cedar strip covered wheelwell. :lol:
Image

I couldn't decide what to use for the top of the display shelf area between the two cupboards. Finally, the idea of a large stained glass nightlight seemed to be a good fit. I repeated the same design element that I've been using with the cedar strips.

Image

Image

This is a test for light intensity. I'll permanently install the light later.

Image

The door has been a big challenge. In hindsight I probably should have installed the door before covering the sides with cedar. The varying width due to the moisture content and the imperfection of cedar fence pickets were hurdles that I couldn't overcome. When dry-fitting a small test area,it didn't work, didn't match-up. I put the door work on the back burner while working on other areas and finally decided I'd use the design element vertically and angle the strips. Yeah.. it's kinda wild.
Image

Not to leave my tomcat Dewey out of the project, I decided he would need a cedar strip food and water bowl holder. Here's my shop kitty, Corina, modeling the new bowl holders.
Image

Ok.. that's it for the cedar strip work, at least for now. Once the galley is complete I'll snap a pic of the cedar strip work above the cupboards. Hmmm, a cedar strip battery box on the tongue might be a good idea.
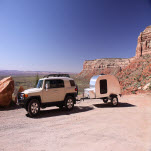
 :lol:
User avatar
StPatron
Donating Member
 
Posts: 748
Images: 297
Joined: Tue Dec 15, 2009 8:38 pm
Location: OK
Top

Postby CliffinGA » Thu Sep 22, 2011 4:40 am

Gary beatiful job on the cedar work and truly amazing workmanship you've done on the diner. That is one trailer that you will be giving tours of anywhere you go for now on!!

Cliff :thumbsup:
In God we trust, shoot the rest and he will sort out!

My Build:

viewtopic.php?f=50&t=42628
User avatar
CliffinGA
1000 Club
1000 Club
 
Posts: 1499
Images: 207
Joined: Sat Nov 14, 2009 1:29 pm
Location: Jefferson, GA
Top

PreviousNext

Return to Build Journals

Who is online

Users browsing this forum: No registered users and 10 guests