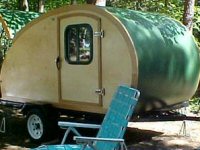
Father-Daughter Build 2013-14

...ask your questions in the appropriate forums BUT document your build here...preferably in a single thread...dates for updates, are appreciated....

Re: Father-Daughter Build 2013-14

Postby aggie79 » Sun Jul 13, 2014 7:11 am

Lauren-

That is a beautiful setting in the picture of your TV and TD.

My side tent is made by Camp Inn. It has an opening around the TD door. There is no mechanical fastening of the TD side panel to the TD. At the top, there is a flap that extends another 1 foot over the roof. From there there are straps that hook on the roof trim on the other side. There are also straps on the sides and bottom that keep the side with the opening snugged up to the TD.

Take care,
Tom
Tom (& Linda)
For build info on our former Silver Beatle teardrop:
Build Thread

93503
User avatar
aggie79
Super Duper Lifetime Member
 
Posts: 5405
Images: 686
Joined: Tue Aug 07, 2007 5:42 pm
Location: Watauga, Texas

Re: Father-Daughter Build 2013-14

Postby 225 » Sun Jul 13, 2014 7:44 am

Wow! That's a beautiful trailer.
User avatar
225
Teardrop Master
 
Posts: 198
Joined: Sun Apr 15, 2012 6:07 am
Location: Asheville, NC.

Re: Father-Daughter Build 2013-14

Postby lfrazer98 » Wed Jul 23, 2014 10:45 pm

Tom- Thanks! It was taken in my parents' driveway before we towed it for the first time! :)

Since then we have installed trim along the front and side bottoms. We permanently attached the hatch and got it wired. We installed the curtain rods, I selected my colors, bought the sheets/blankets and fabric for the curtains and throw pillows. I have to sew the latter.

We also spent some time trying to figure out out to fix the galley hatch.... One side is curved more than the other and there is a 1/2" gap between the middle of the curve and the side wall. We tried to strap it down and bend it to fit... it helped, but I need to do more... I might just have to add another strip of hatch seal on one side and admit defeat. The trailer wasn't square when we started, the side walls weren't perfectly aligned because of this, so it was inevitable that the hatch wouldn't be symmetrical. Trying to bend it into submission is my plan, but I need some help, physically. Dad is down for the count due to surgery today, but I am in no rush. More time to think things through usually goes in my favor. We will see what I end up with in a few days or so.

We will also have to use the side latches as the ones I bought won't work due to the hatch/frame alignment along the bottom. We probably wouldn't get it right and don't want to risk holes in the aluminum. So, with the side latches... Do you guys add handles along the back to lift the hatch by?? Any pics that you have would be great. I can try to take a close picture of my hatch tomorrow. There is really not much of a ledge to lift from on the bottom edge of the hatch, but I guess that is a good thing as far as water is concerned, but that also makes it hard to grasp.

Here are my pics. We used spacers for the fenders so water could pass through and I still need to finish some of the wood under the hatch... finishing touches :)

122716 122717 122718

122719 122720

122721 122722

122723 122724 122725
User avatar
lfrazer98
Teardrop Master
 
Posts: 204
Images: 217
Joined: Tue Sep 17, 2013 6:25 pm
Location: New York
Top

Re: Father-Daughter Build 2013-14

Postby lfrazer98 » Wed Jul 23, 2014 10:46 pm

225 wrote:Wow! That's a beautiful trailer.

Thank you!!
User avatar
lfrazer98
Teardrop Master
 
Posts: 204
Images: 217
Joined: Tue Sep 17, 2013 6:25 pm
Location: New York
Top

Re: Father-Daughter Build 2013-14

Postby lfrazer98 » Thu Jul 24, 2014 12:43 am

Here you can see the driver side of the trailer and the passenger side. The picture isn't that close, but you can clearly see that there is a big gap on the passenger side of the hatch. I curved the hatch with some ratchet straps (not sure what they are called) so that they were even, but forgot that the actual trailer was not as square. Now I have a gap on one side. still trying to figure out how to fix it as I mentioned in my last post.

Driver side- 122726

Passenger side- 122727

I will try to get a closer picture tomorrow. Trying to "unbend" it, but for once, we made the ply bend, attached it, and it stayed.... Go figure.
User avatar
lfrazer98
Teardrop Master
 
Posts: 204
Images: 217
Joined: Tue Sep 17, 2013 6:25 pm
Location: New York
Top

Re: Father-Daughter Build 2013-14

Postby The Teardrop Nanny » Fri Jul 25, 2014 6:00 am

You are really there now, Lauren. Especially now that you are ready to decorate the interior. I see that you've got sewing skills as well!

So you have a hatch gap..... :thinking: I hope you and your Dad can get it closer together.And I am sure you'll get some good advice on how to rectify this situation. My hatch was just repaired this week due to it being blown off lakeside at Applegate. I think side latches are a good hold, but I have a handle at the bottom that also locks. I find that is what I use to lift the lid, and the added security of the lock is nice.
Joanie
Life's uncertain...eat dessert first. Check out our cooking channel for cast iron:
www.youtube.com/outdoorcastironcook Dean & Joanie, your hosts
User avatar
The Teardrop Nanny
Teardrop Muse
 
Posts: 1865
Images: 4
Joined: Wed Aug 03, 2005 11:52 am
Location: Northwestern Coast of California
Top

Re: Father-Daughter Build 2013-14

Postby KCStudly » Fri Jul 25, 2014 7:11 am

Regarding the hatch, it sounds like you are saying that the hatch ribs were cut to the wrong profile because they were fit to the wall when it was in a different position than permanent(?). That might be a tough one to fix. Can the edge of the wall be built up to match the hatch?

I forget what your wall schedule was. How wide is it in the galley area?

If it is wide enough to support adding material, I can think of a couple of ways to do it. Becky used successive layers of glass and epoxy to build hers up (lots of labor and love to get this to look good, IMO). Another way would be to glue thin layers of wood slats on, formed to the curve, one at a time until enough material is built up; then route the excess back off to suit the new profile.

If your wall is thinner (one layer of ply) and the above ideas aren't practical, you may be able to fit an extension piece on to the edge of the ply (trace the top of existing profile onto a new scrap of ply, trying to match the grain as best you can) then cut an over sized crescent shape out. Biscuit join this to the edge, and/or back it up from the galley side by a new thin inner skin laminated on to the inside of the wall, then cut the new profile. if you can't blend the patch well enough to your liking, you could "celebrate" the repair with a nice border of gloss black paint, like edging, or a shadow line for the hatch area.

For my hatch fasteners I have a really nice stainless steel door pull that was left over from another project. http://www.mcmaster.com/#1404a41/=szmj8w (just the handle part, not the protector plate). It is a little heavy, but the contour fits the palm so sweetly and the finish is brighter than the dull aluminum ones that have a different shape.

For draw latches I picked these: http://www.mcmaster.com/#1864a21/=szmr6r.

Zach (absolutsnowboarder) has used some really nice keyed draw latches, and I think he even has some for sale (he bought several, I think to get a better price range, or minimum order quantity). You may want to check those out, too.
Last edited by KCStudly on Fri Jul 25, 2014 6:08 pm, edited 1 time in total.
KC
My Build: The Poet Creek Express Hybrid Foamie

Poet Creek Or Bust
Engineering the TLAR way - "That Looks About Right"
TnTTT ORIGINAL 200A LANTERN CLUB = "The 200A Gang"
Green Lantern Corpsmen
User avatar
KCStudly
Donating Member
 
Posts: 9618
Images: 8169
Joined: Mon Feb 06, 2012 10:18 pm
Location: Southeastern CT, USA
Top

Re: Father-Daughter Build 2013-14

Postby Breytie » Fri Jul 25, 2014 2:32 pm

lfrazer98 wrote: Dad is down for the count due to surgery today

So how is he doing now?

A peach of a build! I love the way it comes together.
Sometimes you have to decide what is good enough and leave it at that.

Good luck
Andre
Experience is learning from your own mistakes
Here I make mine in public: My build
Breytie
Teardrop Master
 
Posts: 209
Images: 36
Joined: Sun Sep 04, 2011 4:21 pm
Top

Re: Father-Daughter Build 2013-14

Postby lfrazer98 » Mon Aug 11, 2014 7:11 pm

KCStudly wrote:Regarding the hatch, it sounds like you are saying that the hatch ribs were cut to the wrong profile because they were fit to the wall when it was in a different position than permanent(?). That might be a tough one to fix. Can the edge of the wall be built up to match the hatch?

I forget what your wall schedule was. How wide is it in the galley area?

If it is wide enough to support adding material, I can think of a couple of ways to do it. Becky used successive layers of glass and epoxy to build hers up (lots of labor and love to get this to look good, IMO). Another way would be to glue thin layers of wood slats on, formed to the curve, one at a time until enough material is built up; then route the excess back off to suit the new profile.

If your wall is thinner (one layer of ply) and the above ideas aren't practical, you may be able to fit an extension piece on to the edge of the ply (trace the top of existing profile onto a new scrap of ply, trying to match the grain as best you can) then cut an over sized crescent shape out. Biscuit join this to the edge, and/or back it up from the galley side by a new thin inner skin laminated on to the inside of the wall, then cut the new profile. if you can't blend the patch well enough to your liking, you could "celebrate" the repair with a nice border of gloss black paint, like edging, or a shadow line for the hatch area.

For my hatch fasteners I have a really nice stainless steel door pull that was left over from another project. http://www.mcmaster.com/#1404a41/=szmj8w (just the handle part, not the protector plate). It is a little heavy, but the contour fits the palm so sweetly and the finish is brighter than the dull aluminum ones that have a different shape.

For draw latches I picked these: http://www.mcmaster.com/#1864a21/=szmr6r.

Zach (absolutsnowboarder) has used some really nice keyed draw latches, and I think he even has some for sale (he bought several, I think to get a better price range, or minimum order quantity). You may want to check those out, too.


We had the ribs for the hatch matched perfectly to the side profile, but when we did the exterior skin it sprung back a little so there was a 3/4" gap mid hatch to the bottom. So, when we skinned the interior, we used ratchet straps and made the hatch curve more so that when we skinned it, it would pull back to the original contour counteracting the original springback. Once side must been ratcheted too much or the hatch twisted when we did so. Now we have a small gap on the right side only. I don't think we can build up the one side because we already have the insert trim molding screwed and taped and we can't take that off and maintain the integrity of the aluminum. We did that once before and the aluminum was misshapen. I don't know if we would be able to reuse that piece of trim molding if we removed it to build up the side. I may just have to put more gasketing in there and call it a day as Andre said. I am going to get back at it tomorrow. Dad is healed enough to be up and moving and is doing very well.

Thans for the links, KC. I like the handles that you used. I will need 2 of those to get a grip on the galley hatch so I can lift it. The bottom is flush with the frame and I can't get my fingers under there, which is a great thing though! I am going to get galley latches like the ones you ordered. I think I found some online at amazon, but it says they are not very heavy duty. They were marketed as popup camper latches. They looks identical to the ones on Grant's website. http://www.amazon.com/JR-Products-10845 ... er+latches These are zinc and I see the ones you posted are stainless steel. I think that would be better as I read zinc does not resist rust. Thanks for your help and I will let you know how it turns out!
User avatar
lfrazer98
Teardrop Master
 
Posts: 204
Images: 217
Joined: Tue Sep 17, 2013 6:25 pm
Location: New York
Top

Re: Father-Daughter Build 2013-14

Postby KCStudly » Mon Aug 11, 2014 10:44 pm

No problem. :D

I understand now what you were saying about the hatch and wall fit. Someone here said that it doesn't really pay much to try and force the inner skin to hold the outer skin down because both inner and outer skins are trying to go flat again (i.e. they are both working with each other, not against), but it sounds like you managed to lock in some correction. :thumbsup:

I'm starting to think that I will need something on the outside edges of my inner hatch skin to hold the profile shape until I can get the foam and canvas skin on. :thinking:
KC
My Build: The Poet Creek Express Hybrid Foamie

Poet Creek Or Bust
Engineering the TLAR way - "That Looks About Right"
TnTTT ORIGINAL 200A LANTERN CLUB = "The 200A Gang"
Green Lantern Corpsmen
User avatar
KCStudly
Donating Member
 
Posts: 9618
Images: 8169
Joined: Mon Feb 06, 2012 10:18 pm
Location: Southeastern CT, USA
Top

Re: Father-Daughter Build 2013-14

Postby oakinteriors1 » Tue Aug 12, 2014 2:34 pm

You might have to peel the skin on the inside and see if it relaxes the curve.....
Or add some kind of trim...Like this..that comes down over the sides...Image

This is another reason I picked (http://www.campingclassics.com/stripper5.html) Steve Fredericks style of hatch construction....
User avatar
oakinteriors1
Silver Donating Member
 
Posts: 297
Images: 1
Joined: Tue Sep 03, 2013 4:47 pm
Location: Bates City Mo.
Top

Re: Father-Daughter Build 2013-14

Postby Sheddie » Wed Aug 13, 2014 8:59 pm

Hi Lauren, you have made a beautiful job there.
It looks like I am not the only one (by far) to have issues with the galley hatch curve. I had the frame sitting perfect then then added extra bracing to hold the shape while I skinned it. Re-fitted it to the body, still good. Took the braces off, still good. A few days later it was sticking out at the bottom. To cut a long story short, after several different stages of too much, or not enough curve, after I eventually fitted the inner skin it now has too much curve. But it works fine and we are enjoying using it, so one day when it annoys me enough I may have another look at it.
Looks like you are about ready to start enjoying yours. 8) :P
Happy Camping Frank.
User avatar
Sheddie
1000 Club
1000 Club
 
Posts: 1499
Images: 1129
Joined: Mon Jul 01, 2013 3:26 pm
Location: Whangarei, New Zealand
Top

Re: Father-Daughter Build 2013-14

Postby Dean in Eureka, CA » Fri Aug 15, 2014 11:45 am

Hi, Teach....... :designing: Soon??? :question: Now you have a theme of what to write for...."What I Did on MY Summer Vacation", Lauren. :lol:
And we are off to the Sierra Region. :vroom:
ttfn,
Joanie (& Dean....forgot that I logged in on HIS computer)
User avatar
Dean in Eureka, CA
The Fogcrawler
 
Posts: 4997
Images: 69
Joined: Thu May 11, 2006 8:44 pm
Top

Re: Father-Daughter Build 2013-14

Postby lfrazer98 » Mon Sep 01, 2014 5:45 pm

Well, she is inspected and registered and ready for the road!! One or two finishing touches left in the galley and then I can finally say she is completely done. But for now. Here are some pics that I am proud to post!

123835 123836 123837

123838 123839 123840

123841 123842 123843

123844

We have the props for the galley to install (we are making our own) and the trim on the inside of the galley just below the hinge. :) Thanks for all the support with the hatch problems. We got it bent back on the right and used the latches to pull it the rest of the way. There is an 1/8" gap, but we will fill it with welting. Problem solved.... We did have to peel back the skin a little so the hatch would give though as suggested above. :thumbsup:

Hopefully, I will be out this weekend and will be able to post some camping pics!!
User avatar
lfrazer98
Teardrop Master
 
Posts: 204
Images: 217
Joined: Tue Sep 17, 2013 6:25 pm
Location: New York
Top

Re: Father-Daughter Build 2013-14

Postby S. Heisley » Mon Sep 01, 2014 6:54 pm

:thumbsup: She's a beauty! :thumbsup:

...Looking forward to seeing those camping pictures!
User avatar
S. Heisley
Super Lifetime Member
 
Posts: 8775
Images: 495
Joined: Mon Sep 17, 2007 10:02 am
Location: No. California
Top

PreviousNext

Return to Build Journals

Who is online

Users browsing this forum: Bing [Bot] and 10 guests