M116A3 Build

...ask your questions in the appropriate forums BUT document your build here...preferably in a single thread...dates for updates, are appreciated....

Re: M116A3 Build

Postby lfhoward » Wed Feb 24, 2016 9:08 am

I am really glad for people on this forum and their advice to build light. My first draft of the plan for this camper was to use 2x4's like house frame construction, and even build a wooden floor! :lol: I bet the weight is way down now compared to that idea! The walls are plenty strong using 1x3's to frame it and 1/4 inch plywood exterior.

The stack of wood in my garage looks like a lot, but it's really not. The cedar for the interior walls is only 1/4 inch thick, and I think it is actually lighter overall than a comparable sheet of 1/4 inch plywood (the other option for the interior walls). I think it will provide a weight savings rather than the other way around.
My off-road camper build on an M116A3 military chassis:
http://www.tnttt.com/viewtopic.php?f=50&t=62581
Tow vehicle: 2008 Jeep Liberty with a 4 inch lift.
User avatar
lfhoward
1000 Club
1000 Club
 
Posts: 1370
Joined: Wed Jan 22, 2014 6:10 pm
Location: Philadelphia, PA

Re: M116A3 Build

Postby S. Heisley » Wed Feb 24, 2016 7:34 pm

:thumbsup: Even if we never meet you, we'd like to know that you're happy and safe and enjoying your completed trailer.
User avatar
S. Heisley
Super Lifetime Member
 
Posts: 8775
Images: 495
Joined: Mon Sep 17, 2007 10:02 am
Location: No. California

Re: M116A3 Build

Postby lfhoward » Sat Feb 27, 2016 11:11 pm

Well, lessons learned from the comedy of errors today. 4 trips to the hardware store ensued.

Trip one: get self tapping bolts to bolt the tongue box to the tongue.

Drilled holes in the top of the tongue. Broke those self tapping bolts off in the holes, all four of them. Tough army steel.

Trip two: get grade 5 bolts and a hole tapper/threader.

Drilled new holes. Tapped three of the holes. Last hole, shattered the tapper. Tough army steel.

Trip three: get a new hole tapper.

Drilled and tapped the last (new) hole of 4. Drilled the tongue box, got it almost right, enlarged two of the holes in the box but eventually got it to set right. Grade 5 bolts plus fender washers to hold the tongue box down... Then stripped two of the holes with the bolts! Tough army steel... Really???

Trip four: (By now Rick who runs the hardware store is quite amused, but still helpful.) Decided to change the way I'm going to mount the box on the tongue. Got four 1/4 inch by 3-1/2 inch long grade 8 bolts plus lock nuts. Will drill all the way down through the tongue (top and bottom), and bolt it all the way through. No more messing around with threading army steel.

I also learned from my attempt to drill the holes in the tongue box and the tongue separately. Even measuring very carefully and checking many times, it was not spot on and I had to make the holes in the aluminum box larger than I planned to get it to work. This lesson will change how I approach mounting the solar panel on the roof. Instead of measuring and drilling holes from underneath, I will set the panel in place and drill from above so I know the holes are going to line up. I don't want to be enlarging any holes in the roof to make sure the solar panel support rails fit the bolts.

A frustrating day to be sure. For a while there it felt like I was fighting the trailer and the trailer won. But at least I was out enjoying the sunshine. It was a good Saturday to be working on a project.
My off-road camper build on an M116A3 military chassis:
http://www.tnttt.com/viewtopic.php?f=50&t=62581
Tow vehicle: 2008 Jeep Liberty with a 4 inch lift.
User avatar
lfhoward
1000 Club
1000 Club
 
Posts: 1370
Joined: Wed Jan 22, 2014 6:10 pm
Location: Philadelphia, PA
Top

Re: M116A3 Build

Postby noseoil » Sun Feb 28, 2016 9:51 am

Always easier to drill through existing holes than do two layouts. Easiest way would have been:

1 - Set box on rails & draw lines with magic marker.
2 - Turn box upside-down & drill 1/8" holes in 4 places from the bottom of the box where they need to go.
3 - Set the box in place, clamp & drill down through the bottom to pick up 1/8" pilot holes in the frame.
4 - Remove box & drill holes you need in frame the correct size.
5 - Drill holes in box & fasten with bolts.
6 - Consume adult beverage.

Sorry, couldn't resist, but we've all been there many times. About that solar panel, you can use it or make a template out of mylar, plastic sheet or cardboard to pick up the holes.

1 - Set solar panel on cardboard & mark holes using existing mounting bracket holes.
2 - Set template on roof & mark roof with awl.
3 - Drill CORRECT size holes in roof.
4 - Fasten panel in place with butyl rubber tape between brackets & skin with screws.
5 - Consume adult beverage.
Build log: viewtopic.php?f=50&t=60248
The time you spend planning is more important than the time you spend building.........

137905
User avatar
noseoil
1000 Club
1000 Club
 
Posts: 1820
Images: 669
Joined: Sun Apr 27, 2014 8:46 am
Location: Raton, New Mexico, living the good life!
Top

Re: M116A3 Build

Postby KCStudly » Sun Feb 28, 2016 11:05 am

Use tapping oil and the proper tap "wrench" (holder) when tapping. Turn the tap 1/4 to 1/2 turn at a time and back off until you hear/feel the chip break; repeat until the tap runs freely. The oil keeps the tap from seizing in the hole, tap holder keeps the tap straight and applies torque evenly due to its T-handle (whereas an adjustable wrench tends to tilt or bend the tap), and breaking the chip keeps the chip from binding the tap making a clean thread.

Bolts should thread into at least 1x their nominal diameter, preferably 1-1/2x, so depending on the thickness of your tongue tube, tapping may not have been the best plan. Also, maybe not such an issue for your overrated (heavy) trailer, but putting holes thru the top and bottom surfaces of the tube can create a stress point; I would not advise that technique for trailers that are closer to their load limits (such as HF or NT trailers. U-bolts or weld on bolt tabs would be better.
Last edited by KCStudly on Tue May 10, 2016 9:12 pm, edited 1 time in total.
KC
My Build: The Poet Creek Express Hybrid Foamie

Poet Creek Or Bust
Engineering the TLAR way - "That Looks About Right"
TnTTT ORIGINAL 200A LANTERN CLUB = "The 200A Gang"
Green Lantern Corpsmen
User avatar
KCStudly
Donating Member
 
Posts: 9617
Images: 8169
Joined: Mon Feb 06, 2012 10:18 pm
Location: Southeastern CT, USA
Top

Re: M116A3 Build

Postby lfhoward » Sun Feb 28, 2016 5:20 pm

noseoil wrote:Always easier to drill through existing holes than do two layouts. Easiest way would have been:

1 - Set box on rails & draw lines with magic marker.
2 - Turn box upside-down & drill 1/8" holes in 4 places from the bottom of the box where they need to go.
3 - Set the box in place, clamp & drill down through the bottom to pick up 1/8" pilot holes in the frame.
4 - Remove box & drill holes you need in frame the correct size.
5 - Drill holes in box & fasten with bolts.
6 - Consume adult beverage.

Sorry, couldn't resist, but we've all been there many times. About that solar panel, you can use it or make a template out of mylar, plastic sheet or cardboard to pick up the holes.

1 - Set solar panel on cardboard & mark holes using existing mounting bracket holes.
2 - Set template on roof & mark roof with awl.
3 - Drill CORRECT size holes in roof.
4 - Fasten panel in place with butyl rubber tape between brackets & skin with screws.
5 - Consume adult beverage.

Brilliant. I never considered making a template, but that makes perfect sense. Wow. I will definitely do this. Way easier to lift the template onto the roof than the whole solar system, and there would be enough room to drill without the panel in the way. Thank you for this idea!
Last edited by lfhoward on Sun Feb 28, 2016 5:25 pm, edited 1 time in total.
My off-road camper build on an M116A3 military chassis:
http://www.tnttt.com/viewtopic.php?f=50&t=62581
Tow vehicle: 2008 Jeep Liberty with a 4 inch lift.
User avatar
lfhoward
1000 Club
1000 Club
 
Posts: 1370
Joined: Wed Jan 22, 2014 6:10 pm
Location: Philadelphia, PA
Top

Re: M116A3 Build

Postby lfhoward » Sun Feb 28, 2016 5:24 pm

KCStudly wrote:Use tapping oil and the proper tap "wrench" (holder) when tapping. Turn the tap a 1/4 to 1/2 turn at a time and back off until you hear/feel the chip break; repeat until the tap runs freely. The oil keeps the tap from seizing in the hole, tap holder keeps the tap straight and applies torque evenly due to its T-handle (whereas an adjustable wrench tends to tilt or bend the tap), and breaking the chip keeps the chip from binding the tap making a clean thread.

Bolts should thread into at least 1x their nominal diameter, preferably 1-1/2x, so depending on the thickness of your tongue tube, tapping may not have been the best plan. Also, maybe not such an issue for your overrated (heavy) trailer, but putting holes thru the top and bottom surfaces of the tube can create a stress point; I would not advise that technique for trailers that are closer to their load limits (such as HF or NT trailers. U-bolts or weld on bolt tabs would be better.

Here also I am learning the hard way after the fact. I wasn't using honing oil until I broke the first tap, and even after that I was going too fast without backing the bit off as often as it should to make a smooth tight thread. In terms of the metal thickness it is something like 1/8 or 3/16 steel. Very beefy, so I agree it is probably fine to drill a through-and-through on a military trailer but not so much on a HF trailer tongue. Thanks for the info, KC. I will put it to use the next time.
My off-road camper build on an M116A3 military chassis:
http://www.tnttt.com/viewtopic.php?f=50&t=62581
Tow vehicle: 2008 Jeep Liberty with a 4 inch lift.
User avatar
lfhoward
1000 Club
1000 Club
 
Posts: 1370
Joined: Wed Jan 22, 2014 6:10 pm
Location: Philadelphia, PA
Top

Re: M116A3 Build

Postby S. Heisley » Sun Feb 28, 2016 8:15 pm

Inch by Inch, anything's a cinch....even if it's fractions of inches when drilling holes. :lol:

...Great Story. It just shows that you're human like the rest of us. :thumbsup:
User avatar
S. Heisley
Super Lifetime Member
 
Posts: 8775
Images: 495
Joined: Mon Sep 17, 2007 10:02 am
Location: No. California
Top

Re: M116A3 Build

Postby lfhoward » Tue Mar 08, 2016 2:03 pm

It's a beautiful day in the 70's today, and I am on spring break! Prime trailer building time.

I'm putting on the last coat of spar urethane today! Next task after this dries is putting on aluminum skin.

Image
Last edited by lfhoward on Sun May 13, 2018 3:00 pm, edited 2 times in total.
My off-road camper build on an M116A3 military chassis:
http://www.tnttt.com/viewtopic.php?f=50&t=62581
Tow vehicle: 2008 Jeep Liberty with a 4 inch lift.
User avatar
lfhoward
1000 Club
1000 Club
 
Posts: 1370
Joined: Wed Jan 22, 2014 6:10 pm
Location: Philadelphia, PA
Top

Re: M116A3 Build

Postby lfhoward » Wed Mar 09, 2016 6:26 pm

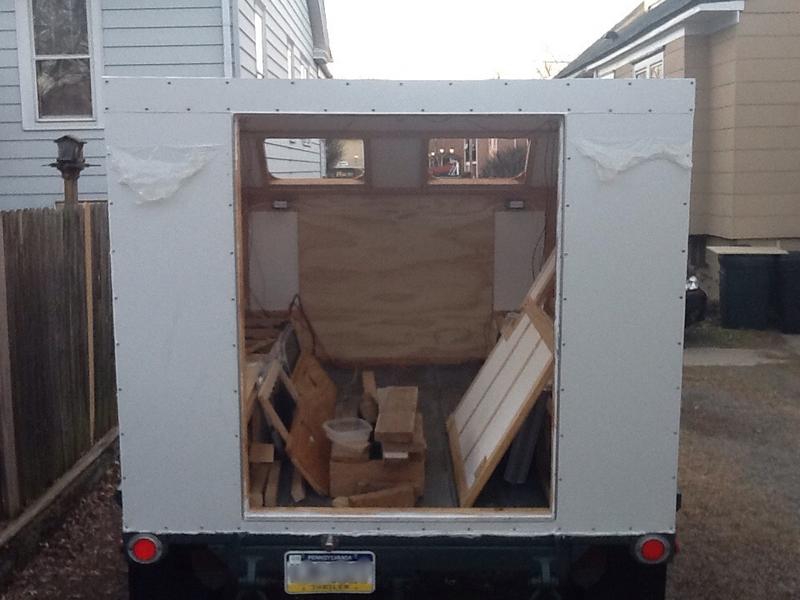
First day of skinning!

Today I got the feel of cutting aluminum with my jig saw, and made a bunch of mistakes that hopefully I won't make again. My neighbor Tim helped out a lot today, as 4x10 pieces of aluminum are unwieldy and are much easier to manipulate with two people than with one. The weather was beautiful. 8)

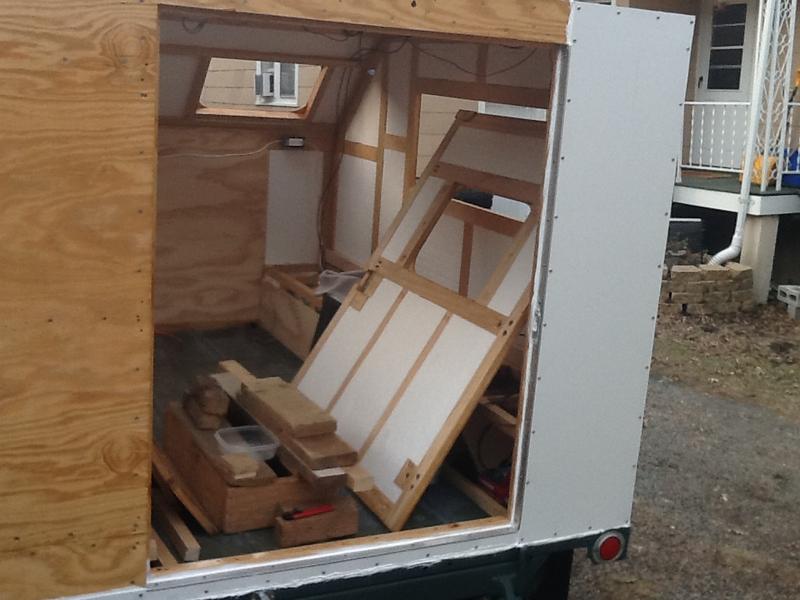
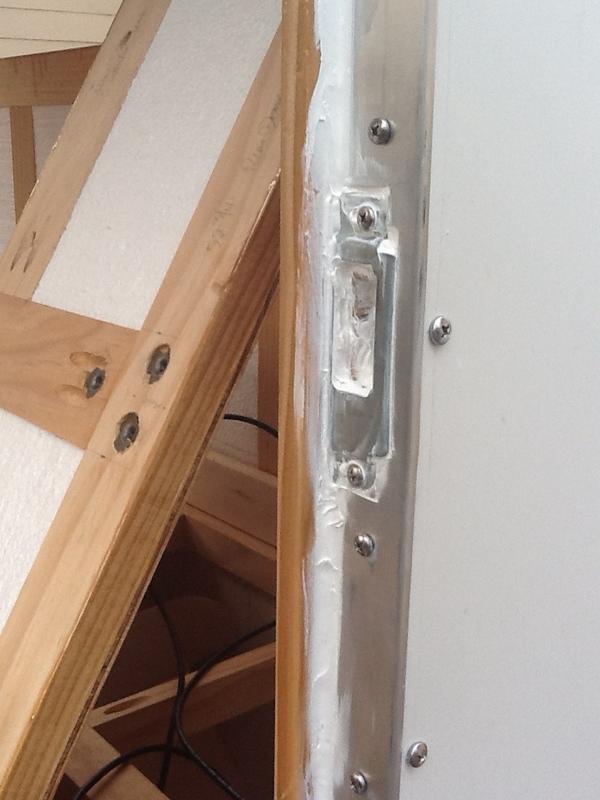
Today we focused on making the rear door skin. We got it cut to shape, including making openings for the 14x21 window and the latch hardware. It looked pretty great and the hardware fit well. We also cut t-moldings for the door edges, using a mitre box for 45 degree corners. Made one length too short by accident, but I have extra molding material just for that reason. ;)

Then, as the sun started to set, Tim noticed the door skin looked gray, not white... What???!!! The aluminum sheeting that I thought was white on both sides was only white on one side, and the other side was a very light gray. Neither one of us noticed the difference during the bright sunny part of the day, but it was clear now. We also realized that the white side was covered in plastic but the gray side was not. We had made the door skin backwards! :cry:

We strategized. We could spray paint it white. Well, no, it would never match or look as good. We could make the trailer all in gray. No, I wanted a white trailer. A gray trailer just wouldn't look good. We could leave the door gray, and make the rest of the trailer white. Well, as my very wise wife said to me, I would probably always notice it every time I opened the door, and I would never be happy with it. So, the only thing to do is to remake that door skin!

Looking at my sheet metal supply and doing some calculations, I still have enough for the whole trailer if I don't make too many more errors. A new door it is! :thumbsup: I will begin bright and early again tomorrow morning.
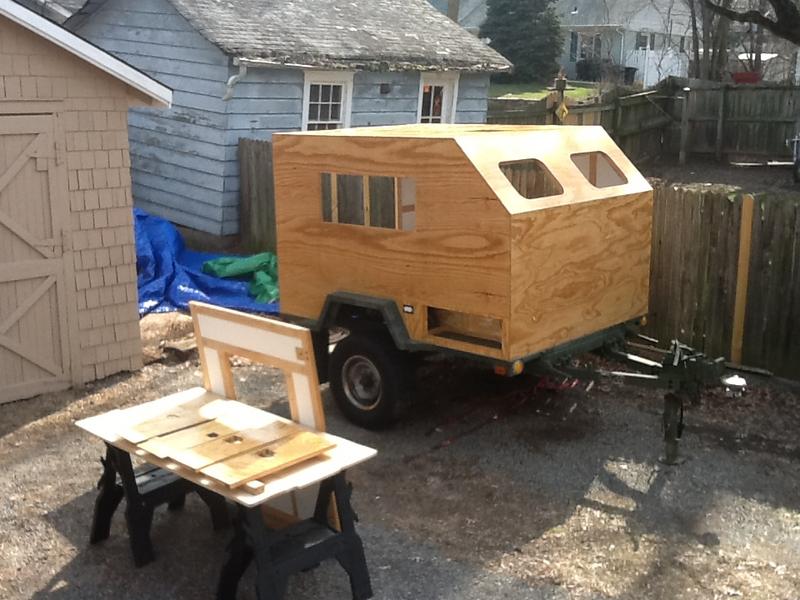
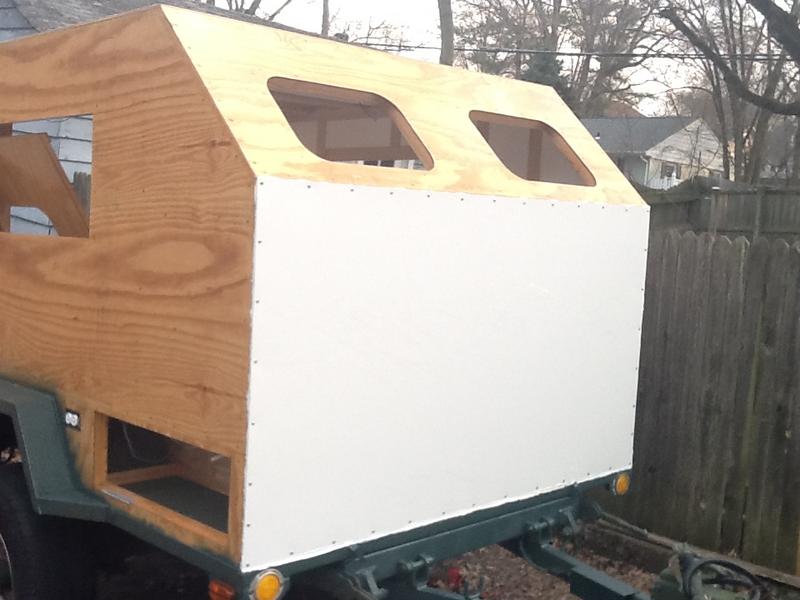
My off-road camper build on an M116A3 military chassis:
http://www.tnttt.com/viewtopic.php?f=50&t=62581
Tow vehicle: 2008 Jeep Liberty with a 4 inch lift.
User avatar
lfhoward
1000 Club
1000 Club
 
Posts: 1370
Joined: Wed Jan 22, 2014 6:10 pm
Location: Philadelphia, PA
Top

Re: M116A3 Build

Postby Vedette » Thu Mar 10, 2016 12:15 pm

Oops!
Usually sheet aluminum comes with the "good"side covered with a "white" plastic film that peals off after you cut your piece to shape.
This is protection like the tape you put on the tool you are using to cut it with. :thinking:
Brian
Good Roads
Brian & Sandi
Here is a link to my Build Journal
viewtopic.php?f=50&t=50912
Image109106109111109110138766
User avatar
Vedette
Silver Donating Member
 
Posts: 5141
Images: 443
Joined: Thu Dec 01, 2011 4:28 am
Location: Westbank B.C.
Top

Re: M116A3 Build

Postby lfhoward » Thu Mar 10, 2016 5:29 pm

Thanks Brian! This one has a clear plastic film, so one side is definitely painted white.

Skinning is a slow process! But challenging in a good way, and I can't think of a better way to spend a spring break that is 80 degrees and sunny. Here are some pics of my progress. Thanks again to my friend Tim for his help! I couldn't do it without him, or at least I would still be on my first panel.

Here's the first one we put on. We picked this one because it is a simple rectangle. Low hanging fruit, and now we feel encouraged after yesterday's adventure.

Image

We are now working on the back wall, and have half of it up.

Image

The striker for the latch is in.

Image

As you can see, I am currently in a love/hate relationship with SikaFlex. (Door sill is not bad, but the lower bead = ugly!)

Image

Can anyone point me in a good direction for SikaFlex tips? The stuff is crazy waterproof but a real bear to work with. :thinking:

Some other things you may notice:
I will be using RV edge moldings, so the screws at the edges of the front and rear panels will be coming out and going back in once I have the side panel and the edge molding in place. I'm also using pan-headed screws in the door jambs, but the gap is sufficient to allow that, so no worries. :D
Last edited by lfhoward on Sun May 13, 2018 3:00 pm, edited 2 times in total.
My off-road camper build on an M116A3 military chassis:
http://www.tnttt.com/viewtopic.php?f=50&t=62581
Tow vehicle: 2008 Jeep Liberty with a 4 inch lift.
User avatar
lfhoward
1000 Club
1000 Club
 
Posts: 1370
Joined: Wed Jan 22, 2014 6:10 pm
Location: Philadelphia, PA
Top

Re: M116A3 Build

Postby lfhoward » Fri Mar 11, 2016 6:17 pm

Another good day for trailer skinning!

Finished up the rear of the trailer, including the door frame. The plastic coating is partially removed at the top.

Image

Am getting a little better with the SikaFlex. Not as much schmear all over everything. The bottom sill was installed yesterday and the side was installed today.

Image

I take back what I said about having enough room in the door jamb for pan headed screws. I am going to replace the sill screws you see here with flat headed ones that will be flush with the surface. Looks like I will need to grind the holes out of the aluminum with a countersink bit first.

One final speed bump I encountered today is that 0.04 sheet aluminum is too thick to bend with the roofing brake I borrowed from my roofer neighbor. I will need to bring my roof panels to a machine shop for bending on a beefier machine. I will call a few local places on Monday to see if anyone would be able to bend them for me. I only need three bends (45, 45, and 90 degrees) for the three roof angles.

Nice to be making progress! Tomorrow looks like nice weather again, so I plan to start making the sides.
Last edited by lfhoward on Sun May 13, 2018 3:01 pm, edited 2 times in total.
My off-road camper build on an M116A3 military chassis:
http://www.tnttt.com/viewtopic.php?f=50&t=62581
Tow vehicle: 2008 Jeep Liberty with a 4 inch lift.
User avatar
lfhoward
1000 Club
1000 Club
 
Posts: 1370
Joined: Wed Jan 22, 2014 6:10 pm
Location: Philadelphia, PA
Top

Re: M116A3 Build

Postby S. Heisley » Fri Mar 11, 2016 7:31 pm

Once you get the door jambs painted white, the squeeze-out of the goo that you are using will be a little less noticeable. Also, you might try using a razor blade to skim off some that got on the frame. Or, is that stuff paint-able so that you cover up some of the overflow on the black frame with black paint?
You might want to use some painters tape on the rest of the frame and around your window area so that you have less clean-up to do.

You're making good progress and spring is just around the corner! ;)
User avatar
S. Heisley
Super Lifetime Member
 
Posts: 8775
Images: 495
Joined: Mon Sep 17, 2007 10:02 am
Location: No. California
Top

PreviousNext

Return to Build Journals

Who is online

Users browsing this forum: No registered users and 15 guests