CapeBuild Build Journal

...ask your questions in the appropriate forums BUT document your build here...preferably in a single thread...dates for updates, are appreciated....

Re: CapeBuild Build Journal

Postby Capebuild » Wed Apr 20, 2022 6:33 pm

4.20.22
halfdome, Danny wrote:John, if you ever lay down contact cemented sheets again and have premature contact use either a spatula to cut the glue or a squirt bottle of lacquer thinner.
Then refresh that spot with more glue and go at again.
.
Thanks for the tips, Danny. I installed the rear roll pan today and followed your "method and direction"...... was a bit of a challenge getting the aluminum to curve out.....but (I think, I hope) it came out okay... left some clamps on overnight and will report back with photos and the outcome tomorrow.

Yesterday installed the pop open vents. I had gotten this TrimLok neoprene molding which worked out pretty well (the black ring around the vent). Also worked on the hatch aluminum trim. Will look to install the hurricane hinge tomorrow.
John
Attachments
trailer.4.20.22.jpg
trailer.4.20.22.jpg (268.74 KiB) Viewed 563 times
vent.jpg
vent.jpg (393.09 KiB) Viewed 563 times
hatch.jpg
hatch.jpg (274.1 KiB) Viewed 563 times
"Success can be defined as moving from failure to failure without loss of enthusiasm".... Churchill

Visit my Teardrop build here: viewtopic.php?f=50&t=73779
User avatar
Capebuild
Donating Member
 
Posts: 756
Images: 129
Joined: Sun Jan 31, 2021 6:50 am
Location: Massachusetts

Re: CapeBuild Build Journal

Postby Capebuild » Fri Apr 22, 2022 4:57 pm

4.22.22

Working on the hatch, looking to get that installed. Big milestone, in my life, seems. Today my wife and I carried the hatch into the house in order to create the curved window that will be in the hatch. Cranked the oven up to 300° to soften the acrylic and drape it over the hatch. This will be the window in the hatch. Curved 2 pieces of aluminum over the window opening on hatch since the radius of the window is slightly larger than radius of the hatch to fit the gasket. I wanted to do all this prior to installing the hatch on the trailer so I wouldn't need to remove said hatch, since I'm using the hatch as the drape form. I had built an oven with a Weber grill for the softening the acrylic for the large front window.... but thought I'd use our kitchen oven for this task. The acrylic just fit in our turkey oven. Once I get the hatch door installed, I'll cut the newly curved acrylic to size and see how it fits with the TrimLok gasket... which will be a good sign to see how the large formed acrylic will fit with said Trimlok gasket.

John
Attachments
IMG_6607 Medium.jpeg
IMG_6607 Medium.jpeg (103.52 KiB) Viewed 533 times
IMG_6609 Small.jpeg
IMG_6609 Small.jpeg (33.33 KiB) Viewed 533 times
"Success can be defined as moving from failure to failure without loss of enthusiasm".... Churchill

Visit my Teardrop build here: viewtopic.php?f=50&t=73779
User avatar
Capebuild
Donating Member
 
Posts: 756
Images: 129
Joined: Sun Jan 31, 2021 6:50 am
Location: Massachusetts

Re: CapeBuild Build Journal

Postby TimC » Fri Apr 22, 2022 5:13 pm

Looks great. You are a talented builder!
Tim
Niagara, WI
My First Benroy Teardrop Build Thread - A 5x8 Woodie - http://www.tnttt.com/viewtopic.php?f=50&t=63575
My Second Teardrop (partial) Build Thread - Started August '16 - http://www.tnttt.com/viewtopic.php?f=50&t=66939
#3 My son's Benroy Foamie team build - Started July '20 - http://www.tnttt.com/viewtopic.php?f=50&t=72877

Image
User avatar
TimC
Gold Donating Member
 
Posts: 1382
Images: 736
Joined: Sat May 23, 2015 4:15 am
Location: WI/MI border
Top

Re: CapeBuild Build Journal

Postby bdosborn » Fri Apr 22, 2022 5:17 pm

Awesome! :thumbsup:
Bruce
2009 6.5'X11' TTT - Boxcar
All it takes is a speck of faith and a few kilowatts of sweat and grace.
Image
Boxcar Build
aVANger Build
User avatar
bdosborn
Donating Member
 
Posts: 5511
Images: 778
Joined: Wed May 05, 2004 11:10 pm
Location: CO, Littleton
Top

Re: CapeBuild Build Journal

Postby Capebuild » Sun Apr 24, 2022 4:59 pm

Thanks Tim and Bruce!!

Well... big day today! Got the hatch installed along with the lighting that goes on the hatch exterior. Good feeling. I can see I'll need some kind of draw latch on each side at the bottom of the hatch to pull it in a bit against the galley wall to get a complete seal. I'm sure there will be some tinkering with the sealing of the hatch.....and need to get a couple of gas struts to keep the hatch open. I had wanted to see what the dead weight of the hatch would be (60 #s) once it was installed before I ordered the struts.

John
Attachments
rear view2.jpg
rear view2.jpg (662.87 KiB) Viewed 481 times
rear.jpg
rear.jpg (645.6 KiB) Viewed 481 times
hatch open.jpg
hatch open.jpg (642.3 KiB) Viewed 481 times
"Success can be defined as moving from failure to failure without loss of enthusiasm".... Churchill

Visit my Teardrop build here: viewtopic.php?f=50&t=73779
User avatar
Capebuild
Donating Member
 
Posts: 756
Images: 129
Joined: Sun Jan 31, 2021 6:50 am
Location: Massachusetts
Top

Re: CapeBuild Build Journal

Postby Mikel46516 » Sun Apr 24, 2022 5:39 pm

That is one good-looking camper. Nice work, John.
Mikel46516
Teardrop Inspector
 
Posts: 22
Images: 11
Joined: Mon Sep 06, 2021 1:58 am
Top

Re: CapeBuild Build Journal

Postby bdosborn » Sun Apr 24, 2022 6:26 pm

Capebuild wrote:I can see I'll need some kind of draw latch on each side at the bottom of the hatch to pull it in a bit against the galley wall to get a complete seal.

I'd do it sooner than later. My hatch sprang back a little in an amazingly short amount of time...

Bruce
2009 6.5'X11' TTT - Boxcar
All it takes is a speck of faith and a few kilowatts of sweat and grace.
Image
Boxcar Build
aVANger Build
User avatar
bdosborn
Donating Member
 
Posts: 5511
Images: 778
Joined: Wed May 05, 2004 11:10 pm
Location: CO, Littleton
Top

Re: CapeBuild Build Journal

Postby JasenC » Mon Apr 25, 2022 10:10 pm

Getting close, it's truly looking great.
I'll be done when I'm finished, if that's not fast enough, take a number.

Build Thread https://www.tnttt.com/viewtopic.php?f=50&t=74269
User avatar
JasenC
The 300 Club
 
Posts: 420
Images: 122
Joined: Tue Oct 19, 2021 2:05 am
Location: Snohomish county Wa
Top

Re: CapeBuild Build Journal

Postby Capebuild » Tue Apr 26, 2022 5:27 am

Thanks for the comments Mikel and Jasen.
And thanks Bruce for your thought on the hatch and the spring back issue. I'm trying to find some sort of draw latch that will work for the situation.

John
"Success can be defined as moving from failure to failure without loss of enthusiasm".... Churchill

Visit my Teardrop build here: viewtopic.php?f=50&t=73779
User avatar
Capebuild
Donating Member
 
Posts: 756
Images: 129
Joined: Sun Jan 31, 2021 6:50 am
Location: Massachusetts
Top

Re: CapeBuild Build Journal

Postby bdosborn » Tue Apr 26, 2022 8:23 am

I used an over center draw latch on mine and it worked great. Something like this:
Image


https://www.mcmaster.com/over-center-latches/adjustable-grip-draw-latches-9/


Bruce
2009 6.5'X11' TTT - Boxcar
All it takes is a speck of faith and a few kilowatts of sweat and grace.
Image
Boxcar Build
aVANger Build
User avatar
bdosborn
Donating Member
 
Posts: 5511
Images: 778
Joined: Wed May 05, 2004 11:10 pm
Location: CO, Littleton
Top

Re: CapeBuild Build Journal

Postby halfdome, Danny » Tue Apr 26, 2022 9:24 am

Image
John, these work great for seasonal changes in your hatch.
:D Danny

https://www.pegasusautoracing.com/productdetails.asp?RecID=779
ImageImage
"Conditions are never just right. People who delay action until all factors are favorable do nothing". William Feather
Don't accept "It's Good Enough" build to the best of your abilities.
Image
Teardroppers Of Oregon & WashingtonImage
User avatar
halfdome, Danny
*Happy Camper
 
Posts: 5885
Images: 252
Joined: Sun Aug 14, 2005 11:02 pm
Location: Washington , Pew-al-up
Top

Re: CapeBuild Build Journal

Postby Capebuild » Tue Apr 26, 2022 2:29 pm

Thanks Danny and Bruce for the links. I had seen a latch on Mcmaster I had liked but they were out of stock. It was similar to
the product Danny posted.... ordered a set of those.

John
"Success can be defined as moving from failure to failure without loss of enthusiasm".... Churchill

Visit my Teardrop build here: viewtopic.php?f=50&t=73779
User avatar
Capebuild
Donating Member
 
Posts: 756
Images: 129
Joined: Sun Jan 31, 2021 6:50 am
Location: Massachusetts
Top

Re: CapeBuild Build Journal

Postby KCStudly » Wed Apr 27, 2022 9:38 am

I got those same adjustable locking draw latches from McMaster and they're pretty nice.

Couple of things to look out for:

1. The threads on the adjustment feature of mine were pretty rough, and being stainless steel, they wanted to gaul. First thing I did was disassemble, chase threads and lubricate.

2. Before drilling for mounting the catch tab, adjust the draw hook into the latch so that the catch tab screws are hidden under the latch handle when locked. There is enough adjustment that if you don't screw it in enough the catch tab screws can be left out in the open, defeating the security of the locking feature (if not hidden under the locked handle, a thief could just unscrew the catch tab freeing the latch to open).

Hope that makes sense.
KC
My Build: The Poet Creek Express Hybrid Foamie

Poet Creek Or Bust
Engineering the TLAR way - "That Looks About Right"
TnTTT ORIGINAL 200A LANTERN CLUB = "The 200A Gang"
Green Lantern Corpsmen
User avatar
KCStudly
Donating Member
 
Posts: 9616
Images: 8169
Joined: Mon Feb 06, 2012 10:18 pm
Location: Southeastern CT, USA
Top

Re: CapeBuild Build Journal

Postby Onajourney » Wed Apr 27, 2022 10:10 am

This is coming along spectacularly. I have been very excited watching this build and have been eagerly awaiting you installing the windows which is SO soon I can't stand it.. I am going with your design on mine which has had not much progress other than me continuing research and tweaking design since finishing the frame. I have completed a bunch unrelated projects that give me the green light on my build. Great to to see yours coming along so impressively.
User avatar
Onajourney
Teardrop Master
 
Posts: 248
Images: 181
Joined: Mon Sep 06, 2021 2:16 am
Location: Central North Carolina
Top

Re: CapeBuild Build Journal

Postby Capebuild » Wed Apr 27, 2022 4:52 pm

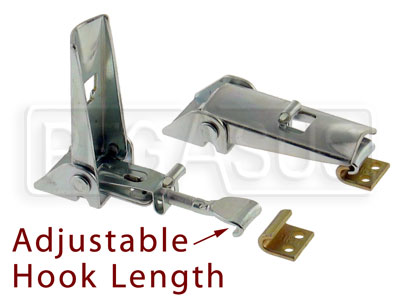
KCStudly wrote:I got those same adjustable locking draw latches from McMaster and they're pretty nice.

Couple of things to look out for:


Thank you for the tips, KCStudly. They sound good and I'll do a some prep work on latches (once I receive them and prior to install. I still want to add some additional seals so I think I'll install the seals first .... then the latches... thanks

Onajourney wrote:have been eagerly awaiting you installing the windows

Thanks for your comments, Onajourney. You and me both.... waiting to start work on the windows. I've got them ready for install just want to finish up a few other things.

But today I did install the fixed curved window that is located in the hatch. This is the acrylic that I showed in a post or 2 back where I softened the plastic up in my kitchen oven and draped the softened acrylic over the form (the hatch). That was very exciting to see that come together and not as much of a PITA as I thought it was going to be. I'll see what the experience will be with the larger front window.... but all in all... the hatch window went relatively aggravation free. Picts attached. I had made a tool that helped to coerce the gasket's flange over the window. Spraying soapy water prior to install also helped. The gasket I used has an integral self locking feature. I can't see setting that locking feature on the gasket without the tool shown below. The first picture Is shown prior the locking gasket closed up. The double second pictures shows the job completed with the locking gasket folded into position. Once the locking gasket is set it really sets the gasket nice and tight up against the aluminum.

Started to install some exterior lighting, also. The "porch lights" installed relatively easily. The marker lights.... not so much and need to dittle around with them and make some rubber gaskets to place between them and the aluminum siding.... so the aluminum siding is not grounded to the lights. These lights were made for Airstreams where I guess the aluminum siding acts as a ground. Probably could have chosen better on the lights, but I liked the way they looked :frightened:

John
Attachments
bfore locking gasket.jpg
bfore locking gasket.jpg (180.88 KiB) Viewed 298 times
w window.jpg
w window.jpg (781.8 KiB) Viewed 298 times
locking gasket tool.jpg
locking gasket tool.jpg (194.66 KiB) Viewed 298 times
"Success can be defined as moving from failure to failure without loss of enthusiasm".... Churchill

Visit my Teardrop build here: viewtopic.php?f=50&t=73779
User avatar
Capebuild
Donating Member
 
Posts: 756
Images: 129
Joined: Sun Jan 31, 2021 6:50 am
Location: Massachusetts
Top

PreviousNext

Return to Build Journals

Who is online

Users browsing this forum: No registered users and 21 guests