Tin Tiny - a 1940's rebuild

...ask your questions in the appropriate forums BUT document your build here...preferably in a single thread...dates for updates, are appreciated....

Postby doug hodder » Sun Jan 03, 2010 10:33 pm

Those windows just look great in that!!!!! Doug
doug hodder
*Snoop Dougie Doug
 
Posts: 12625
Images: 562
Joined: Tue Dec 14, 2004 11:20 pm

Re: Some work got done over Christmas break.

Postby Alfred » Sun Jan 03, 2010 11:06 pm

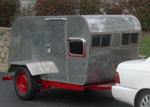
crdouger wrote:I finished installing the last two windows...I like the way they came out....


This camper just keeps getting better and better, you're doing great work on it. Its gonna be a headturner in the campground...I really dig the windows - And what a nice view you will have from the front with the windows all around...

Al in Asheville :thumbsup:
4 minute video of our build - A 5x8 Camper for a family of 5 - http://youtu.be/CYGTlkfpIhY
How we built a 5x8 camper for a family of 5, using a utility trailer with an incorporated bunk bed for the kids.
From plain trailer to campground!

ImageImageImage
Also - More pictures here: http://flic.kr/ps/225piC
User avatar
Alfred
Silver Donating Member
 
Posts: 1633
Images: 368
Joined: Sun Jun 03, 2007 9:18 pm
Location: NC, Asheville

Sorry it's been so long...

Postby crdouger » Tue Apr 13, 2010 8:56 pm

I know I haven't posted in a while. I got in a slump over Christmas and didn't fee like working on it. And the all of a sudden Spring Break was upon us and it was a crash course in trying to get it done-enough for it's maiden voyage. I remembered to snap a few pictures along the way. Here you go. Enjoy. If you have advice or lessons learned along the way, please feel free to share. Thanks.

Doug
User avatar
crdouger
Teardrop Builder
 
Posts: 33
Images: 57
Joined: Thu Nov 06, 2008 10:32 pm
Location: Rockford, MI
Top

Postby crdouger » Tue Apr 13, 2010 9:02 pm

I had removed the old frame and found some aluminum I-beam at the local scrap yard. So I made a new frame out of the I-beam and .060 aluminun sheet. It was maybe 75 lbs when I was done compared to hundreds for the steel frame. In the pictures you can see the top views and the under view. You can also see the aluminum frames for the upper and lower hatches.

Image

Image
User avatar
crdouger
Teardrop Builder
 
Posts: 33
Images: 57
Joined: Thu Nov 06, 2008 10:32 pm
Location: Rockford, MI
Top

Postby crdouger » Tue Apr 13, 2010 9:07 pm

Next on the list was to mount the axles. I ordered a #9 torsion axle from Dexter with a 2000# capacity. Now I wish I had lowered the load rating to 1500# because it rides a bit stiff. I ordered electric brakes and bolted it directly to the bottom of the frame. My kids and I did a whole bunch of testing of wieght with our bathroom scale to find the best axle location. The estimated total weight of the trailer finished with out the axle came out to 692lbs. I think the axle wieghs another 95lbs. With it completely loaded I think it will be around 1000lbs.

Image

I bought some used rims and tires off craigslist for $80. I think rims make the vehicle. :D

Image
User avatar
crdouger
Teardrop Builder
 
Posts: 33
Images: 57
Joined: Thu Nov 06, 2008 10:32 pm
Location: Rockford, MI
Top

Postby crdouger » Tue Apr 13, 2010 9:10 pm

Next I turned back to the interior to finish the insulating and running all of the 12v and 120v wires. I used great stuff to fill all the cracks and "glue" the wires in place so they didn't vibrate and wear. I used liquid nail to glue the wires in place wherever they could possibly rub on a sharp edge. I ran everything to the tool box up from that became my electrical headquarters. I ran a short piece of 2" diameter pvc with a rubber sleeve joint as conduit between the trailer and the toolbox and then sealed it all with silicone.

Image
User avatar
crdouger
Teardrop Builder
 
Posts: 33
Images: 57
Joined: Thu Nov 06, 2008 10:32 pm
Location: Rockford, MI
Top

Postby crdouger » Tue Apr 13, 2010 9:14 pm

I used a hurricane hinge style hinge on the upper hatch. I sealed the top part of the hinge well, but assumed that water would automatically shed off of the lower part of the hinge that is riveted to the hatch itself. That's great in theory...AS LONG AS YOU NEVER LIFT THE HATCH IN THE RAIN!!!!!! Brain fart...I've got to redo that. Sorry about all the tools in the picture. I drilled a real small hole on each end and put in a small stainless steel cotter pin to hold the hatch from walking side to side.


Image
User avatar
crdouger
Teardrop Builder
 
Posts: 33
Images: 57
Joined: Thu Nov 06, 2008 10:32 pm
Location: Rockford, MI
Top

Postby crdouger » Tue Apr 13, 2010 9:18 pm

The edges of my galley wall perplexed me for a long time. I need a smooth surface for my weather strip to seal against. But I had all kinds of rough sheet metal edges to cover. I ended up cutting a piece of sheet aluminum 1/4" wide on each side and screwing it to the trailer with 10-28 flat heads. Then I wrapped it around each edge with a rubber mallet and sealed the whole thing down with silicone. While not perfect, I'm happy with the results.


Image

Image
User avatar
crdouger
Teardrop Builder
 
Posts: 33
Images: 57
Joined: Thu Nov 06, 2008 10:32 pm
Location: Rockford, MI
Top

Postby crdouger » Tue Apr 13, 2010 9:19 pm

I used four pop-up trailer hatches to lock everything closed and tight.

Image
User avatar
crdouger
Teardrop Builder
 
Posts: 33
Images: 57
Joined: Thu Nov 06, 2008 10:32 pm
Location: Rockford, MI
Top

Postby crdouger » Tue Apr 13, 2010 9:24 pm

The hatches gave me a run for my money too, but I love the way they came out. Here's the lower hatch covering what we call the trunk. I used a stainless piano hinge to mount it.

Image

Image

Here's the upper hatch frame and the second shot shows the gas struts I used to lift it. Those worked fantastic. 40# each and it pushes the hatch up and keeps it up firmly. But I estimate that the whole hatch weighs less than 10lbs.

Image

Image

Image
User avatar
crdouger
Teardrop Builder
 
Posts: 33
Images: 57
Joined: Thu Nov 06, 2008 10:32 pm
Location: Rockford, MI
Top

Postby crdouger » Tue Apr 13, 2010 9:27 pm

The front of the trailer I bolted a steel 2" hitch and safety chains and on the side plate I mounted a swivel jack. Above the frame in the front I mounted my plastic delta tool box (another craigslist find!)


Image

Image
User avatar
crdouger
Teardrop Builder
 
Posts: 33
Images: 57
Joined: Thu Nov 06, 2008 10:32 pm
Location: Rockford, MI
Top

Postby crdouger » Tue Apr 13, 2010 9:36 pm

Next I got to move to the interior which was a little more fun. We skinned the walls in knotty pine. I installed a flush ceiling light run off of a switch by the door. You'll notice that I haven't done any of the trim pieces yet. We decided that could wait until after the spring break trip.


Image

This picture shows the light switches by the door. The middle one turns on the interior dome light. The upper one turns on the outside porch light. THe outside porch light is a aftermark replacement for some 1940's ford truck or something. I thought it looked cool and sort-of period correct. It actually shines brighter than the picture shows.

Image

Image
User avatar
crdouger
Teardrop Builder
 
Posts: 33
Images: 57
Joined: Thu Nov 06, 2008 10:32 pm
Location: Rockford, MI
Top

Postby crdouger » Tue Apr 13, 2010 9:38 pm

In the back wall of the inside I needed to seal off any fumes from the gas powered fridge, but I also needed to access it in case it needs any work. So I built a small aluminum door. I content with the way it came out. It hinges at the top and is held in place by two small black screws on the bottom. I put weather stripping in it to seal off fumes.


Image
User avatar
crdouger
Teardrop Builder
 
Posts: 33
Images: 57
Joined: Thu Nov 06, 2008 10:32 pm
Location: Rockford, MI
Top

Postby crdouger » Tue Apr 13, 2010 9:41 pm

YEAH!!!!!!!!!! We were camping. I need to build the shelves in the galley yet, so we just threw the food in totes for now. But we were using it!

Image
User avatar
crdouger
Teardrop Builder
 
Posts: 33
Images: 57
Joined: Thu Nov 06, 2008 10:32 pm
Location: Rockford, MI
Top

Postby crdouger » Tue Apr 13, 2010 9:44 pm

We camped at Fall Creek Falls State Park in TN and at Mammoth Cave State Park in Indiana.


Image

Image

A pretty serious accident on I-65N gave us a two break right on the highway. We hauled out chairs, food, cards, and met the neighbors. The trailer was a fun conversation piece.

Image
User avatar
crdouger
Teardrop Builder
 
Posts: 33
Images: 57
Joined: Thu Nov 06, 2008 10:32 pm
Location: Rockford, MI
Top

PreviousNext

Return to Build Journals

Who is online

Users browsing this forum: No registered users and 15 guests