Mueller Teardrop Cargo Hauler

...ask your questions in the appropriate forums BUT document your build here...preferably in a single thread...dates for updates, are appreciated....

Postby aggie79 » Fri May 07, 2010 8:35 am

Mark,

:applause: :thumbsup: :applause:

Your teardrop is looking good! Interesting suspension by the way. I bet you felt proud when the sidewalls were stood up and the spars/joists were installed.
Tom (& Linda)
For build info on our former Silver Beatle teardrop:
Build Thread

93503
User avatar
aggie79
Super Duper Lifetime Member
 
Posts: 5405
Images: 686
Joined: Tue Aug 07, 2007 5:42 pm
Location: Watauga, Texas

Postby Rigsby » Fri May 07, 2010 5:54 pm

As you plan on using the parking brake , why dont you run the cables to an equaliser, and then on to an over-run hitch, This way you will have the trailer braked, and have an integeral parking brake when not attatched to the beamer
This is what i did when i made a trailer from the back end of a pick up. It gives you that piece of mind that the trailer shouldnt step the rear of the car out when braking in the fast corners
steve
DOOIN IT THE YAARKSHA WAY--FA NOWT, THA NUS !!
User avatar
Rigsby
500 Club
 
Posts: 587
Joined: Sun Aug 31, 2008 12:21 pm
Location: Doncaster, England

Postby mark6mueller » Sat May 08, 2010 10:04 pm

Tom and Linda,

You are right it really felt like I was making progress when the profiles where standing up!

Steve,

I bought a hydraulic tongue to operate the brakes of the trailer. It has an electric lock out so I can turn it off on long hills and use the engine instead of frying the trailer drums. I think I figured out a way to get the parking brake to work. I am going to use an extension rod so the lever can be near the hitch. The cables aren't long enough.
Best Regards,

Mark.
User avatar
mark6mueller
Donating Member
 
Posts: 58
Images: 51
Joined: Thu Mar 25, 2010 11:50 pm
Location: Eureka, California
Top

Headliner Going In!

Postby mark6mueller » Fri May 14, 2010 10:24 pm

I'm starting to install the head liner! Image
Best Regards,

Mark.
User avatar
mark6mueller
Donating Member
 
Posts: 58
Images: 51
Joined: Thu Mar 25, 2010 11:50 pm
Location: Eureka, California
Top

Headliner, Wiring

Postby mark6mueller » Sun May 16, 2010 10:57 pm

I completed the main head liner and started installing the wiring. Waiting for electrical parts to arrive to complete the wiring. Next is complete wiring, hatch, and outside shell. I added pics to the album.
Best Regards,

Mark.
User avatar
mark6mueller
Donating Member
 
Posts: 58
Images: 51
Joined: Thu Mar 25, 2010 11:50 pm
Location: Eureka, California
Top

Electrical Parts Arrived!

Postby mark6mueller » Mon May 17, 2010 10:46 pm

Meeting tomorrow evening so I will try to get back to work on Wednesday.
Best Regards,

Mark.
User avatar
mark6mueller
Donating Member
 
Posts: 58
Images: 51
Joined: Thu Mar 25, 2010 11:50 pm
Location: Eureka, California
Top

Postby grizz » Tue May 18, 2010 1:11 am

Mark, I love the supports you used to get the liner sitting just right.
Another trick learned too late, however, I did use my yard broom last night to hold up the liner when cutting and prepping the skylight.
Greetings from England.

Rian.


Hoping to get it all done in time.
User avatar
grizz
1000 Club
1000 Club
 
Posts: 1210
Images: 29
Joined: Mon Sep 21, 2009 2:37 pm
Location: Rochester, Kent, UK
Top

Postby mark6mueller » Tue May 18, 2010 11:30 pm

Grizz,

Yah, 4 foot stakes. 85 cents a pop. Now I am using them as ribs for the hatch.
Best Regards,

Mark.
User avatar
mark6mueller
Donating Member
 
Posts: 58
Images: 51
Joined: Thu Mar 25, 2010 11:50 pm
Location: Eureka, California
Top

Postby Ageless » Tue May 18, 2010 11:47 pm

In the Navy; that is called shoring up a seal
Strangers on this road we are on; we are not two, we are one - Raymond Douglas Davies
User avatar
Ageless
Platinum Donating Member
 
Posts: 1603
Images: 8
Joined: Tue Aug 04, 2009 8:34 am
Location: Pt. Orchard, WA
Top

It is fully Enclosed!

Postby mark6mueller » Sun May 23, 2010 7:46 pm

Hey all!

Got some more done. I am feeling a little frantic. I was hoping to complete this trailer a week ago. Need it Memorial Day Weekend. I think I can make it in time. Gotta finish the rear latch, profile skin, electrical, safety cables, add coats of finish. Check out the tail!

Image
Best Regards,

Mark.
User avatar
mark6mueller
Donating Member
 
Posts: 58
Images: 51
Joined: Thu Mar 25, 2010 11:50 pm
Location: Eureka, California
Top

Back to Work

Postby mark6mueller » Sun Jul 18, 2010 2:14 pm

In May, I had completed the top and rear hatch surfaces and had them propped them up with a board on the ground. I moved the trailer forgetting to let the hatch down first and when it fell, the top hatch turned into splinters when hit it's stops. Various obligations since then. Now I am back to work. Remade a new top hatch with some strength improvements. After creaming the first hatch, I am aware that I must have the hatch movement carefully worked out.
So yesterday I designed a linkage system that allows the user to simply lift the two piece hatch to open it. It stays in place once opened. To close just pull down on the back of the rear lid to release and support the hatch as it closes. I will post a video soon.
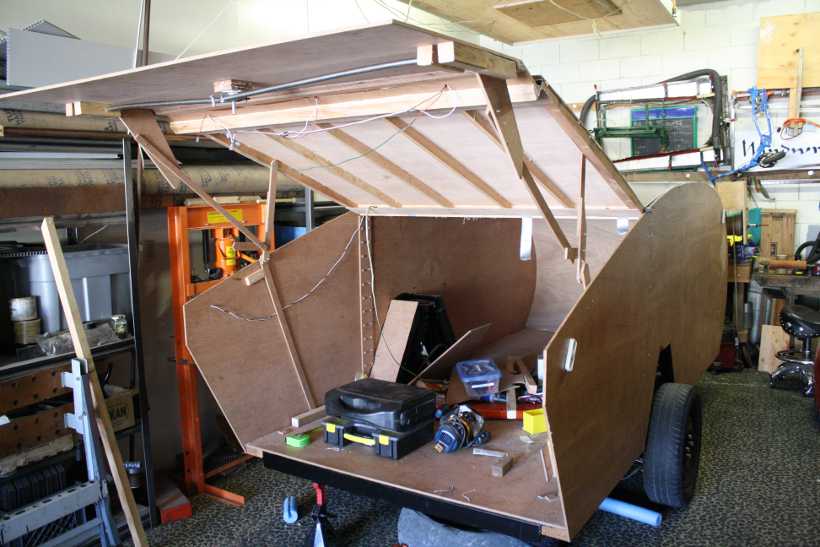
Image

Today I will replace the sheet rock screws and plywood scrap version with oak and 1/4" 20 screws with Nylock nuts.
Best Regards,

Mark.
User avatar
mark6mueller
Donating Member
 
Posts: 58
Images: 51
Joined: Thu Mar 25, 2010 11:50 pm
Location: Eureka, California
Top

Teardrop Hatch Operation

Postby mark6mueller » Sun Jul 18, 2010 9:57 pm

Here's a link to video of the hatch using the plywood strips and sheet rock screw linkage mock up:

http://www.youtube.com/watch?v=-d9T3notwuw
Best Regards,

Mark.
User avatar
mark6mueller
Donating Member
 
Posts: 58
Images: 51
Joined: Thu Mar 25, 2010 11:50 pm
Location: Eureka, California
Top

Postby Greg M » Sun Jul 18, 2010 11:52 pm

Tres cool, Mark.

-Greg
Give a person a fish and you feed them for a day; teach a person to use the Internet and they won't bother you for weeks.
User avatar
Greg M
*Geek Extraordinaire
 
Posts: 1167
Images: 85
Joined: Mon Sep 12, 2005 12:40 am
Location: Victoria, BC, Canada
Top

Pamplin Grove

Postby mark6mueller » Mon Jul 19, 2010 6:27 pm

Dang,

I need to look at the calendar. I missed Pamplin Grove! It's in my neighborhood.
Best Regards,

Mark.
User avatar
mark6mueller
Donating Member
 
Posts: 58
Images: 51
Joined: Thu Mar 25, 2010 11:50 pm
Location: Eureka, California
Top

Installing the Skin!

Postby mark6mueller » Thu Jul 29, 2010 12:14 am

I am starting to install the aluminum skin. I found my local RV shop, J's RV, to be helpful. Alicia, one of the mechanics, helped me pick out edge trim. I think I will go back and see if they have some without the lip to go in between the aluminum sheets, rather than using 1/8" x 1" Aluminum bar stock. Image
That chunk of plywood on the side is a fender in the making. I want to bend the ends to the main walls to make a fender reminiscent of a Porsche 944. I am hoping the fenders will stiffen up the rear walls around the hatch.
Best Regards,

Mark.
User avatar
mark6mueller
Donating Member
 
Posts: 58
Images: 51
Joined: Thu Mar 25, 2010 11:50 pm
Location: Eureka, California
Top

PreviousNext

Return to Build Journals

Who is online

Users browsing this forum: No registered users and 15 guests