Johns TearDrop for 5

...ask your questions in the appropriate forums BUT document your build here...preferably in a single thread...dates for updates, are appreciated....

Postby J.Heyboer » Mon Nov 22, 2010 11:49 am

S. Stewart

I am definitly glad to be done working on the floor (goo) and now focusing on the fun stuff. It seems like it took forever to get to this point. I hope things go fast from here.

Tom & Sharon,

Thanks for the kind words, the floor was really quite easy. The spar varnish and birch plywood did most of the work! It only took 3 coats of spar varnish with light sanding in between coats to get a nice glossy finish.

Up until recently we have been exclusively tent campers. However we have had two seasons in a row were we got rained out 3 days into a week long camping trip. Hopefully by next spring we wont have to worry about that anymore.

Thanks John.
User avatar
J.Heyboer
Teardrop Advisor
 
Posts: 93
Images: 84
Joined: Mon Apr 19, 2010 12:00 pm
Location: Zeeland, MI

Postby J.Heyboer » Sun Dec 05, 2010 2:34 pm

Update Tme!

Over the holiday weekend I was able to finish framing the second wall. I then spent this past week glueing 1/4" birch ply to the first frame. By friday I had one wall completed and set in place.

Image

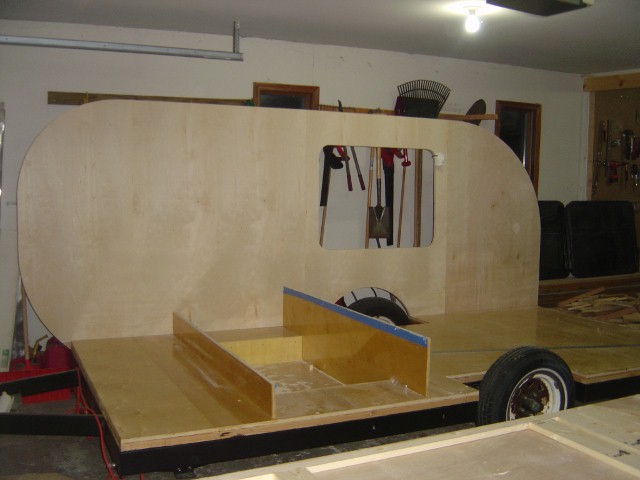
Saturday I glued the ply onto the second wall frame and trimmed it flush with the router. Today my brother-in-law came over and helped me set it in place.

Image

Image

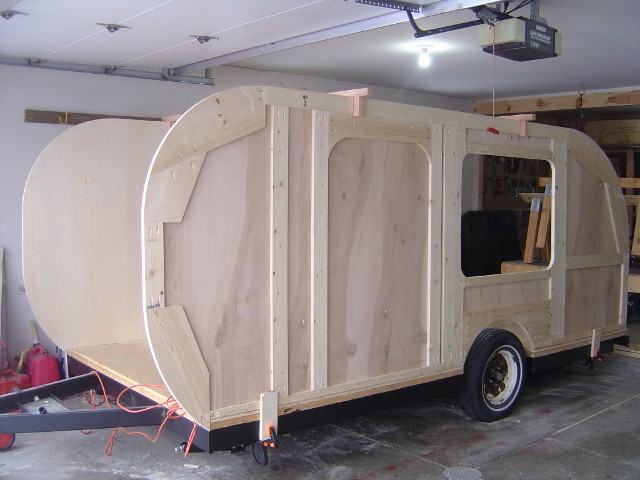
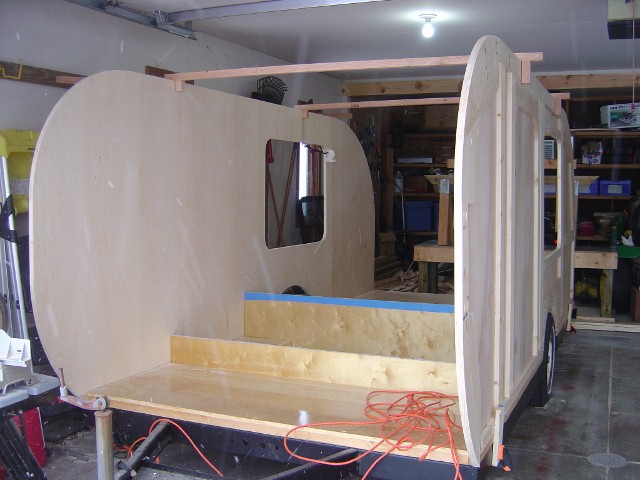
I am really happy with how it turned out. Even happier is my wife who finally got her side of the garage back, and can now park the van in side. It was nice for a few weeks there with the garage all to my self, o well....

John
User avatar
J.Heyboer
Teardrop Advisor
 
Posts: 93
Images: 84
Joined: Mon Apr 19, 2010 12:00 pm
Location: Zeeland, MI

Postby aggie79 » Sun Dec 05, 2010 3:36 pm

:applause: :thumbsup: :applause:

John,

Your Teardrop for Five is really cool! I know you are happy to have the walls up. Now you can see how your TD is coming together.

Are you going to do the same finish on the walls as you did for the floor?

Take care and keep posting pictures.

Tom
Tom (& Linda)
For build info on our former Silver Beatle teardrop:
Build Thread

93503
User avatar
aggie79
Super Duper Lifetime Member
 
Posts: 5405
Images: 686
Joined: Tue Aug 07, 2007 5:42 pm
Location: Watauga, Texas
Top

Postby mcspin50 » Mon Dec 06, 2010 1:58 am

Hi John,
Just read through your build for the first time. You're doing a great job. I'm envious of the smooth curved cuts you are making. Your Teardrop for Five looks like it will be a great getaway for your family.
My teardrop is tucked away for the winter. We needed the garage to keep the cars out of the cold and snow. :cry: I'm going to try and do smaller teardrop related projects in the furnace room (one I get it cleaned up :roll:) so I don't go through withdrawal.

Keep up the good work!
Lil M.
In every walk with nature, one receives far more than he seeks. - John Muir
Generic Benroy Build Journal here - My LilScamper Update Journal here
The Lily Pad...Image My LilScamper...Image Image
User avatar
mcspin50
Gold Donating Member
 
Posts: 488
Images: 158
Joined: Mon Oct 12, 2009 6:35 pm
Location: Perham, MN
Top

Postby J.Heyboer » Tue Dec 07, 2010 11:53 am

Tom,

I am absolutely glad to have the walls up. Just like everyone has said a thousands times before, it really looks like a camper now. My motivation factor went up exponentially. I am planning on doing the walls, floor, and ceiling in amber colored spar varnish. The benches, trim and cabinets will most likely be a darker brown color.

Lil,

I know what you mean on the snow, we just got our first 12" of lake effect snow. I will be donating my parking spot to the teardrop cause for the duration of the winter. I cringe everytime I open the garage door and a snow flake floats down onto the teardrop. My wife just looks at me like I'm crazy. (which I am of course)

Thanks for the words of encouragement from you both!
User avatar
J.Heyboer
Teardrop Advisor
 
Posts: 93
Images: 84
Joined: Mon Apr 19, 2010 12:00 pm
Location: Zeeland, MI
Top

Postby J.Heyboer » Sun Feb 06, 2011 8:35 pm

Hey Guys,

Time for an update.

Now that the walls have been built I obviously needed to attach them. However, when I went to install the above mentioned walls I found that there was a gap between the bottom of the wall and the floor. Not sure if it was the floor or my wall.

Image

I realized what I needed to correct this issue was a REALLY big clamp.

Image

After the mega clamp was deployed the walls were secured in very short order with screws and tite bond.

I then moved on to the interior roof and spars.

I preglued the spars to 1/4" plywood and then screwed 1x2 blocks on for clamping.

Image

Image

I then secured one side of the roof section and SLOWLY bent it around the curve. This ended up being very difficult (mostly due to 1/4" ply), but the end result was very satisfying. I then shot 2 screws into the sides of each spar.

Image

Image

Image

FYI - I can't take credit for the nifty roof install method, I stole it from NorthernMN.

Thats all for now.

John
Last edited by J.Heyboer on Tue Feb 08, 2011 5:37 am, edited 2 times in total.
User avatar
J.Heyboer
Teardrop Advisor
 
Posts: 93
Images: 84
Joined: Mon Apr 19, 2010 12:00 pm
Location: Zeeland, MI
Top

Postby droid_ca » Sun Feb 06, 2011 10:10 pm

wow I just read your build I really like your tequnics for the way you were bracing your walls and that seems like another one with the little blocks to space it for the ceiling panel and the finish looks great can't wait to see more
There is a world, just beyond now,
where reality runs a razor thin seam between fact and possibility;

Anywhere I roam where I lay my head is home....
Image
“Fide Canem”
Please check out my build thread
viewtopic.php?f=5&t=52816
User avatar
droid_ca
Donating Member
 
Posts: 1981
Images: 176
Joined: Thu Sep 30, 2010 5:08 am
Location: Prince George BC Canada
Top

Postby aggie79 » Mon Feb 07, 2011 10:50 am

:applause: :thumbsup: :applause:

John,

I bet it felt good to get the "roof" on. That method for attaching the ceiling ply to the spars and then clamping/screwing it to the sidewalls really seems effective.

Your Teardrop for Five looks great!

Tom
Tom (& Linda)
For build info on our former Silver Beatle teardrop:
Build Thread

93503
User avatar
aggie79
Super Duper Lifetime Member
 
Posts: 5405
Images: 686
Joined: Tue Aug 07, 2007 5:42 pm
Location: Watauga, Texas
Top

Postby J.Heyboer » Tue Feb 08, 2011 12:24 pm

Thanks for the kind words guys, things seem to be going smoothly so far. I think I am going to tackle the wheel wells next. Wish me luck.........

John
User avatar
J.Heyboer
Teardrop Advisor
 
Posts: 93
Images: 84
Joined: Mon Apr 19, 2010 12:00 pm
Location: Zeeland, MI
Top

Postby LDK » Wed Feb 16, 2011 9:46 pm

That's a nifty way of installing the interior ceiling. :thumbsup:
LDK
Gold Donating Member
 
Posts: 1419
Images: 1
Joined: Fri Jan 22, 2010 8:29 pm
Top

Postby J.Heyboer » Sun Feb 20, 2011 8:33 pm

Alright got a little done this weekend.

Started out by cutting out my doors using a pattern bit and my router.

Image

Image

Next I cut all the pieces for my wheel wells from left over 3/4" pieces of birch plywood.

Then I glued matching pieces of .010" aluminum to each piece.

Image

Image

Next I cut squares out of the corners and folded the flaps over.

Image

Image

Then I bolted the pieces together using SS lag bolts and aluminum angle.

Image

Here they are set in place.

Image

Probably a little more complicated than they need to be, but Im happy with how they turned out.

Im thinking of coating the inside with roofing tar for added protection, but it seems like over-kill.

John
User avatar
J.Heyboer
Teardrop Advisor
 
Posts: 93
Images: 84
Joined: Mon Apr 19, 2010 12:00 pm
Location: Zeeland, MI
Top

Postby droid_ca » Sun Feb 20, 2011 8:50 pm

wow good job on the wheel wells very well thought out :applause: :applause: :applause:
There is a world, just beyond now,
where reality runs a razor thin seam between fact and possibility;

Anywhere I roam where I lay my head is home....
Image
“Fide Canem”
Please check out my build thread
viewtopic.php?f=5&t=52816
User avatar
droid_ca
Donating Member
 
Posts: 1981
Images: 176
Joined: Thu Sep 30, 2010 5:08 am
Location: Prince George BC Canada
Top

Postby aggie79 » Mon Feb 21, 2011 9:44 am

John,

Those are the prettiest wheelwells I've ever seen. You want have to worry about strength or moisture-resistance with those!

Take care,
Tom
Tom (& Linda)
For build info on our former Silver Beatle teardrop:
Build Thread

93503
User avatar
aggie79
Super Duper Lifetime Member
 
Posts: 5405
Images: 686
Joined: Tue Aug 07, 2007 5:42 pm
Location: Watauga, Texas
Top

Postby tsmiley23 » Wed Feb 23, 2011 11:27 pm

Hi J,

I'm on this site to make use of all the good advice available here and I hope people will help me if they see something I miss or don't know. Having said this; I know water and even though your wheel wells may keep water out the seams between the angles, corners and butt joints will get moisture between them and will stay wet for a long time. Instead of tarring the whole well I'd disassemble these joints and fill them with caulk. I apologize for any offense I just hope this helps.
CONSISTENCY!!!!!! It's only a good thing if you're not a screw up.
User avatar
tsmiley23
Teardrop Advisor
 
Posts: 70
Images: 159
Joined: Thu Feb 04, 2010 10:44 am
Location: Woodland Park, CO
Top

Postby J.Heyboer » Mon Feb 28, 2011 1:19 pm

Thanks Tom and Droid,

I am happy with how they turned out.


Smiley,

Thanks for the advice, no need to apologize. I already coated the entire wheel well with roofing tar this weekend, but I do plan to squirt caulk into all the joints from the inside of the camper. I think the roofing tar + alumium wrapped around the edges of each piece should make for a pretty water tight seal.

John
User avatar
J.Heyboer
Teardrop Advisor
 
Posts: 93
Images: 84
Joined: Mon Apr 19, 2010 12:00 pm
Location: Zeeland, MI
Top

PreviousNext

Return to Build Journals

Who is online

Users browsing this forum: No registered users and 16 guests