Trails in the Sand new updates 9-28-11

...ask your questions in the appropriate forums BUT document your build here...preferably in a single thread...dates for updates, are appreciated....

Postby Alan and Lianna » Fri Jun 04, 2010 12:00 am

We know we are working awfully slow, behind schedule and probably boring y'all to death with our daily updates and pictures (you should see all of the pictures we don't post). Bear with us and we will try to pick up the pace.

Alan and Lianna
Don't just dream about it!
Wake up and make it happen...
User avatar
Alan and Lianna
Teardrop Master
 
Posts: 120
Images: 389
Joined: Mon May 17, 2010 5:55 pm
Location: Pearland Tx

Postby S. Heisley » Fri Jun 04, 2010 9:29 am

Hi, Alan and Lianna:

Actually, you seem to be moving quite fast. You are not the least bit boring! You're doing a beautiful job and the pictures tell a great story. I like the bread box idea and the galley is very nice. :thumbsup: Thanks for sharing. :applause:
User avatar
S. Heisley
Super Lifetime Member
 
Posts: 8866
Images: 495
Joined: Mon Sep 17, 2007 10:02 am
Location: No. California

Postby BillZ » Fri Jun 04, 2010 2:57 pm

Love it Love it Love it!

Your build is giving me some great ideas!
User avatar
BillZ
The 300 Club
 
Posts: 308
Images: 0
Joined: Tue Feb 16, 2010 7:39 pm
Location: College Park, Maryland
Top

Postby aggie79 » Fri Jun 04, 2010 4:16 pm

Alan and Lianna wrote:We know we are working awfully slow, behind schedule and probably boring y'all to death with our daily updates and pictures (you should see all of the pictures we don't post). Bear with us and we will try to pick up the pace.

Alan and Lianna


Slow? Y'all have almost caught up with me and I started 18 months ago. Pictures? You can't have too many. Keep on posting!
Tom (& Linda)
For build info on our former Silver Beatle teardrop:
Build Thread

93503
User avatar
aggie79
Super Duper Lifetime Member
 
Posts: 5405
Images: 686
Joined: Tue Aug 07, 2007 5:42 pm
Location: Watauga, Texas
Top

Postby Alan and Lianna » Sat Jun 05, 2010 1:10 am

Thanks everyone for the words of encouragement. Today we framed the ceiling for the fantastic fan.
Image
We epoxied the ceiling seam, it still needs to be sanded and re epoxied and sanded again before painting
Image
We installed some roof insulation, really frustrating, first we tried liquid nails-it was taking too long to dry and eating into the insulation, so we used contact cement and found that if we left the plastic coating on the insulation it would work, if not it too would melt the insulation. I know there is foam board adhesive, but when we tried using it before it was so thick we destroyed a caulk gun!
Image
Then we started pulling wire, we installed 12 and 120v to the front cabinet, ran wiring for 2 3 way switches for the overhead lights, and wires for the exterior lights to be switched from the interior, and wires for the fantastic fan.
Image
Well, it may not be pretty, but it will be functional and it will look alot better when the roof is on...


Alan and Lianna
Don't just dream about it!
Wake up and make it happen...
User avatar
Alan and Lianna
Teardrop Master
 
Posts: 120
Images: 389
Joined: Mon May 17, 2010 5:55 pm
Location: Pearland Tx
Top

Postby Alan and Lianna » Sat Jun 05, 2010 11:37 pm

Today we finished up the insulation and ran a straight edge along the edge of the roof from side to side and sanded off anything that was protruding and installed the first layer of 1/8th inch plywood.
Image
Image
We secured it with finishing nails and PL Premium glue.
Image
We ran our wires through the cabinets and covered it with some homemade conduit.
Image
Image
The we sanded and applied another layer of epoxy to the interior ceiling.
Image
We are using this epoxy, which really seems to bond well and is not too hard to sand.
Image

Alan and Lianna
Don't just dream about it!
Wake up and make it happen...
User avatar
Alan and Lianna
Teardrop Master
 
Posts: 120
Images: 389
Joined: Mon May 17, 2010 5:55 pm
Location: Pearland Tx
Top

Postby Alan and Lianna » Sun Jun 06, 2010 10:39 pm

Well today started out good, we patched the lower edge of the galley wall which was initially cut 1/2 inch too short and since this is part of the hatch seal it had to be fixed.
Image
Then we started working on installing the second layer of 1/8th inch plywood on the roof. We were using the PL Premium glue and spreading it with a v notched trowel and using straps to hold everything down. Well let me tell you that by the time you spread enough of this glue to coat a 5 by 5 plywood sheet it will be too dry to work. We strapped it down and waited a while, then took the straps loose and nothing was holding and all the glue was dry only on the surface where it was applied. :x 
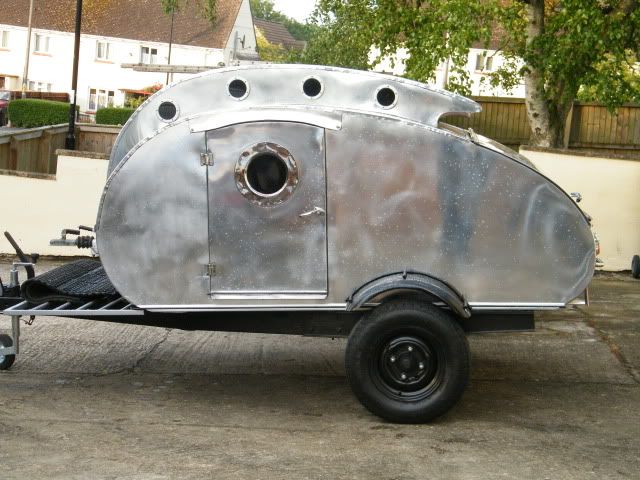
We wanted to finish this surface without putting any holes into the top layer, but after this frustration we bought some more Tightbond 3 squirted it everywhere and nailed and screwed all the plywood on. We will remove all the screws and sink the nails after it cures overnight.
Image
When cutting the last piece, I cut it on the wrong edge, so I had to cut it again and add another piece to patch the end. :x
Image
Then we sanded to interior roof seam again.
Image
We quit early today to get some much needed mental relaxation and be ready to do it again tomorrow.

Alan and Lianna
Don't just dream about it!
Wake up and make it happen...
User avatar
Alan and Lianna
Teardrop Master
 
Posts: 120
Images: 389
Joined: Mon May 17, 2010 5:55 pm
Location: Pearland Tx
Top

Postby Alan and Lianna » Tue Jun 08, 2010 12:37 am

Well today we started by removing all the screws holding down the ply and everything stayed in place, so off to a good start. We mixed some epoxy and
sawdust and filled in all the gaps and screw holes.
Image
We cut off the overhang on the roof with a router flushcut bit mounted in the Rotozip which a lot smaller and is easier to handle. My 1/4 inch flush cut had a locked up bearing, so I used the 1/2 inch to keep from burning the wood with the bearing. The cut came out nice.
Image
Image
Then we started sanding,
Image
and sanding, after I had sanded all the roof except for the seams, I decided to start sanding them too. The epoxy is still green and not completely cured, but changing sandpaper often worked out well.
Image
Lianna had a headache, so she decided dreaming about teardrops was what she needed.
Image
After she was rested, it was back to sanding...
We still have more sanding to do tomorrow before we are ready to epoxy, hopefully we can get the first coat on tomorrow afternoon.. We'll see...
Image

Alan and Lianna
Don't just dream about it!
Wake up and make it happen...
User avatar
Alan and Lianna
Teardrop Master
 
Posts: 120
Images: 389
Joined: Mon May 17, 2010 5:55 pm
Location: Pearland Tx
Top

Postby BillZ » Tue Jun 08, 2010 4:21 pm

Looks great! :applause:

That roof edge came out beautiful. After all the sanding, what are you covering the exterior with?
User avatar
BillZ
The 300 Club
 
Posts: 308
Images: 0
Joined: Tue Feb 16, 2010 7:39 pm
Location: College Park, Maryland
Top

Postby Alan and Lianna » Tue Jun 08, 2010 11:59 pm

Today started out with more sanding.
Image
After about 4 hours Lianna was sick and tired of sanding and wanted to know if we were done. I told her we were indeed done(2 second pause), with the rough sanding and ready to do the fine sanding- oh if looks could kill!! Well after a couple hours of fine sanding we were ready to move on.
Image
We swept up, blew down and vacuumed to reduce any flying debris. Then we applied the fiberglass cloth, this is a 6oz cloth that is 72 inches wide.
Image
Image
Then we applied the RAKA epoxy to wet out the fiberglass, we spread it with small plastic putty knives and used a paint brush to apply it to the front below
the curve and then pressing flat with the putty knife or a gloved hand.
Image
Image
Image
This worked out well, but we did have some of the edge that would not lay flat, we will have to see what we can do with it tomorrow.
Image
Our plan has been to make it look as good as possible and leave it a woody, but if it does not look as good as we would like, we could always paint it.

Alan and Lianna
Don't just dream about it!
Wake up and make it happen...
User avatar
Alan and Lianna
Teardrop Master
 
Posts: 120
Images: 389
Joined: Mon May 17, 2010 5:55 pm
Location: Pearland Tx
Top

Postby Alan and Lianna » Wed Jun 09, 2010 12:18 am

Looks great! Applause

That roof edge came out beautiful. After all the sanding, what are you covering the exterior with?


Thanks...

We have already applied 2 coats of CPES from the ROT Doctor to the exterior
walls. We are now using Fiberglass cloth on the roof and coating it with Epoxy
we ordered from RAKA.com. We ordered the 3 gallon kit with 127 resin and the
350 non blushing hardener. We are planning on at least 3 coats on the roof and
several coats on all other exterior surfaces. After we are finished we will
either leave it a woody and coat it with a UV protectant or paint it.

Alan and Lianna
Don't just dream about it!
Wake up and make it happen...
User avatar
Alan and Lianna
Teardrop Master
 
Posts: 120
Images: 389
Joined: Mon May 17, 2010 5:55 pm
Location: Pearland Tx
Top

Postby Alan and Lianna » Thu Jun 10, 2010 12:10 am

Upon arriving at the shop today, we cleaned off the bugs and applied another
coat of epoxy to the roof.
Image
This is what happens when you mix up too much epoxy.
Image

While waiting for the top and sides to dry, we started working on prepping the doors for installation, sanded all sides and cut off 1/4th of an inch from the width.
Image
Then we hung them.
Image
The edge of fiberglass draping over from the top was not laying flat in most areas and most of it had some air trapped under it. We decided to sand it all off on the sides.
Image

Image
Image
Then we applied another coat of epoxy on the roof and on the sides and doors.
Image
Image
We are rolling it on with small foam rollers which seems to be working out
very nicely. They do swell up and start falling apart just before the epoxy starts getting to thick to work with anyway.

Alan and Lianna
Don't just dream about it!
Wake up and make it happen...
User avatar
Alan and Lianna
Teardrop Master
 
Posts: 120
Images: 389
Joined: Mon May 17, 2010 5:55 pm
Location: Pearland Tx
Top

Postby grizz » Thu Jun 10, 2010 1:01 pm

hats off to you .

You guys are progressing massively well.

I love the look and the doors did it for me now.
Greetings from England.

Rian.


Hoping to get it all done in time.
User avatar
grizz
1000 Club
1000 Club
 
Posts: 1210
Images: 29
Joined: Mon Sep 21, 2009 2:37 pm
Location: Rochester, Kent, UK
Top

Postby Chris00WJ » Thu Jun 10, 2010 3:14 pm

Your progress and project is amazing. It's threads like this that keep me motivated to work on mine.

Thank you!
Chris00WJ
Teardrop Builder
 
Posts: 34
Images: 6
Joined: Mon Oct 19, 2009 3:22 pm
Top

Postby Alan and Lianna » Thu Jun 10, 2010 11:04 pm

Well today started out with sanding down the whole outside, I used a fine sandpaper and just knocked down the high areas. We then applied another coat of epoxy to the exterior.
Image
While that was drying, we started working on the inner door frames. We used 1/2" x 3 red oak on the bottom and poplar on the sides with a 1/8" spacer to create the gap where the weather stripping will go.
Image
Image
This is how it looks from the inside, we will be filling the holes and painting it to match the walls.
Image
Then we wired and skinned the hatch exterior.
Image
We are planning on removing the screws tomorrow and drilling out and filling in the holes with dowels.

Thanks for the words of encouragement ...

Alan and Lianna
Don't just dream about it!
Wake up and make it happen...
User avatar
Alan and Lianna
Teardrop Master
 
Posts: 120
Images: 389
Joined: Mon May 17, 2010 5:55 pm
Location: Pearland Tx
Top

PreviousNext

Return to Build Journals

Who is online

Users browsing this forum: No registered users and 20 guests