6 x 12 Pace American. Question on A/C answered.

...ask your questions in the appropriate forums BUT document your build here...preferably in a single thread...dates for updates, are appreciated....

aft

Postby Jeffmo63 » Wed Jul 14, 2010 9:00 am

Here is the aft end sheeted from the inside. Outside to be sheeted also.
Image
User avatar
Jeffmo63
Donating Member
 
Posts: 106
Images: 81
Joined: Mon Mar 22, 2010 12:31 am

Insulation

Postby Jeffmo63 » Thu Jul 15, 2010 11:03 pm

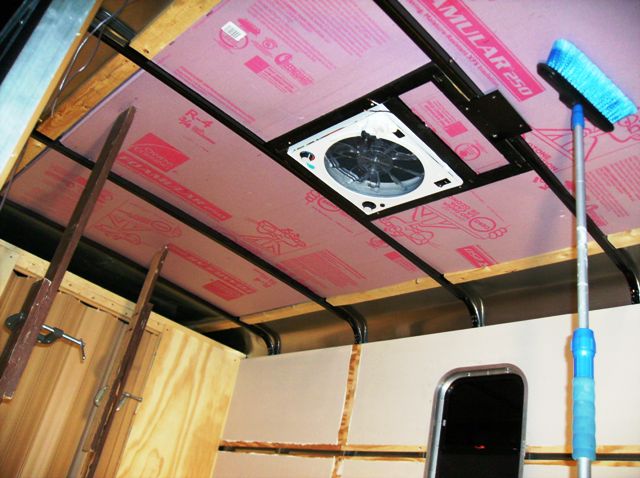
Today I finished installing the overhead insulation. Note makeshift bracing while the adhesive cures.
Image
User avatar
Jeffmo63
Donating Member
 
Posts: 106
Images: 81
Joined: Mon Mar 22, 2010 12:31 am

Postby aggie79 » Fri Jul 16, 2010 8:23 am

Your conversion is coming along nicely Jeff.

There sure is a lot of room in those! I know you'll put it to good use.
Tom (& Linda)
For build info on our former Silver Beatle teardrop:
Build Thread

93503
User avatar
aggie79
Super Duper Lifetime Member
 
Posts: 5405
Images: 686
Joined: Tue Aug 07, 2007 5:42 pm
Location: Watauga, Texas
Top

Postby Jeffmo63 » Fri Jul 16, 2010 12:59 pm

aggie79 wrote:Your conversion is coming along nicely Jeff.

There sure is a lot of room in those! I know you'll put it to good use.


Thank you for the words of encouragement. Actually, sometimes I get to thinking I would like even more room but this is OK for now. Late next week I will be going up to the EAA Airventure for about 10 days off grid so I am hoping to get at least the major mechanical stuff done in the next week or so.
User avatar
Jeffmo63
Donating Member
 
Posts: 106
Images: 81
Joined: Mon Mar 22, 2010 12:31 am
Top

Wiring

Postby Jeffmo63 » Sat Jul 17, 2010 2:47 pm

Today I plan on finishing the wiring for the lights and fan. Those wires sure get everywhere.
Image Image
User avatar
Jeffmo63
Donating Member
 
Posts: 106
Images: 81
Joined: Mon Mar 22, 2010 12:31 am
Top

Postby Jeffmo63 » Sun Jul 18, 2010 12:05 pm

Today I am mounting the refer/freezer in the trailer. I am using a 7/16 bolt and a coupling nut and another 7/16 bolt through the floor. This should be more than adequate and will let a little more cooling air flow under the bottom of the refer.
Image
User avatar
Jeffmo63
Donating Member
 
Posts: 106
Images: 81
Joined: Mon Mar 22, 2010 12:31 am
Top

main wiring harness

Postby Jeffmo63 » Mon Jul 19, 2010 6:39 am

More wiring. This time the main harness to the batt. Thick 6 ga goes to the inverter and thinner 10 ga goes to main fuse block. Still got to seal the hole with a semi non-permanent putty. Any ideas? I ended up using something called duct seal. It was in the electrical department and is very appropriate for this application.
Image Image
Last edited by Jeffmo63 on Tue Jul 20, 2010 11:01 am, edited 4 times in total.
User avatar
Jeffmo63
Donating Member
 
Posts: 106
Images: 81
Joined: Mon Mar 22, 2010 12:31 am
Top

wood

Postby Jeffmo63 » Mon Jul 19, 2010 8:37 am

1/4 luan to be used in overhead. First coat of poly-u shown. Next pic is of second and final coat. Pretty.

Image Image
User avatar
Jeffmo63
Donating Member
 
Posts: 106
Images: 81
Joined: Mon Mar 22, 2010 12:31 am
Top

refer

Postby Jeffmo63 » Mon Jul 19, 2010 12:50 pm

Refer/freezer installed and operating on 12 vdc. Wiring to be neatly bundled after lighting checks out.
Image
User avatar
Jeffmo63
Donating Member
 
Posts: 106
Images: 81
Joined: Mon Mar 22, 2010 12:31 am
Top

solar

Postby Jeffmo63 » Mon Jul 19, 2010 12:54 pm

15w of solar helping out a little. 80w Sharp panel desired.
Image
User avatar
Jeffmo63
Donating Member
 
Posts: 106
Images: 81
Joined: Mon Mar 22, 2010 12:31 am
Top

overhead

Postby Jeffmo63 » Tue Jul 20, 2010 11:09 am

Got one overhead panel screwed into the roof bows. Somewhat cumbersome working alone but managed with the help of some temporary braces. Also, make a note. Do not use cheap drill bits when drilling into steel. I wasted a lot of time trying it that way.
Image Image
User avatar
Jeffmo63
Donating Member
 
Posts: 106
Images: 81
Joined: Mon Mar 22, 2010 12:31 am
Top

lighting

Postby Jeffmo63 » Wed Jul 21, 2010 8:47 am

And here is the lighting installed. I will have a total of 5 dual bulb lights in the overhead and 2 singles on the aft bulkhead for reading. They light the interior quite nicely.
Image Image
User avatar
Jeffmo63
Donating Member
 
Posts: 106
Images: 81
Joined: Mon Mar 22, 2010 12:31 am
Top

Oshkosh

Postby Jeffmo63 » Thu Jul 22, 2010 12:06 am

OK, I am leaving in the morning for EAA Oshkosh Airshow with a partially completed CT. My intention is to work on her a little bit here and there while up there. All major systems are in place and functional. Will continue to update as I get more done or learn something new.
Image
User avatar
Jeffmo63
Donating Member
 
Posts: 106
Images: 81
Joined: Mon Mar 22, 2010 12:31 am
Top

Here

Postby Jeffmo63 » Sat Jul 31, 2010 7:14 pm

Here she is at the EAA. Had to move to a more dry location.
Image
User avatar
Jeffmo63
Donating Member
 
Posts: 106
Images: 81
Joined: Mon Mar 22, 2010 12:31 am
Top

roof/wall

Postby Jeffmo63 » Tue Aug 10, 2010 11:51 am

And for my next trick I had planned on attaching a beveled piece of plywood to finish the corner between the ceiling and side wall. Tried ripping some plywood with a circular saw and a guide but the pieces turned out pretty lousy as it seems circular saws don't rip too well on a 45 degree bevel. If I had a table saw, I would re-rip the pieces and I'm sure they would turn out pretty good. As it is I may be able to save what I have with some sanding and piecing together. Any suggestions or ideas in this department would be appreciated.
Image
User avatar
Jeffmo63
Donating Member
 
Posts: 106
Images: 81
Joined: Mon Mar 22, 2010 12:31 am
Top

PreviousNext

Return to Build Journals

Who is online

Users browsing this forum: No registered users and 12 guests