Tub Toys gone fishin' Update 8/7/11, cabinets etc

...ask your questions in the appropriate forums BUT document your build here...preferably in a single thread...dates for updates, are appreciated....

Postby droid_ca » Sat Mar 05, 2011 8:23 pm

good job your making it look easy
There is a world, just beyond now,
where reality runs a razor thin seam between fact and possibility;

Anywhere I roam where I lay my head is home....
Image
“Fide Canem”
Please check out my build thread
viewtopic.php?f=5&t=52816
User avatar
droid_ca
Donating Member
 
Posts: 1981
Images: 176
Joined: Thu Sep 30, 2010 5:08 am
Location: Prince George BC Canada

Tub Toys gone fishin' update 3/9/11, walls

Postby tsmiley23 » Wed Mar 09, 2011 8:09 pm

Starting the walls:;)
I'm using 2x4s ripped to 2x2s for almost every member and 2 1/2" deck screws to put it all together.
Image

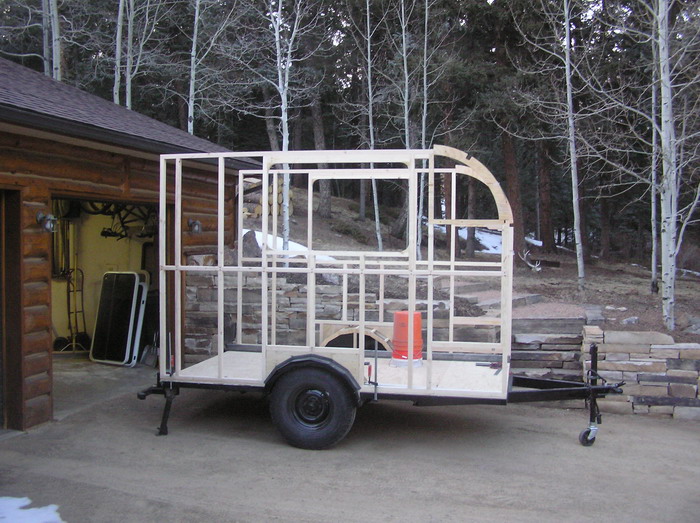
Nothing is fastened, I'll get all of the walls dry fit first, then remove them and install the exterior 1/4" luan and then reinstall with lots of construction adhesive and screws.
Image

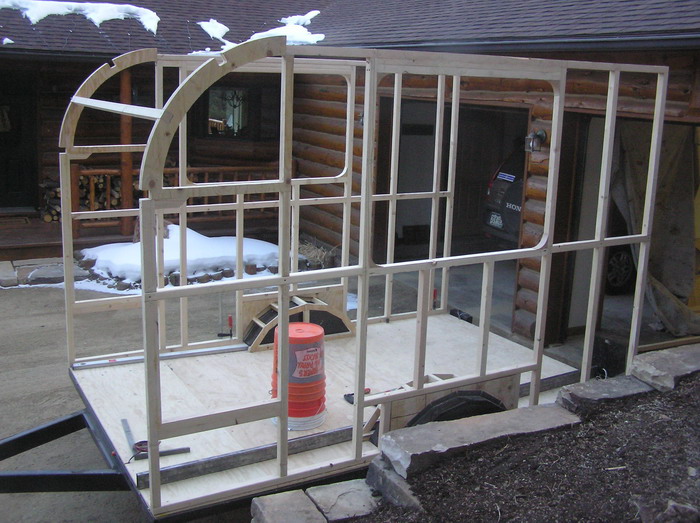
Hope by next week to have framing all put together and exterior luan on. So far it's really exciting, nice height, nice windows. :thumbsup:
CONSISTENCY!!!!!! It's only a good thing if you're not a screw up.
User avatar
tsmiley23
Teardrop Advisor
 
Posts: 70
Images: 159
Joined: Thu Feb 04, 2010 10:44 am
Location: Woodland Park, CO

Postby LDK » Thu Mar 10, 2011 7:50 pm

Looks good. Your moving real quick on your build. :thumbsup:
LDK
Gold Donating Member
 
Posts: 1419
Images: 1
Joined: Fri Jan 22, 2010 8:29 pm
Top

Postby tsmiley23 » Sun Mar 13, 2011 8:50 pm

Spent some time yesterday and today with my trailer:
Image
I'm proud of the wheel well connection, the angle fastened to the top of the wheel well will give me a clean attachment for my siding:
Image
And the interior is just as clean:
Image
Just one more shot goin away:
Image
CONSISTENCY!!!!!! It's only a good thing if you're not a screw up.
User avatar
tsmiley23
Teardrop Advisor
 
Posts: 70
Images: 159
Joined: Thu Feb 04, 2010 10:44 am
Location: Woodland Park, CO
Top

Postby aggie79 » Tue Mar 15, 2011 1:45 pm

Terry,

Your standy is looking really nice. I like the proportions...and, man, do you have a lot of usable interior space!

Thank you for documenting your build so well. I plan to use some of your techniques for #2.

Take care,
Tom
Tom (& Linda)
For build info on our former Silver Beatle teardrop:
Build Thread

93503
User avatar
aggie79
Super Duper Lifetime Member
 
Posts: 5405
Images: 686
Joined: Tue Aug 07, 2007 5:42 pm
Location: Watauga, Texas
Top

Postby H-Balm » Tue Mar 15, 2011 4:01 pm

Nice looking garage, driveway, stone wall!

Sharp.
Image
User avatar
H-Balm
Teardrop Master
 
Posts: 243
Joined: Sat May 27, 2006 5:52 am
Location: Where NY/NJ/PA Meet
Top

Postby tsmiley23 » Wed Mar 16, 2011 9:40 pm

aggie79 wrote:Terry,

Your standy is looking really nice. I like the proportions...and, man, do you have a lot of usable interior space!

Thank you for documenting your build so well. I plan to use some of your techniques for #2.

Take care,
Tom


Thanks Tom, So far I'm very happy with all of the dimensions. It's a pleasure sharing and if there's anything you need more info on just let me know. The only thing so far which I feel I could do better would be to consult someone to engineer the steel portion of the trailer. I believe I could have saved some weight, not in the layout but by using thinner steel.

I'm also curious, I've seen other people build standies and they build from the inside out, it seems easier to me building from the outside, finishing the siding and getting the trailer dried in. Just curious what's the thoughts? :thinking:
CONSISTENCY!!!!!! It's only a good thing if you're not a screw up.
User avatar
tsmiley23
Teardrop Advisor
 
Posts: 70
Images: 159
Joined: Thu Feb 04, 2010 10:44 am
Location: Woodland Park, CO
Top

Postby tsmiley23 » Wed Mar 16, 2011 9:43 pm

H-Balm wrote:Nice looking garage, driveway, stone wall!

Sharp.


Thanks "H-Balm", I live in beautiful country. :D
CONSISTENCY!!!!!! It's only a good thing if you're not a screw up.
User avatar
tsmiley23
Teardrop Advisor
 
Posts: 70
Images: 159
Joined: Thu Feb 04, 2010 10:44 am
Location: Woodland Park, CO
Top

Postby tsmiley23 » Thu Mar 17, 2011 9:42 pm

Finishing the luan:
Image

Luan's done
Image

The interior:
Image

Let's welt a wheel well:
Image

Setting the welting in 795 silicone:
Image

covering the welting with 795 silicone in prep for the siding
Notice the holes in the welting, these are pre- drilled and tapped 1/4'-20 holes for stainless screws. remember the angle iron bolted on top the wheel well:
Image

And here's the siding .058 aluminum diamond plate, drilled to match the angle:
Image

Installed:
Image


Image

Fastening the top of the siding, I predrilled and counter sunk for dry wall screws, these will be covered with trim.
Image

Image

The top green sheet is Hartford green pre-finished 24 gauge steel:
Image

One side sided!! Whoo HOO

I just had to temp in the window and see what the trim would look like??? :?
CONSISTENCY!!!!!! It's only a good thing if you're not a screw up.
User avatar
tsmiley23
Teardrop Advisor
 
Posts: 70
Images: 159
Joined: Thu Feb 04, 2010 10:44 am
Location: Woodland Park, CO
Top

Postby Miriam C. » Thu Mar 17, 2011 11:23 pm

:thumbsup: :applause: Image

A wonderful build to be sure! Do you have a weight on it yet?
“Forgiveness means giving up all hope for a better past.â€
User avatar
Miriam C.
our Aunti M
 
Posts: 19675
Images: 148
Joined: Wed Feb 15, 2006 3:14 pm
Location: Southwest MO
Top

Postby tsmiley23 » Sun Mar 20, 2011 7:57 pm

Thanks Miriam, in answer to your question, in this picture "home from paint" the trailer weighed 680 lbs:
Image

In this picture I have the floor finished and am ready for walls and it weighs 900 pounds:
Image

Completed I'm hoping to be around 2000 pounds without gear and no more than 2500 pounds with. As I said in an earlier post it has a 3500 lb capacity axle.

Terry :D
CONSISTENCY!!!!!! It's only a good thing if you're not a screw up.
User avatar
tsmiley23
Teardrop Advisor
 
Posts: 70
Images: 159
Joined: Thu Feb 04, 2010 10:44 am
Location: Woodland Park, CO
Top

Postby tsmiley23 » Tue Mar 22, 2011 7:51 pm

Picked up the aluminum yesterday for the roof. I had vacillated about how to put the roof together but came to the conclusion that a seamless 24 guage aluminum was the way I wanted to go and after installing it today I'm tickled ;)
The windows are just temped in cause I love looking at them. Hopefully I can get them in in the next week.
Image

Image

I was also losing sleep wondering how the corner trim on the roof was going to work making the 26" radius. Well I needn't have worried, I simply started fastening it at the lower front and when I got to the radius I just worked it around the radius using a 14 ounce rubber dead blow hammer and the results were outstanding. I believe a radius of 12 inches would be very doable with patience.
Image

So tomorrow I'll apply masking tape next to the trim I have temporarily installed, remove the trim, caulk the corner between the tape, install butyl tape to the trim, reinstall the trim, caulk both edges of the trim, and remove the tape. I'll try and get some step by step pictures.
Image

It's really coming together! :D
CONSISTENCY!!!!!! It's only a good thing if you're not a screw up.
User avatar
tsmiley23
Teardrop Advisor
 
Posts: 70
Images: 159
Joined: Thu Feb 04, 2010 10:44 am
Location: Woodland Park, CO
Top

Postby myoung » Tue Mar 22, 2011 8:43 pm

Excellent. You should be very proud of this exceptional TTT.
:applause: :applause:
Mike Young
build thread: viewtopic.php?t=40459
User avatar
myoung
500 Club
 
Posts: 644
Images: 250
Joined: Sat Aug 07, 2010 11:21 am
Location: Nipomo, CA
Top

Postby tsmiley23 » Thu Mar 24, 2011 8:05 pm

Thanks Mike :shake hands: , does that mean you want more???

Well here it is:

These pics walk you through how I sealed my trim. First I installed the trim, then I masked off both sided with blue tape, then I removed the trim, then I caulked the corner with Dow Corning 795 silicone to seal the crack. Then I applied butyl tape to the back of the trim and reapplied it to the corner. If I applied enough caulk it oozed out as I tightened the screws, if not I applied a little more and pushed it into the seam using a softwood stick. All that was left to do was clean up and remove the tape.

Image

Image

Image

Image
CONSISTENCY!!!!!! It's only a good thing if you're not a screw up.
User avatar
tsmiley23
Teardrop Advisor
 
Posts: 70
Images: 159
Joined: Thu Feb 04, 2010 10:44 am
Location: Woodland Park, CO
Top

Postby S. Heisley » Thu Mar 24, 2011 8:19 pm

It's looking really good! :thumbsup: :applause:
User avatar
S. Heisley
Super Lifetime Member
 
Posts: 8775
Images: 495
Joined: Mon Sep 17, 2007 10:02 am
Location: No. California
Top

PreviousNext

Return to Build Journals

Who is online

Users browsing this forum: No registered users and 16 guests