Travel trailer with slide out build

...ask your questions in the appropriate forums BUT document your build here...preferably in a single thread...dates for updates, are appreciated....

Postby Dmanrick » Sun May 08, 2011 7:30 am

We are going to put a rubber roof on it. Hopefully by next weekend.
Dmanrick
Gold Donating Member
 
Posts: 65
Joined: Tue Sep 14, 2010 8:42 pm

Postby Deryk the Pirate » Sun May 08, 2011 10:12 am

Looks great, Im so envios that you can stand up in there! Keep up the Great Work!
Build Thread lil vardo 1: http://tinyurl.com/baqe6py
Build Thread lil vardo 2: http://tinyurl.com/b3rwffm
User avatar
Deryk the Pirate
500 Club
 
Posts: 809
Images: 158
Joined: Tue Aug 18, 2009 11:03 am
Location: Parlin NJ

Postby Dmanrick » Sun May 08, 2011 10:32 am

LOL I can almost stand up in a teardrop. (Short joke) :)
Dmanrick
Gold Donating Member
 
Posts: 65
Joined: Tue Sep 14, 2010 8:42 pm
Top

Postby Dmanrick » Sun May 08, 2011 8:28 pm

Well it turned out to be a pretty good weekend. We got all of the siding on except for the slide out room. I haven't even started on that yet but we are getting close.

The first thing we did was to put the siding on the rear wall.

Image

Everything shown is actually installed except for the taillights, they are just sitting in there.

Image

Then we insulated the last wall, made the siding and got it all installed along with the bathroom window and the water hookup. I haven't gotten my lid for the electrical yet but it is on the way. I hope their rough opening measurements are pretty close. This picture is before I trimmed out the slideout opening. You can also see where I started playing around and making patterns for trimming out the corners and slideout opening.

Image

This is what I am going to use on the corners. It is a piece of the coil stock that is bent to 90 degrees and the edges folded back against themselves. It will be stuck only to the siding and only with gutter seam seal. I did it this way on the other trailer and when I tore it apart it not only ruined the trim pieces but also the aluminum sheeting underneath trying to get them apart so I know it will work good.

Image


Image


I also made a pattern of the trim that is going to go all around the slideout opening. It is basically a u channel that I made with the edges folded back against themselves. This will trim out both the inside wall and the outside wall as well as cover the edge of the walls and give the slideout wall seal something to stick to. I also had the seals I bought for the other trailer (thankfully I never cut them) that I will use on the inside to give the slideout another sealing point when it is in the out position along with the one that will actually seal off the wall.

Image


This is close to what it will look like when installed. Of course I will have to do some trimming and fitting when I actually start on the real pieces but you can get an idea.

Image


Image
Dmanrick
Gold Donating Member
 
Posts: 65
Joined: Tue Sep 14, 2010 8:42 pm
Top

Postby Dmanrick » Mon May 09, 2011 8:07 pm

I decided that I am going to try to get at least one thing done per day if I can and today I got more than one!

The first thing I did was to brake a piece of trim for the floor. This will seal off the wood and give my slideout seal a good base to stick to. Not a pic of that but you can see it a little a couple of pics down.

I then bent all of the trim to go around the sldieout opening. It isn't attached yet, just sitting up there but it trims out the inside and the outside pretty good as well as the exposed wall end. This will also give me a good base to stick the slideout seal to. Here's how I did the top ends. I 45'd both the inside and outside and left the middle long so there will not be a big gap in the corners.

Image

Here's what it all looks like setting up there.

Image

Image

Image

I got my electrical door in today so I got that installed.

Image


I wanted to get one more thing done before dark so I wired in and covered the outside receptacle and made up the trim around the wheel opening. I am not sure if I like it though, I might take it off and make it a little wider.


Image
Dmanrick
Gold Donating Member
 
Posts: 65
Joined: Tue Sep 14, 2010 8:42 pm
Top

Postby Miriam C. » Mon May 09, 2011 10:37 pm

:applause: :thumbsup: :thumbsup: Wow! You are almost done! It is going to be beautiful for sure! :applause:
“Forgiveness means giving up all hope for a better past.â€
User avatar
Miriam C.
our Aunti M
 
Posts: 19675
Images: 148
Joined: Wed Feb 15, 2006 3:14 pm
Location: Southwest MO
Top

Postby Dmanrick » Fri May 13, 2011 7:50 pm

Thanks but I wish I was almost done. My objective for this weekend is to get it dried in.

The last couple of nights I have built the walls for the slideout and I got a chance yesterday to go and get the rubber roof. I'm going to concentrate on getting the slide out done (at least on the outside) and sealed off tomorrow and try to get the roof done sunday. Hopefully we won't run into any snags.

We are going to have a couch only in the slide out and possibly outside storage since I got another storage door but I'm not going to cut that out until we determine exactly what we are going to do couch/bed wise.

Image


Image
Dmanrick
Gold Donating Member
 
Posts: 65
Joined: Tue Sep 14, 2010 8:42 pm
Top

Postby lukeyslide » Sun May 15, 2011 6:35 am

G'day from Australia.

Dmanrick your build thread is Brilliant to say the least. Yours has the added bonus of a slide which I have been looking at with great interest.People pay alot of money to do what you have done and you used the KISS principal :). I would like to build a 10ft with slide outs front and rear making it a 18ft. Just wanted to know if you used rollers along the edge parrallel to the metal T that slides out and is your boxes main weight attached to the T. I have a few ideas in my head i.e using bed slides from a Jayco camper or even heavy duty draw runners and even the old school cabana style fold out.The slides will be for the beds, 4ft each. Everybody on this forum has given me ideas and inspiration to build something that you can't buy but you will know is better then off the shelf.

Thanks.
lukeyslide
Teardrop Builder
 
Posts: 29
Joined: Wed May 11, 2011 5:35 am
Location: Brisbane, Australia
Top

Travel Trailer with Slide out - Updated 05/15

Postby Dmanrick » Sun May 15, 2011 7:24 pm

Thanks. I'm not exactly sure what you are asking so I will show the drawing that I made of it. If this doesn't answer your question, please ask again.

Image

Now, if I were to do it again, I would change a couple of things that I did and I probably still will when I put the motor on it. I have 1 piece of #8 all thread in the middle that screws it in and out. When I go in and out it cocks a little. Not enough to hurt anything but I notice it. I would go with one piece of acme all thread on each side so it will slide out and in perfectly straight. It would be easy enough to make the go in and out together using a chain and sprockets. I will more than likely do this to mine when I get everything else done.

The second thing I would do is definitely get the slide out seal first before you frame out. I had one I started with and have since scrapped it for something completely different. Needless to say we didn't get everything done this weekend I wanted to because I spent so much time with trial and error on seals.

Now to what we did get done. First thing we boxed in the slideout with luan so we could cover it in the aluminum.

Image

I then covered the bottom first. We used contact cement to hold it onalong with a few staples in places that should never see weather. Notice the carpet squares that the plywood on the bottom slide on across the vinyl floor in the camper.

Image

I then covered the side walls and made a bend on the bottom to overlap the bottom piece and sealed it up before I stapled it.

Image

Here's a better picture of the other side wall. You can also see the bend on the outside that will be used to hold the trim and to help seal it off later. You can also see my mockup of the outside trim piece. The way it is bent, there really should be no way for it to leak.

Image

This is what I am talking about, the way the walls are bent out and the trim is bent in, it shouldn't leak without sealer but we are using it anyway.

Image

This is the seal I started with. That has since been scrapped. I found that a bottom garage door seal should work pretty good. I didn't get a pic of that but I only did one side with it so when I do the others I will get it.

Image

Here the sides were done and we slide the box back into place. We did the top like the side, by bending them over and sealing them. I also have the top slanted towards the outside to deflect any rain. I am also going to put a gutter (deflector?) above it so that should do it. Hopefully anyway.

Image

Here the siding is made and installed. All wood has now been covered and sealed on the slideout.

Image

I didn't take any pics of the roof install, it was basically insulating it, cover it with luan and then gluing the rubber roof. Nothing special there. I actually had some help today beside the little woman so I took advantage of it. I still need to trim the roof material and finish stapling it all around and get the trim up but this old man is tired today so I quit. Will do it later this week.

Image

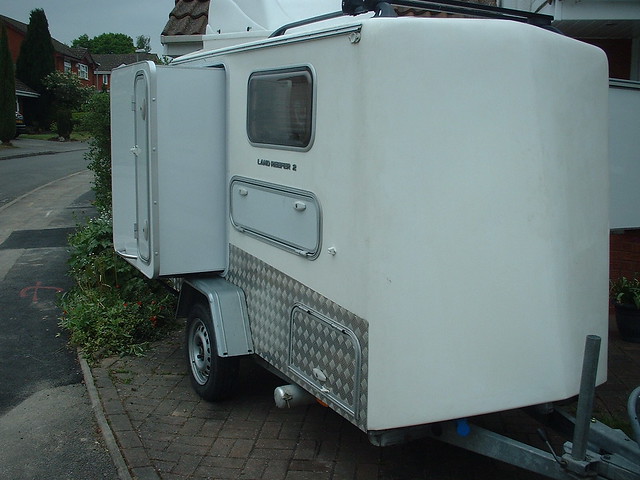
Here's the other side with the window and the trim on the sides of the slide out. I wanted to have all of this as well as the roof and trim done this weekend but I spent so much time trying to figure out seals, we just ran out of time.

Image
Dmanrick
Gold Donating Member
 
Posts: 65
Joined: Tue Sep 14, 2010 8:42 pm
Top

Postby Dmanrick » Mon May 16, 2011 8:33 pm

I went down to PPL Motorhomes the other day to get the rubber roof and other stuff. While I was there I asked them about the trim that goes around the outside of the roof to seal it up between the rubber and the siding. The guy in parts told me to just use my old stuff. I told him that I didn't have any and that's why I needed it. He then told me that it comes in 20' lengths and asked me if I had any way to carry a 20' stick. I told him that I was in the 4 runner but I would figure something out. He then said that they could rough cut it if I wanted I told him that would be perfect.

Then he looked for about 1 minute in his book and closed it and told me that any aluminum trim would work and I could get that anywhere and started ringing up my other stuff. By his tone, he meant I could get it anywhere else but there. I guess he didn't feel like looking it up because that was basically the end of the conversation.

So I get home and try to figure something out. What I ended up doing was ripping a piece of treated wood into 1 1/2" x 1/2" dimensions and stapling it around the edges. I still have to put the rest on but you can see in the pictures where I am going with it.

Image

I then bent some of the coil stock in a u shape to cover that board.

Image

I just have this setting up there but when I get the other wood attached all the way around, I will secure it with liquid nail and seal it on the top and bottom sides.

Image

Notice we got the ac up there today. It is blowing cold now so I am ready to get the outside completely done so I can start on the inside. I think with the 1 1/2" styrofoam, this is going to be like a little igloo cooler. I know I checked the temp on the back wall where it was blowing and it was 54 degrees.
Dmanrick
Gold Donating Member
 
Posts: 65
Joined: Tue Sep 14, 2010 8:42 pm
Top

Postby iSpy » Thu May 19, 2011 3:54 am

Only yesterday I posted "haven't seen a tear with a slide-out yet"

Well now I have !!!. What a great design.

Just joined the site this week.
I know I ought to post my own thread, (I'm not sure where yet) but here are a few pics of my unit with two slide-outs.

Image

Image

Image


Good luck with your design. :applause:
iSpy
Teardrop Advisor
 
Posts: 51
Images: 1
Joined: Tue May 17, 2011 3:10 am
Location: UK
Top

Re: Travel Trailer with Slide out - Updated 05/15

Postby lukeyslide » Thu May 19, 2011 6:18 am

[quote="Dmanrick"]Thanks. I'm not exactly sure what you are asking so I will show the drawing that I made of it. If this doesn't answer your question, please ask again.

Image

Your pictures are a thousand words.Thanks for the explaination. ;)

Image

And iSpy your trailer should be commended as well. Can't wait to see the build pics. Did you build the whole body? :thumbsup:
lukeyslide
Teardrop Builder
 
Posts: 29
Joined: Wed May 11, 2011 5:35 am
Location: Brisbane, Australia
Top

Postby Dmanrick » Wed May 25, 2011 6:46 pm

Not much to report, the wife's grandma passed away and we had to deal with all of that this weekend. What little time I had I just piddled with the outside trying to get that completely finished. Almost there on that part of it.

I have the front and door side completely caulked and finished except for trimming the front trim at the bottom, installing a stopper so the door doesn't slam into the side when the wind blows. That's why there is no side marker light there yet. I also need to make a plastic trim piece for the very front where it bend backwards. The trim sucks there trying to make a bend in it. I'll take better pics of that when I do it.

Anyway we got the graphics on the front and side tonight. I will try to do the other side and back tomorrow if I have time. I got all of the graphics on Ebay for like 55.00 shipped. I thought it was a good deal.

Image

Over the weekend I got all of the slideout trimmed out and sealed, the wheel opening trimmed out and all of the lights on and working except for the one that the door hits (other side) when opening.

Image

Here's the lights all finished in the back.

Image
Dmanrick
Gold Donating Member
 
Posts: 65
Joined: Tue Sep 14, 2010 8:42 pm
Top

Postby PhotoGuy » Wed May 25, 2011 7:25 pm

looking really good. I like the decals they look sharp
PhotoGuy
Teardrop Master
 
Posts: 132
Images: 2
Joined: Wed Jun 09, 2010 1:16 am
Location: St Thomas Ont Canada
Top

Postby Dmanrick » Wed May 25, 2011 7:31 pm

Thanks. They sure break up the white. :)
Dmanrick
Gold Donating Member
 
Posts: 65
Joined: Tue Sep 14, 2010 8:42 pm
Top

PreviousNext

Return to Build Journals

Who is online

Users browsing this forum: No registered users and 17 guests