"Fred Sanford" build

...ask your questions in the appropriate forums BUT document your build here...preferably in a single thread...dates for updates, are appreciated....

Postby aggie79 » Mon May 23, 2011 8:44 am

Woodstramp,

Your teardrop is really coming together nicely! I really like the design and the size of your teardrop, and your recycling of materials.

BTW, what is your first name?

Keep the progress pics coming.

Take care,
Tom
Tom (& Linda)
For build info on our former Silver Beatle teardrop:
Build Thread

93503
User avatar
aggie79
Super Duper Lifetime Member
 
Posts: 5405
Images: 686
Joined: Tue Aug 07, 2007 5:42 pm
Location: Watauga, Texas

Postby Woodstramp » Mon May 23, 2011 2:08 pm

Thanks Tom. The radiused areas are a real pain. Glad to see that section almost done.
-Chuck (BTW) :)
User avatar
Woodstramp
The 300 Club
 
Posts: 438
Joined: Fri Nov 20, 2009 9:28 pm
Location: Aladambama

Postby Woodstramp » Sun May 29, 2011 10:23 pm

Had a few update pics...here they are.

Somewhere here at the forums there is probably a "How to" on making custom radiused ribs, but just in case there isn't...here you go. I needed some radiused filler material and came up with these jigs. Used scrap strips of 3/16 thick luan, glued and clamped. The foamy Gorilla brand glue is the bomb for making these, BTW.

Form is 3/4" plywood scrap, radiused....screwed down blocks to keep things from torquing.

Image

Glue lams, bend and clamp on each end...wait a couple of hours until the Gorilla glue sets.
Note: Two jigs shown here...35 degree and 23 degree ribs curing.

Image

Got to do some work on the AC unit. Here I've attached the frame and the side intake duct.

Image

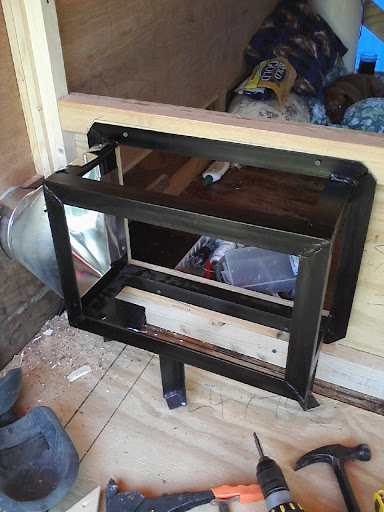
It was hot, so we had to give the AC a go....closed off the sleeping area and plugged the AC up...got cool purty quick. :)

Image

We've been looking for a good deal on an Easy Up style canopy for when we finally get to camp. Had and unusually lucky moment while making a Gorilla glue run to Home depot. Spotted one of these display canopies....it had a $49 price tag...I inquired about buying the displayed one because it did have a really low price tag. Lucky for me the folks knew it was priced too low, but they let me get a new one because they weren't too willing to drag a new one up and set it up.

Image

Got the back wall started and the rear ceiling..

Image

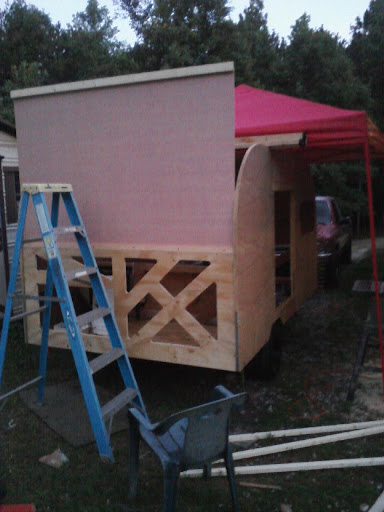
The girls checking out the new ceiling after we rolled it down. (Man, that was tough on that 24 inch radius.

Image

Thought this was a cool looking night shot.

Image
User avatar
Woodstramp
The 300 Club
 
Posts: 438
Joined: Fri Nov 20, 2009 9:28 pm
Location: Aladambama
Top

Postby StandUpGuy » Mon May 30, 2011 6:29 am

Looking good Tramp. I was confused by your layout but now I am starting to grasp it I think. I gather you have a raised bed platform and the AC is underneath it? Unique.
User avatar
StandUpGuy
1000 Club
1000 Club
 
Posts: 1090
Images: 52
Joined: Sun Mar 27, 2011 6:15 pm
Top

Postby Woodstramp » Mon May 30, 2011 9:51 am

Standup,

The current plan is that this will sleep 2 +1. My wife and I on the main floor and a third on the raised deck. Under side of deck will house the AC+intake/exhaust ducting, a stubby slide out with Coleman cooker/wash basin, vented battery box and some storage.

I also intend to have a small table on a post up there on the face of the raised sleeping deck. This will be asymetric and will swivel. The table will hold dinner plates or serve as a laptop or TV stand.

Wish I was good at CAD....would save some time. :)
User avatar
Woodstramp
The 300 Club
 
Posts: 438
Joined: Fri Nov 20, 2009 9:28 pm
Location: Aladambama
Top

Postby Woodstramp » Mon Jun 06, 2011 12:03 am

Last week, after completing the camper work for the weekend, I couldn't stand it.....had to hook up and take her for a short spin around the block. Don't have a tag, but luckily Mr Smokey weren't in the area. :)

Image

It was dry this weekend, but in the high 90's....the heat brought on some long mid-day siestas....not much was accomplished. Did manage to get the roof insulated....

Image

.....and the two steel roof sheets on.

Image
User avatar
Woodstramp
The 300 Club
 
Posts: 438
Joined: Fri Nov 20, 2009 9:28 pm
Location: Aladambama
Top

Postby GuyllFyre » Mon Jun 06, 2011 4:51 pm

That rides nice and level, had to be a nice trip around the block.
Things I have for sale on craigslist:
http://albany.craigslist.org/search/?ar ... catAbb=sss

Things I have for sale on eBay:
http://www.ebay.com/sch/merchant/seansmith
User avatar
GuyllFyre
Donating Member
 
Posts: 209
Joined: Fri May 21, 2010 9:35 pm
Location: Scotia, NY
Top

Postby Woodstramp » Wed Jun 08, 2011 4:15 am

Guy,

Yeah, it road nice, but the torsion axle is a tad stiff....will have to make sure things are tethered down when I do get to take it for a long ride. :)
User avatar
Woodstramp
The 300 Club
 
Posts: 438
Joined: Fri Nov 20, 2009 9:28 pm
Location: Aladambama
Top

Postby pete42 » Wed Jun 08, 2011 5:48 pm

I read the post supposedly written by Mary but I think Chuck wrote it....come on Chuck fess-up...........

but I have been wrong before if Mary did write it then Mary, Chuck sounds like a good guy much happiness to you both

oh yea the TD looks good too.

ol' pete
User avatar
pete42
Super Lifetime Member
 
Posts: 2203
Images: 13
Joined: Sat Nov 07, 2009 11:52 am
Location: SouthWest Ohio
Top

Postby Woodstramp » Sun Jun 12, 2011 6:51 pm

Pete,


Thanks for the kudos on the TTT. Right now I aint to happy with the project....made some boo-boos.

Decided to paint the sides with OP22 paint instead of the metal I bought. (Trying to leave off an extra 70lbs. of steel) Figured I'd finish it so good that it would look like metal...eyes aint as good as last time I did something like this and finish painting just shows more mistakes.

ALSO....NEVER USE A MAGIC MARKER FOR MARKING PLACES THAT NEED WORK. :cry: Takes three coats to keep it from bleeding through.

Good finish painting just shows more mistakes...oh I said that already.

ALSO.....Never put final coat on when tiny little black bugs do a fly by.....now the paint is peppered with dots. They were no where to be seen on coats 1,2. Guess it'll get a forth coat in the dead of next winter. :)

New paint on sides...

Image

$35/gallon fly paper.

Image
Last edited by Woodstramp on Mon Jan 06, 2020 3:31 am, edited 1 time in total.
User avatar
Woodstramp
The 300 Club
 
Posts: 438
Joined: Fri Nov 20, 2009 9:28 pm
Location: Aladambama
Top

Wife, is real and really wrote that.....

Postby Woodstramp » Sun Jun 12, 2011 8:02 pm

Deleted
Last edited by Woodstramp on Mon Jan 06, 2020 3:32 am, edited 1 time in total.
User avatar
Woodstramp
The 300 Club
 
Posts: 438
Joined: Fri Nov 20, 2009 9:28 pm
Location: Aladambama
Top

Postby Deryk the Pirate » Mon Jun 13, 2011 8:37 am

Looks Great Chuck!

I like the frame for the ac unit, Im sure its not gonna be moveing around! So what made you go with fiberglass insulation vs foam board?

deryk
Build Thread lil vardo 1: http://tinyurl.com/baqe6py
Build Thread lil vardo 2: http://tinyurl.com/b3rwffm
User avatar
Deryk the Pirate
500 Club
 
Posts: 809
Images: 158
Joined: Tue Aug 18, 2009 11:03 am
Location: Parlin NJ
Top

Postby Woodstramp » Mon Jun 13, 2011 10:20 am

Deryk the Pirate wrote:
So what made you go with fiberglass insulation vs foam board?

deryk


Patience/money ......lack of both :lol: .....

Actually did use foam in the walls. Used glass in the ceiling for several reasons....

#1-found a roll of glass dirt cheap at HD at the time I was to insulate the roof. $14 in glass or 2 sheets of 1" thick @ $40 a sheet for the board? I chose the $14 option.
#2-Glass bends around radiuses. The foam would have taken forever to cut/fit.
#3- I stripped down an old camper once. It was insulated with glass. I saw no ill effects from that material during the autopsy of the old trailer.
User avatar
Woodstramp
The 300 Club
 
Posts: 438
Joined: Fri Nov 20, 2009 9:28 pm
Location: Aladambama
Top

Postby CliffinGA » Mon Jun 13, 2011 10:54 am

Looks good chuck!! That just gave me an idea to get some free insulation for the ceiling! The hvac guys on one of the jobs always pull the tubing out of the stuff they throw away and leave the insulation and silver wrapping. That stuff can be cut and opened and instant insulation! Are you and the mrs going to the gathering at Chiaha in July?

Cliff
In God we trust, shoot the rest and he will sort out!

My Build:

viewtopic.php?f=50&t=42628
User avatar
CliffinGA
1000 Club
1000 Club
 
Posts: 1499
Images: 207
Joined: Sat Nov 14, 2009 1:29 pm
Location: Jefferson, GA
Top

Postby Woodstramp » Mon Jun 13, 2011 2:17 pm

Cliff,

Did you mean there is a gathering at Cheaha Mt. in July? Hadn't heard about it. If so, don't know. July is a toughy for us. Eldest is getting hitched in July.

BTW, the fiberglass I used was regular unbacked kind. Just peeled off the thickness I needed from the roll and stuck it on. Duct tape suspenders on top to keep the wind from blowing it off.

You are supposed to use a vapor barrier on the "warm in winter" side of the insulation, but the old camper I mentioned didn't have any barrier.
User avatar
Woodstramp
The 300 Club
 
Posts: 438
Joined: Fri Nov 20, 2009 9:28 pm
Location: Aladambama
Top

PreviousNext

Return to Build Journals

Who is online

Users browsing this forum: No registered users and 25 guests