Feeling the panic of the looming camping date

(Oct 12, 11 days to go...), I declared a 3 day weekend and took Friday off work.
First up for Friday was the aft roof insulation and skin. Apply contact adhesive to ceiling and insulation and hold in place with ratchet straps. I kerf-cut the insulation to get it to bend nice and easy. Just set my Stanley knife to about 1/2 the thickness of the insulation then made a bunch of transverse cuts.

It is quite the exercise in high speed work to get the roof paneling on before the glue sets. I marked all of my screw locations before I started to that it would go quicker. In order: apply glue to roof structure, position and align panel (had dry-fit already), drill in ~40 screws, then screw down / shape aluminum edge and bottom trim pieces. All within ~20 minutes...
I decided that getting sealant applied in that same time-frame wasn't going to happen, so I am going to pull the edge trims back off, epoxy coat the outside, then apply sealant. I am also going to seal the screw holes and put washers under the heads.


Next up was a bit of finish work on the inside. Thanks to an awesome suggestion by KCStudly, I just used hot-glue to apply the quarter-round to cover all of my edge gaps. Another fun exercise in working fast before the glue sets, but trying not to get squeeze out. It probably took longer to remove any squeeze out than it did to get the molding in place, but still a good method.


First task on Saturday was to finish the forward roof with insulation and birch. Similar game to the aft roof...work fast before the glue sets! Since I ran out of contact adhesive I have resorted to hot glue to hold the insulation in place. Much faster and easier.

Insulation in place

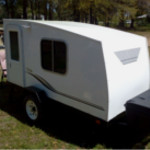
Outer skin on!!
Moving back to the interior, I installed the center strip on the cabinets and galley bulkhead that I had made on Friday. This covers the panel join between the two halves of the cabinet front, and is also routed on the backside to hide the wiring from the galley to the cabinets (12 V plugs) and the speaker wiring up to the hatch. Taped all the edges and ready for the interior varnish...

We used a very light varnish by Rustoleum...very subtle change to the color, since we like the look of the birch so much.
Now moving on to the hatch...trimmed up the aft side of the hurricane hinge (offset type) and slid into place

I used some leftover luan to trace a template of the curvature needed for the ribs. Then constructed my own 3-legged compass based on some ideas from members here...


The resulting template...ribs will be 1 1/2 inches deep x 3/4 in thick.

I used 2 x 2's for the top and bottom, cut out 6 ribs and Kreg-screwed them to the top and bottom pieces. End of the day on Saturday:

Woke up Sunday to this giant bug hanging around my work area
He is about 4 inches long, for reference!

Time to put the inner skin on the hatch. I am only going to cover the top part on the inner since I didn't account for the radio and 12 V plug sticking out of the galley cabinet front. There is only ~1/8 of an inch between the inside surface of the hatch and the galley front, so can't put skins on there.


Next was insulation and some reinforcement for the stereo speakers on the inner skin. I also needed to offset the speakers inboard since they are deeper than the 1 1/2 inch depth. So a cut a bunch of circles the same size as the speaker diameter out of 1/8 birch and glued them together on both sides of the inner skin.

Now, time for the hatch outer skin. This is where my first major screw-up occured

I had some spring-back in the hatch, so I belt-sanded the outermost ribs of the hatch to get them to match the wall profile better. However, I didn't think about the fact that that would then require the birch to curve in two directions...which it won't. So I started putting the outer skin on (fortunately without wood glue as I was trying to be very careful about hitting the hidden ribs with the screws) and realized I had some big bubbles on the outer edges.


So, I guess, like so many others, the hatch will need some serious re-build before it is 'finished'. I figure my options are to completely start the hatch over, or so pull off the outer skin and sand the other 4 ribs to try to match the two outer ones. I even have the crazy notion of cutting a wedge shape in the outer skin, and then covering that with a 'decorative' piece to hide and and seal it. Any other suggestions??
Looks OK from here:

Well, huge weekend...tired body. Best actually get to work!
Adventurelad


 And as my wife always reminds me, it's not as though you lost an arm or leg! Gotta keep things in perspective
 taken in the garage with my smartphone...

 Final product:
 , sealed and reinstalled all of the roof screws and edging, installed a wooden strip (with lots of sealant) over the join in the roof panels, etc...