Build #2 - The Log Cabin

...ask your questions in the appropriate forums BUT document your build here...preferably in a single thread...dates for updates, are appreciated....

Re: Build #2 - The Log Cabin 7/15 Electrical

Postby M C Toyer » Mon Jul 15, 2013 2:45 pm

First, thanks to all who have commented during my absence. Had a minor delay for open heart surgery, but am back in the saddle now.

My electrical plan includes 110V shore power, 12V Battery, WFCO Converter, and a 4000W Inverter. It is wired for solar recharge but haven't acquired that equipment yet. It is also wired for an outside backup generator.

A few photos and details:

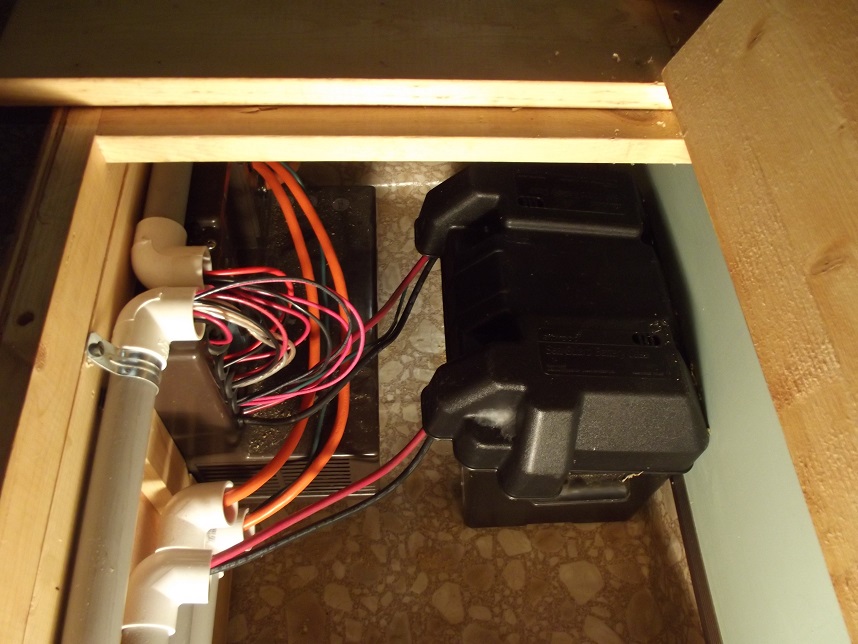
The converter was mounted in the center of the storage bench with the battery behind in the floor recess.

Image

Image

Image

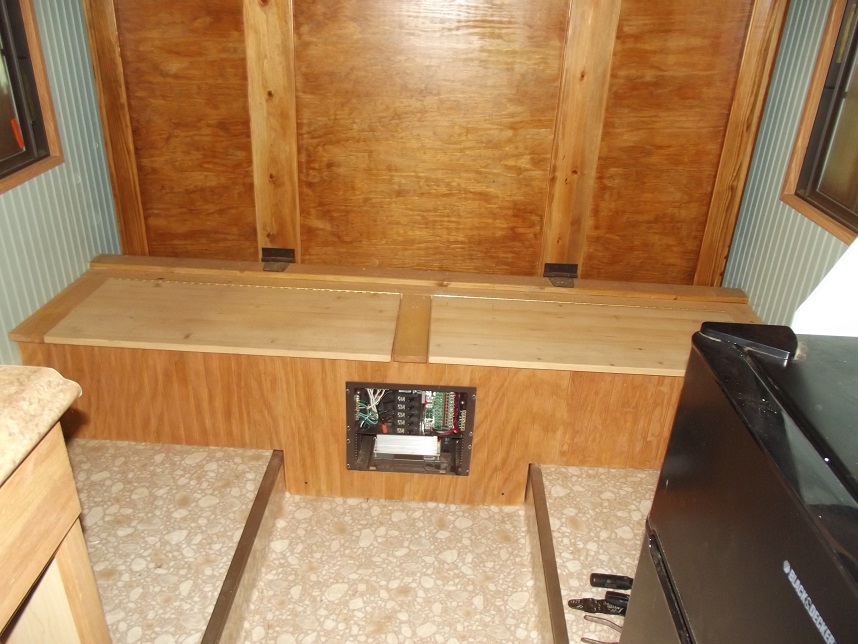
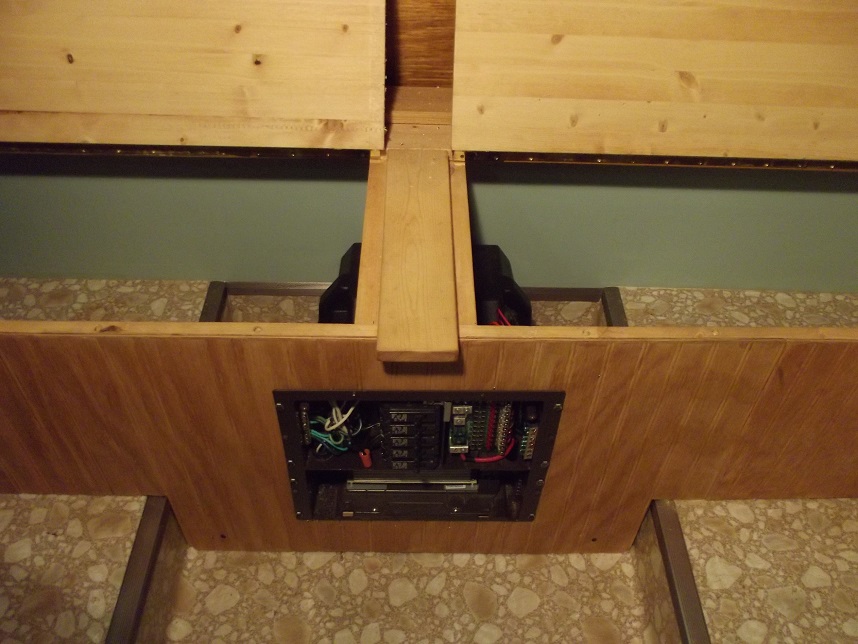
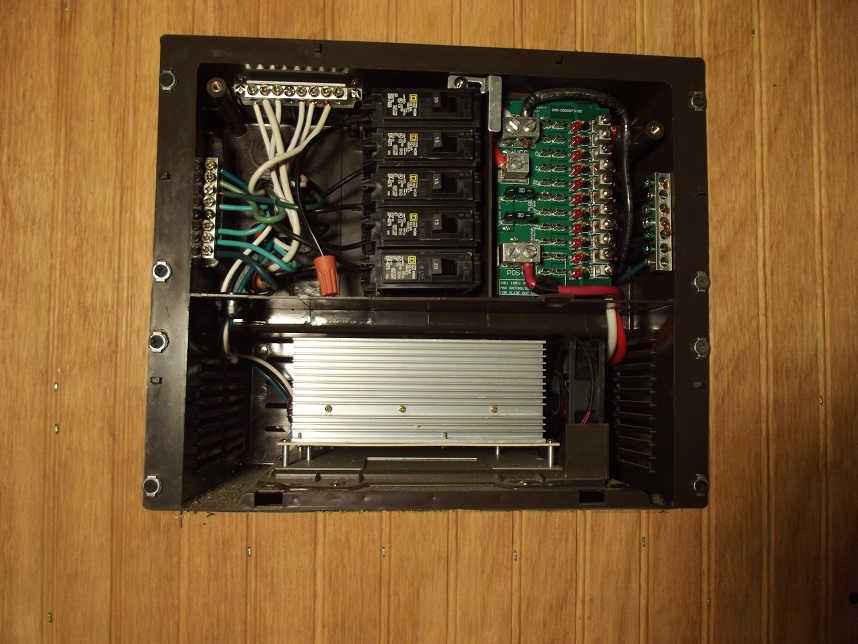
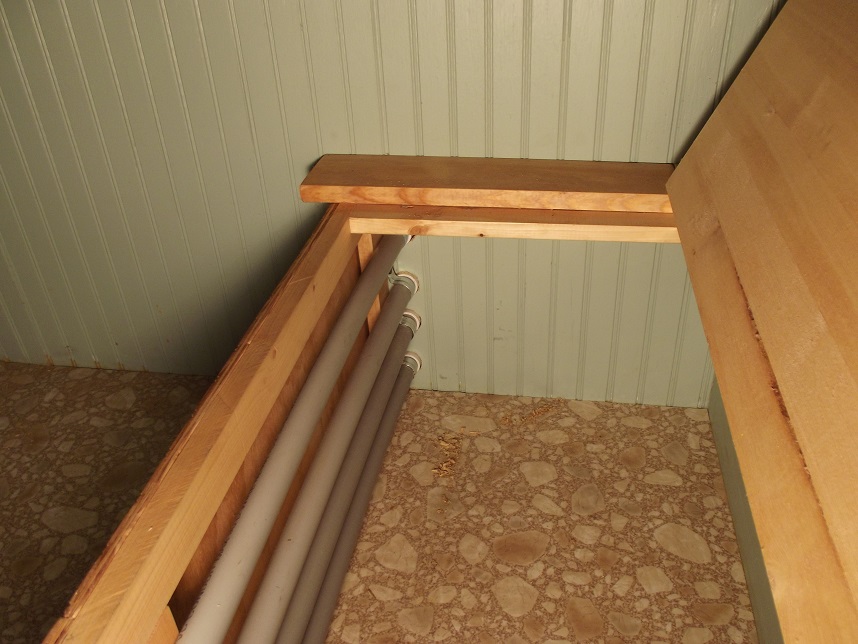
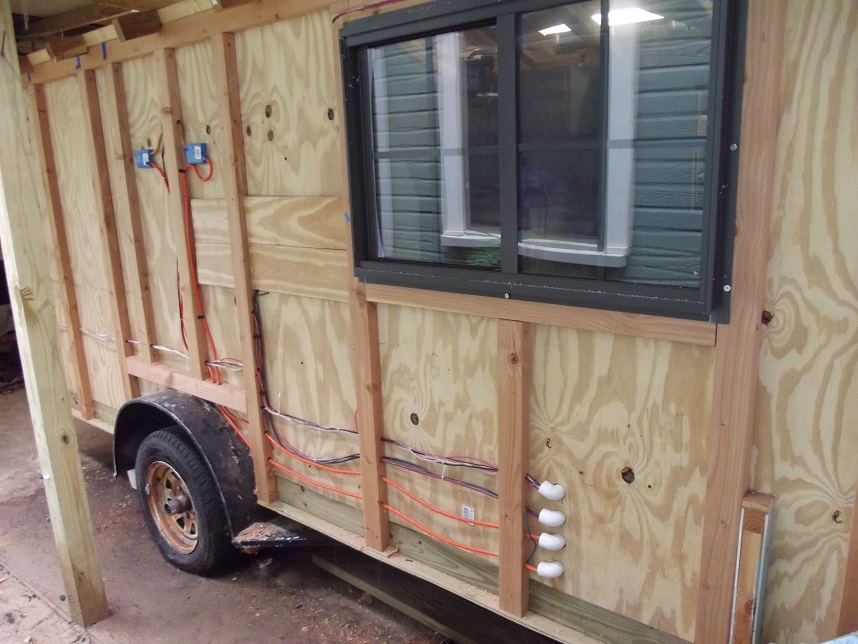
Wiring is routed through PVC to the wall cavity. There will be an expanded metal box around the converter, battery and exposed wiring in the storage bench.

Image

Image

Image

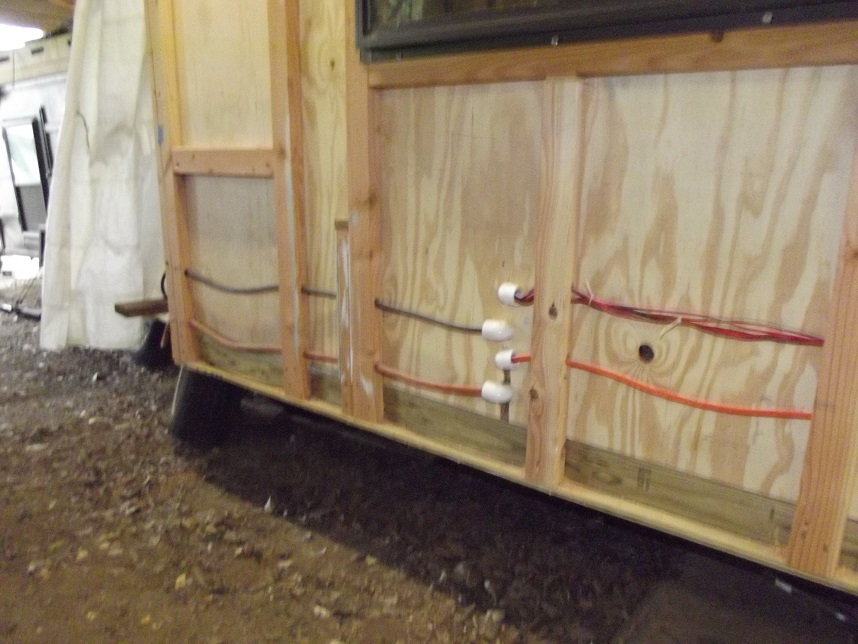
Within the wall cavity the wiring will be sandwiched between the rigid foam insulation. All switches and 110V receptacles are in the shallow blue boxes which fit well in the 1-1/2 inch cavity:

Image

Image

Image

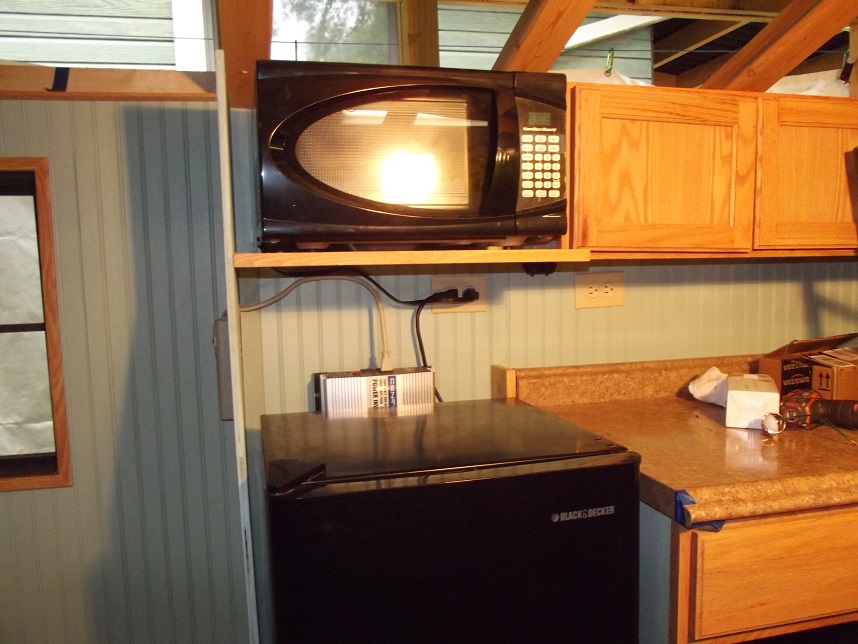
Power can be switched from 110V shore power by plugging into the inverter mounted on wall behind appliances. An additional 110V power strip outlet is seen on the left side of the panel separating the appliances from the seating area. That power strip, the microwave oven and refrigerator / freezer will be the only units operated from the inverter when shore power or an outside generator are not available.

The small black object under the upper cabinet between the 110V receptacles is a dual 12V receptacle. There is another above the sink on the other wall and a third mounted on the outside of the storage bench just below the lid.

Image

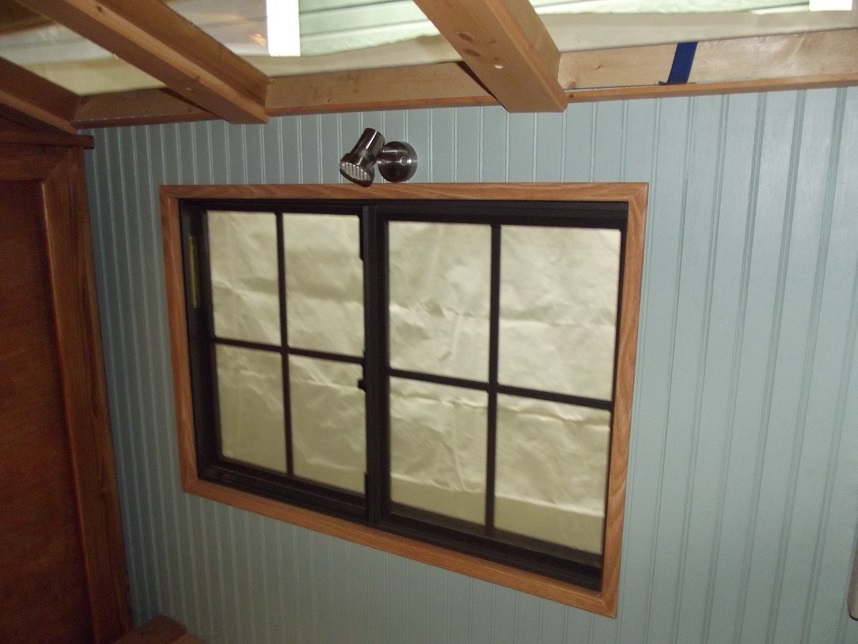
12V LED swivel head lights are above each side window for reading either while seated or on the Murphy Bed. They are direct wired and have a built in switch.

Image

I've previously shown the12V Led overhead lights. Those will have a 3 way switch by the entry door and another 3 way switch in the ceiling beam reachable from the Murphy Bed. I also have 12V LED puck lights under the upper cabinets and within the lower cabinets with a switch by the entry door. A third switch controls the 12V outdoor light which will be mounted above the entry door.

That's all for now. Plumbing is next.
User avatar
M C Toyer
The 300 Club
 
Posts: 363
Images: 11
Joined: Thu May 31, 2012 8:59 pm
Location: Pilot Point (Denton County) Texas

Re: Build #2 - The Log Cabin

Postby KCStudly » Mon Jul 15, 2013 2:55 pm

Great progress. :applause:

Glad to hear that you are healed. :thumbsup:
KC
My Build: The Poet Creek Express Hybrid Foamie

Poet Creek Or Bust
Engineering the TLAR way - "That Looks About Right"
TnTTT ORIGINAL 200A LANTERN CLUB = "The 200A Gang"
Green Lantern Corpsmen
User avatar
KCStudly
Donating Member
 
Posts: 9640
Images: 8169
Joined: Mon Feb 06, 2012 10:18 pm
Location: Southeastern CT, USA

Re: Build #2 - The Log Cabin

Postby rebapuck » Mon Jul 15, 2013 3:21 pm

I have a Murphy bed in my guest room. Although it has two straps at the foot for the mattress, I've never used them. The 4" lip around the perimeter holds the mattress fine on it's up and down trips. When in the up position, your mattress will be against the wall... right?. Where would it go if you did not strap it? Forget the straps.
Judy
1966 VW camper
1967 VW singlecab
Image
User avatar
rebapuck
.
 
Posts: 2243
Images: 1
Joined: Thu May 14, 2009 1:55 pm
Location: Chapel Hill NC
Top

Re: Build #2 - The Log Cabin

Postby stonykill » Mon Jul 15, 2013 5:39 pm

fantastic build. I love it
User avatar
stonykill
Teardrop Master
 
Posts: 173
Joined: Mon Sep 05, 2011 12:28 pm
Location: Canaan NY
Top

Re: Build #2 - The Log Cabin

Postby Oldragbaggers » Mon Jul 15, 2013 7:55 pm

So glad to hear you came through your surgery well and are back to doing what you love. Your trailer looks great. Hopefully you'll be out camping in it soon and that fresh air and relaxation is just what the doctor ordered to keep that heart going strong.
Life is sooooo good.........
Sail...camp....bike...repeat
Becky

Build Journal http://www.tnttt.com/viewtopic.php?f=50&t=45917
Visit our blog at http://www.oldragbaggers.com
Image Image
User avatar
Oldragbaggers
Gold Donating Member
 
Posts: 1842
Images: 331
Joined: Mon Aug 01, 2011 9:22 pm
Location: Essex, MD
Top

Re: Build #2 - The Log Cabin

Postby M C Toyer » Tue Jul 16, 2013 3:25 am

rebapuck wrote:I have a Murphy bed in my guest room. Although it has two straps at the foot for the mattress, I've never used them. The 4" lip around the perimeter holds the mattress fine on it's up and down trips. When in the up position, your mattress will be against the wall... right?. Where would it go if you did not strap it? Forget the straps.


The pivot point for the Murphy bed is about 1/3 of the platform width and requires a slightly larger space to clear when folded up. I do plan to use part of that space for hanging clothes and above that a shelf. Per you suggestion the shelf could hold the mattress against the bed platform, so I'll give that a try. Thanks.
User avatar
M C Toyer
The 300 Club
 
Posts: 363
Images: 11
Joined: Thu May 31, 2012 8:59 pm
Location: Pilot Point (Denton County) Texas
Top

Re: Build #2 - The Log Cabin

Postby mezmo » Tue Aug 06, 2013 12:26 am

'Sorry to hear of your medical problem, and glad to see
your treatment was a success and you're back at it now.

Just pace yourself as you work and you'll be finishing up
before you know it.

I like your idea/practice of using conduit for your wiring.
Future mods/updates should be much easier to do using that.

The build's still 'Lookin' Good !

Cheers,
Norm/mezmo
If you have a house - you have a hobby.
User avatar
mezmo
1000 Club
1000 Club
 
Posts: 1817
Images: 194
Joined: Fri Jan 01, 2010 4:11 am
Location: Columbia, SC
Top

Re: Build #2 - The Log Cabin 8/13 Plumbing

Postby M C Toyer » Tue Aug 13, 2013 11:15 pm

Norm, Becky, Stony, KC and all -

Thanks for the encouragement. I've had a few non-medical distractions but am back working on the trailer.

Plumbing is almost done. I located two 10 gallon freshwater tanks under the sink and a Shur-FLo pump (3 or 3.5 gpm I think). I used the 1/2 inch ID braided clear vinyl and hose clamps for now until I'm sure everything works. I may add an accumulator tank just to limit the pump cycling, but with the cabinet doors shut it is whisper quite now. The sink trap is waterless as is the shower.

Image

I installed the tankless water heater (I think its a Eco-Temp) on the other side of the cabinet vented to the outside through a triple wall flue.

Image

Image

The plenum was made from a standard 12x4x6 end boot. I crimped the rectangular section for a tight fit, rounded the corners, pop-riveted to the heater housing and sealed with high temperature tape. It stands a minimum of 2'' from all wood surfaces and is fairly warm to the touch when operating so I may shield all the wood with a layer of metal then make a metal screen enclosure for the front and side just to avoid accidental injury.

Image

The propane tanks (2) are located on the other side of the trailer at the back in a separate (vented through the floor) cabinet under the oven with separate regulators and hoses for the stove/oven and water heater so can be switched if one runs tank out.

I opted for a single hot water connection to the shower head which has an on-off switch. I decided a cold water connection and mixing valve would just waste time and water so will experiment with an average setting for flow and temperature.

I have separate 9 gallon gray water tanks for the sink and shower but both have shut off valves then will drain into a 3 inch drain pipe that runs the length of the trailer with a dump valve toward the rear of the trailer. The black water tank will enter the drain just before the dump valve and I'll open the gray water drains to flush the lines.

I think I've previously posted a photo of the combo toilet and shower pan. The black water tank for the toilet is directly underneath with a side drain into the main drain line.
User avatar
M C Toyer
The 300 Club
 
Posts: 363
Images: 11
Joined: Thu May 31, 2012 8:59 pm
Location: Pilot Point (Denton County) Texas
Top

Re: Build #2 - The Log Cabin - Finished, almost

Postby M C Toyer » Tue Oct 08, 2013 6:53 pm

Just a few odds and ends and ready to camp. Need to paint fenders, hook up trailer lights, install equalizer hitch, and add some cabinet latches.

The door was made from 3/4 inch tongue and groove cedar and 2xs for the stiles; rear bumper will attach to trailer frame on the flat area below the bottom log
Image


I will make a travel cover for the AC but later it and a tongue box will be enclosed with a faux stone metal chimney; the AC was mounted high in the wall for circulation when the bed is up
Image


I made the standing seam roof from standard galvanized v-crimp roof panels; each is a continuous sheet bent over the ridge
Image


Shower and porta-potty (temporary for now)
Image


Cushions can be used upright for seating or down for a day bed; a folding table stores behind the sink cabinet
Image

Image


With the murphy bed down hanging storage is shown on wall behind; the shelf will hold pillows, books, radio, hats, etc. - it is also accessible with the bed up
Image


Grid from drop ceiling light fixture to separate electrical and battery from under bench storage and allow ventilation; cut off switches for 1) shore power, 2) converter to battery, 3) battery to inverter. (edited to read shore power, not shower power, but the Shur-Flow pump also has a on-off switch under the sink) All the interior 12V LED lighting except the reading lights is controlled by wall switches.
Image
Last edited by M C Toyer on Fri Oct 11, 2013 2:30 pm, edited 1 time in total.
User avatar
M C Toyer
The 300 Club
 
Posts: 363
Images: 11
Joined: Thu May 31, 2012 8:59 pm
Location: Pilot Point (Denton County) Texas
Top

Re: Build #2 - The Log Cabin

Postby KCStudly » Tue Oct 08, 2013 8:50 pm

Some very innovative thought, a lot of work and craftsmanship went into your build.

It looks great! :thumbsup: :applause: :applause: :applause:
KC
My Build: The Poet Creek Express Hybrid Foamie

Poet Creek Or Bust
Engineering the TLAR way - "That Looks About Right"
TnTTT ORIGINAL 200A LANTERN CLUB = "The 200A Gang"
Green Lantern Corpsmen
User avatar
KCStudly
Donating Member
 
Posts: 9640
Images: 8169
Joined: Mon Feb 06, 2012 10:18 pm
Location: Southeastern CT, USA
Top

Re: Build #2 - The Log Cabin

Postby pchast » Tue Oct 08, 2013 9:45 pm

I'm impressed by what you have accomplished.
:thumbsup: :applause: :applause:
pchast
Platinum Donating Member
 
Posts: 2065
Images: 97
Joined: Mon Jan 28, 2013 5:47 pm
Location: Athens, NY
Top

Re: Build #2 - The Log Cabin

Postby 2bits » Wed Oct 09, 2013 4:31 pm

Wow! The interior has turned out awesome! Very nice work! :thumbsup:
Thomas

Image
User avatar
2bits
2bit Member
 
Posts: 5132
Images: 8
Joined: Thu Dec 27, 2007 6:04 pm
Location: Lake Tawakoni, TX
Top

Re: Build #2 - The Log Cabin

Postby aggie79 » Fri Oct 11, 2013 10:37 am

Fantastic work!

:applause: :thumbsup: :applause:

I've been trying to come up with a design that fits 10 gallons of amenities into a 5 gallon bucket, has standing room, and fits within a garage. Your layout and design accomplishes more than what I was looking to do. Very well done.
Tom (& Linda)
For build info on our former Silver Beatle teardrop:
Build Thread

93503
User avatar
aggie79
Super Duper Lifetime Member
 
Posts: 5405
Images: 686
Joined: Tue Aug 07, 2007 5:42 pm
Location: Watauga, Texas
Top

Re: Build #2 - The Log Cabin

Postby M C Toyer » Fri Oct 11, 2013 2:22 pm

Thanks folks -

Finished height of the trailer with 225/75/15 trailer tires is exactly 96" so wouldn't fit in a standard residential garage. Width at the eaves is the max legal 102" but the cabin itself is 90" outside width.

Took KC's early suggestion and omitted the outside sheathing. I picked up some 1-1/2" polyurethane faced with vinyl and foil and after fitting between the studs and wrapping with Tyvek was rigid enough to provide a flat backing for the steel siding. BTW I got the foam at the Habitat for Humanity Re-Store in Denton for $10 a 4' x 8' sheet and they still had quite a bit a couple of months ago.

I have enough left over that I will used it for the floor, walls, roof and hatch on my KIT restoration then cover with aluminum or filon.

My goal was to be able to stand-up inside and still fit in the combo garage/carport I built about the same time. I had 96" clearance within but only 90" at the front. During construction I had it on some 13" wheels and was just able to squeeze outside by deflating the tires. I took 12" out of the front beam of the carport just to have a margin.

I had considered a collapsible roof but the mechanics of making it watertight just didn't seem practical. About midway during construction I exchanged my KIA Sportage and Ford Sport Trac for the Jeep Liberty so was less concerned about wind resistance and weight - I haven't confirmed what that is yet.

As for the interior amenities I have pretty much everything I planned for in the beginning and didn't make any sacrifices except for the money spent.

First campout will be next weekend at the spring my gggf claimed in 1842. It is within the Great Trinity Forest in Dallas.

M C
Last edited by M C Toyer on Fri Oct 11, 2013 7:50 pm, edited 1 time in total.
User avatar
M C Toyer
The 300 Club
 
Posts: 363
Images: 11
Joined: Thu May 31, 2012 8:59 pm
Location: Pilot Point (Denton County) Texas
Top

Re: Build #2 - The Log Cabin

Postby 2bits » Fri Oct 11, 2013 3:07 pm

I would love to know more about the place where you are doing your first campout on the trinity, it gets a bad rap but it's not all sewage!
Thomas

Image
User avatar
2bits
2bit Member
 
Posts: 5132
Images: 8
Joined: Thu Dec 27, 2007 6:04 pm
Location: Lake Tawakoni, TX
Top

PreviousNext

Return to Build Journals

Who is online

Users browsing this forum: No registered users and 17 guests