Dash Camper

...ask your questions in the appropriate forums BUT document your build here...preferably in a single thread...dates for updates, are appreciated....

Re: Dash Camper

Postby PKCSPT » Sat Aug 31, 2013 3:05 am

At first I wasn't too sure about this design but I like it now that I see it taking shape.
121172 116946 159644
PKCSPT
Silver Donating Member
 
Posts: 1515
Images: 61
Joined: Wed Mar 31, 2010 11:27 pm
Location: Minnesota

Re: Dash Camper

Postby kludge » Sat Aug 31, 2013 7:31 am

Wow, great build quality!

So... what are all those electric bicycles in the background?
kludge
Teardrop Master
 
Posts: 177
Joined: Fri Dec 11, 2009 9:41 am
Location: Indy

Re: Dash Camper

Postby theDangerz » Sun Sep 01, 2013 1:19 pm

MrMatt wrote:I am just curious about the bamboo you are covering your trailer with. Is that a veneer? Is it easy to work with? Expensive?


so far so good. we'll see how the ceiling and roof installation goes. :thinking:
its a thin ply product made from a local company here in town.
more money than id like to spend...but so far its gorgeous!
theDangerz
Teardrop Builder
 
Posts: 31
Images: 67
Joined: Tue Jul 09, 2013 4:09 pm
Location: PNW
Top

Re: Dash Camper

Postby theDangerz » Sun Sep 01, 2013 1:22 pm

kludge wrote:Wow, great build quality!

So... what are all those electric bicycles in the background?


thanks! :beer:


another bonus of the community space that im working in...lots of cool projects and ideas!
those bikes are from Conscious Commuter, another local company doing good work for good cause.
theDangerz
Teardrop Builder
 
Posts: 31
Images: 67
Joined: Tue Jul 09, 2013 4:09 pm
Location: PNW
Top

Re: Dash Camper

Postby theDangerz » Sat Sep 07, 2013 4:44 pm

been working long hours/days so were a bit behind on photos...but heres an update.

things really slowed down when we were working on the cabinets. Hadnt really solved all details here and probably should have...
finally got a plan and put everything together. nice to see things firm up with more connecting pieces.
Image

a shot of the front cabinets after installing the ceiling panel
Image

tested a few curved pieces to see whats possible
Image

after the ceiling we installed the ribs ad spacers
Image

Image

framed in and cut the hole for sunroof
Image

insulation
Image

and test fit the first exterior panel before we start closing everything in
Image

this is what happens when you dont watch the dog closely and leave pieces laying under the trailer...lesson learned
Image

we are trying to psyche ourselves up for the next coming days, installing the ceiling panels and then starting to finish/epoxy the exterior
Image
theDangerz
Teardrop Builder
 
Posts: 31
Images: 67
Joined: Tue Jul 09, 2013 4:09 pm
Location: PNW
Top

Re: Dash Camper

Postby KCStudly » Sat Sep 07, 2013 9:04 pm

That's looking really "clean and tidy" (nice fit and finish). Good job! :applause: :thumbsup:
KC
My Build: The Poet Creek Express Hybrid Foamie

Poet Creek Or Bust
Engineering the TLAR way - "That Looks About Right"
TnTTT ORIGINAL 200A LANTERN CLUB = "The 200A Gang"
Green Lantern Corpsmen
User avatar
KCStudly
Donating Member
 
Posts: 9640
Images: 8169
Joined: Mon Feb 06, 2012 10:18 pm
Location: Southeastern CT, USA
Top

Re: Dash Camper

Postby _Ryan_ » Tue Sep 10, 2013 10:02 am

Looking great! I especially like the wood skin you are using!

theDangerz wrote:
_Ryan_ wrote:
theDangerz wrote:I bought frank's hurricane hinge. if anyone has installed the hurricane hinge with concealed screws (on the inside rather than on the roof), id love to see photos before the hinge arrives!!


Could you explain this a bit further? I've installed this exact hinge but I don't quite understand what you are speaking about. As far as I could tell there is only one way to install the hinge, although I have seen or heard of people who have installed the body side flange underneath the top skin on the outside.


I hadnt thought of installing the flange under the skin. if you could point me in the right direction of any examples that would be awesome.

when i was talking with frank he explained that it was possible remove both flanges (cut them off with a table saw) and instead of screwing through the outside you could screw through the face and effectively hid almost the entire hinge. I certainly don't see any examples of this in the galleries and was just wondering if anyone has tried.


Here is a post I found from Doug Hodder. Doug is a forum moderator and a very knowledgeable builder. I couldn't find any pictures but if you ask nicely he might shed more light on the subject.

Doug Hodder wrote:I routed a groove in the body portion of the tear and installed the hinge...I then overlapped it with the roofing material...I filled the "C" channel with a small hardwood strip first...this way when it is all said and done...I only have the crown of the hinge and the flap on the galley side showing....photo is prior to completion, but shows how it was layered....no leaks on it....just what I did....the aluminum skin is shown flapping above the tear....the sides were covered with maple framing and weatherstripping....not shown...but I built a woody....doug


As far as removing the flanges I think you might be getting into dangerous territory. The top flange on the body side is where the screws are installed. Removing this will leave you with only about a 3/8" wide flange on the inside of the body to install screws and support the weight of the hatch. The hatch side of the hinge is installed on the inside so this is less of an issue. Just my 2 cents. :D

Looking forward to seeing more pictures! :thumbsup:
User avatar
_Ryan_
Teardrop Master
 
Posts: 241
Images: 356
Joined: Fri Nov 16, 2012 6:24 pm
Top

Re: Dash Camper

Postby theDangerz » Wed Sep 11, 2013 10:57 am

_Ryan_ wrote:Looking great! I especially like the wood skin you are using!

As far as removing the flanges I think you might be getting into dangerous territory. The top flange on the body side is where the screws are installed. Removing this will leave you with only about a 3/8" wide flange on the inside of the body to install screws and support the weight of the hatch. The hatch side of the hinge is installed on the inside so this is less of an issue. Just my 2 cents. :D

Looking forward to seeing more pictures! :thumbsup:


Thanks. I decided to do neither. It just looked like asking for water troubles later and if anything ever went wrong would mean breaking into the shell to fix/maintain.
Just not worth it.
theDangerz
Teardrop Builder
 
Posts: 31
Images: 67
Joined: Tue Jul 09, 2013 4:09 pm
Location: PNW
Top

Re: Dash Camper

Postby theDangerz » Wed Sep 11, 2013 11:15 am

Wow.
Just flipped back through photos. Its so hard to remember that we just cut our first piece under a month ago. :shock:

suffice to say, were spent. completely exhausted.
getting out of bed is tough and at the end of the day we crash the second we get home. Definitely cut the timeline short.
WAY short...but were still pushing.

Really want to have the trailer on the road this weekend (not finished, but at least on the road and able to be slept in.

Here's the latest:

spent a few days readying for the outer shell, including soldering wires for our interior lights
Image

starpped and clamped the outer shell in place. so exciting to see the final shape without having to imagine the image without something else in the way!
Image

Image

Image

last few days were spent on the rear hatches. the curve certainly didnt make them easy but everything bent up okay. Trying to make sure we think ahead completely in terms of running wires etc...but it seems a given we'll miss something and kick ourselves for it later. :roll:
Image

We have epoxied the trailer itself (just realized i dont have a photo...ill grab one today) and are finishing up the hatches for the same. Then we need to throw a few coats of UV resistant spar urethane on the outside and we should be set to pull it out of the shop for the maiden (although still incomplete) voyage.
woohoo! :beer:
theDangerz
Teardrop Builder
 
Posts: 31
Images: 67
Joined: Tue Jul 09, 2013 4:09 pm
Location: PNW
Top

Re: Dash Camper

Postby _Ryan_ » Wed Sep 11, 2013 11:55 am

Looks amazing! I bet the epoxy will darken that wood up nicely.

Just a quick word on varnishes. I used both the Minwax Helmsman Spar Urethane (for the inside and galley), and Pettit Z Spar Flagship Varnish (for the exterior). This is an ongoing battle on this forum and I'm no expert but I caution you on using the spar urethane as it has far less UV inhibitors than a real spar varnish. When I compared the two the urethane was like like water and the varnish was like maple syrup. Realistically If your teardrop is garaged it shouldn't matter, but if it's stored outside you might want to reconsider.

Also the urethane won't build up coats as nicely as the true varnish, so make sure your epoxy is as smooth as you can get it before applying the urethane finish.
User avatar
_Ryan_
Teardrop Master
 
Posts: 241
Images: 356
Joined: Fri Nov 16, 2012 6:24 pm
Top

Re: Dash Camper

Postby theDangerz » Fri Sep 13, 2013 11:07 am

_Ryan_ wrote:Looks amazing! I bet the epoxy will darken that wood up nicely.

Just a quick word on varnishes. I used both the Minwax Helmsman Spar Urethane (for the inside and galley), and Pettit Z Spar Flagship Varnish (for the exterior). This is an ongoing battle on this forum and I'm no expert but I caution you on using the spar urethane as it has far less UV inhibitors than a real spar varnish. When I compared the two the urethane was like like water and the varnish was like maple syrup. Realistically If your teardrop is garaged it shouldn't matter, but if it's stored outside you might want to reconsider.

Also the urethane won't build up coats as nicely as the true varnish, so make sure your epoxy is as smooth as you can get it before applying the urethane finish.


thanks ryan
we went with a recommendation from the boat builders in our space and used schooner gold. maple syrup it is!
Ill get photos up as soon as i can
theDangerz
Teardrop Builder
 
Posts: 31
Images: 67
Joined: Tue Jul 09, 2013 4:09 pm
Location: PNW
Top

Re: Dash Camper

Postby _Ryan_ » Fri Sep 13, 2013 11:10 am

theDangerz wrote:
_Ryan_ wrote:Looks amazing! I bet the epoxy will darken that wood up nicely.

Just a quick word on varnishes. I used both the Minwax Helmsman Spar Urethane (for the inside and galley), and Pettit Z Spar Flagship Varnish (for the exterior). This is an ongoing battle on this forum and I'm no expert but I caution you on using the spar urethane as it has far less UV inhibitors than a real spar varnish. When I compared the two the urethane was like like water and the varnish was like maple syrup. Realistically If your teardrop is garaged it shouldn't matter, but if it's stored outside you might want to reconsider.

Also the urethane won't build up coats as nicely as the true varnish, so make sure your epoxy is as smooth as you can get it before applying the urethane finish.


thanks ryan
we went with a recommendation from the boat builders in our space and used schooner gold. maple syrup it is!
Ill get photos up as soon as i can


Great! But where are those epoxy pics!? :x :lol:
User avatar
_Ryan_
Teardrop Master
 
Posts: 241
Images: 356
Joined: Fri Nov 16, 2012 6:24 pm
Top

Re: Dash Camper

Postby theDangerz » Wed Sep 25, 2013 9:52 pm

sorry for the delay
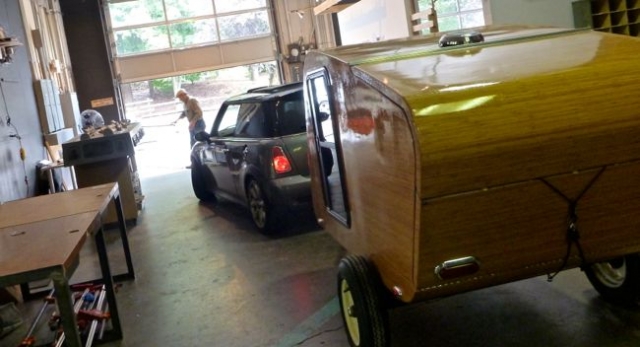
been a crazy few weeks trying to finish up. worked 14-16hour days for 2 weeks trying to get out of the shop in time for a weekend of tailgating.
made it (just barely) in time to beat traffic on the interstate south.the trailer wasnt complete...but it was weather tight and road ready. nothing left but finishing touches and cabinetry touches.

pulling out of the shop was terrifying. i picture this must be what its like when people leave the hospital with their first baby "are they really going to let us just drive off with this thing?" :oops:

Image

Image

Image

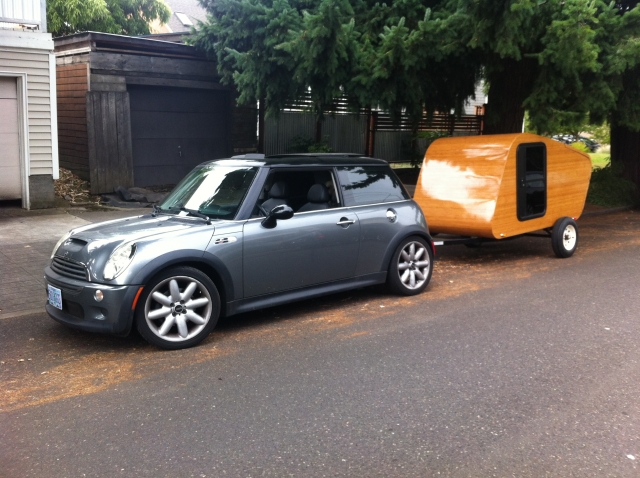
trailer drove like a dream. the mini didnt even know it was behind us, and even at high speeds there was absolutely no wobbling or shaking. sweet!
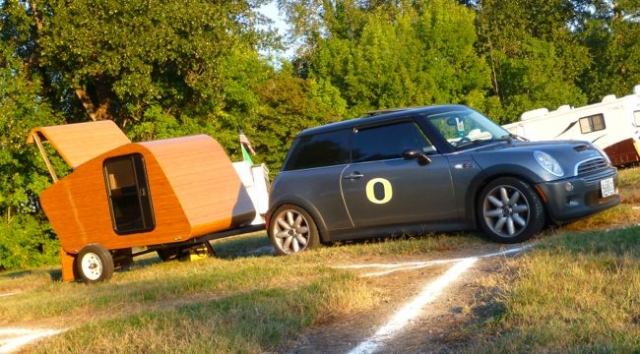
once at our destination, we were able to fit the mini and trailer in a typical car space saving us a lot of cash...and it slept awesome!

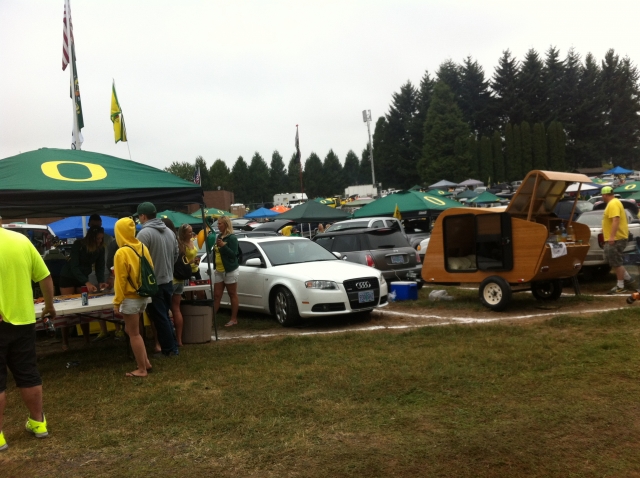
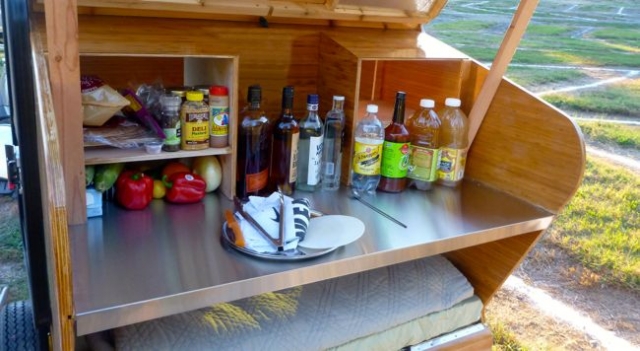
Even without the cabinets being done, she setup nicely for our tailgating party and looked pretty good. it also drew a ton of attention...and i wished it was actually complete!
Regardless, a nice boost of enthusiasm to get back into the shop and finish everything up.

Image

Image

Image

sadly, we woke up sunday morning and realized that jen's face had swelled to 2-3 times its normal size.
she was having a severe allergic reaction to something and we fear it might be the epoxy used to finish the trailer.

We rushed home and took her into urgent care where they confirmed the allergic reaction, put her on some steroids to reduce the swelling and counteract the reaction. Shes now been laid up for a week and ive been struggling to find the enthusiasm to get into the shop and finish up. the mere thought that we might not be able to use it due to an allergy makes me sick.

We understand that odds are... she simply cant be around wet epoxy (IF it is the epoxy at all that caused the reaction) but the mere thought of not being able to use the trailer is nothing short of horrific.
:cry:
theDangerz
Teardrop Builder
 
Posts: 31
Images: 67
Joined: Tue Jul 09, 2013 4:09 pm
Location: PNW
Top

Re: Dash Camper

Postby KCStudly » Wed Sep 25, 2013 10:07 pm

Well here's hoping that once the epoxy/varnish/mattress(?)/etc. has had a good long time to gas out that she will no longer be affected.

What a roller coaster emotionally.

But she sure does shine brightly! Looks great and I hope things work out for you.
KC
My Build: The Poet Creek Express Hybrid Foamie

Poet Creek Or Bust
Engineering the TLAR way - "That Looks About Right"
TnTTT ORIGINAL 200A LANTERN CLUB = "The 200A Gang"
Green Lantern Corpsmen
User avatar
KCStudly
Donating Member
 
Posts: 9640
Images: 8169
Joined: Mon Feb 06, 2012 10:18 pm
Location: Southeastern CT, USA
Top

Re: Dash Camper

Postby rebapuck » Sun Sep 29, 2013 10:47 pm

Beautiful trailer.
Judy
1966 VW camper
1967 VW singlecab
Image
User avatar
rebapuck
.
 
Posts: 2243
Images: 1
Joined: Thu May 14, 2009 1:55 pm
Location: Chapel Hill NC
Top

PreviousNext

Return to Build Journals

Who is online

Users browsing this forum: No registered users and 5 guests