Slipstream

...ask your questions in the appropriate forums BUT document your build here...preferably in a single thread...dates for updates, are appreciated....

Re: Slipstream

Postby Robot » Sun May 31, 2015 8:40 am

Foam sheeting is attached with screws and fender washers. I cut the 4x8 sheets down to 2x8 to make the steam bending easier, but that has led to allignment issues now that I'm putting it together. For now I'm using duct tape to try to keep them level with each other, but I may need to glue some support panels on the inside of the seams.
uploadfromtaptalk1433079581716.jpg
uploadfromtaptalk1433079581716.jpg (73.65 KiB) Viewed 2411 times
uploadfromtaptalk1433079262756.jpg
uploadfromtaptalk1433079262756.jpg (102.14 KiB) Viewed 2411 times


Interior I am still contemplating. I scored some free foam on Craig's list. 6" cubes from a gymnastics gym foam pit. I got a minivan stuffed full. Planning on using a hotwire to cut each cube down to 2x6 and glue them into all the voids between the pvc. Still not sure what to do for interior walls. Canvas & paint? Scrap cloth in a mosaic? Wood strips? Coroplast? Really don't know yet.
uploadfromtaptalk1433079250538.jpg
uploadfromtaptalk1433079250538.jpg (72.56 KiB) Viewed 2411 times
User avatar
Robot
Teardrop Advisor
 
Posts: 78
Joined: Mon Mar 30, 2015 3:06 pm

Re: Slipstream

Postby tac422 » Sun May 31, 2015 6:25 pm

I like this :D
User avatar
tac422
500 Club
 
Posts: 639
Images: 224
Joined: Sun Mar 17, 2013 11:39 am

Re: Slipstream

Postby dales133 » Sun May 31, 2015 6:30 pm

I have to be honest I was somewhat skeptical that this idea would be alot more difficult than you'd thought but your making great progress and it's realy taking shape.
Nice job on the innovation and the build
User avatar
dales133
4000 Club
4000 Club
 
Posts: 4605
Images: 1
Joined: Mon Oct 13, 2014 5:26 pm
Top

Re: Slipstream

Postby Fred Trout » Sun May 31, 2015 8:02 pm

Pretty neat, thanks

Yes, it does look like panel joints between supports will need some reinforcement / attention. I would think it would be better to leave the panels as wide as possible if that turns out to be difficult.

Good luck !!
User avatar
Fred Trout
The 300 Club
 
Posts: 396
Joined: Fri May 08, 2015 4:30 pm
Location: SW Montana
Top

Re: Slipstream

Postby Robot » Mon Jun 08, 2015 1:21 am

I made some progress this weekend. First project was all the misaligned seams. My first solution, duct tape, worked great for about 30 minutes. Then the glue just gave out. My second idea was to stitch the panels together with a support panel on the inside. This worked quite well.

On the end side corners, both sides of the panel were too close to the PVC frame to get a support panel in. Discussing the issue with a co-worker, he recommended plywood sheathing clips. These worked excellent. They were sized for 7/16 and the foam is closer to 9/16, so I had to squeeze the foam a bit to get the clips seated. They sit flush with the surface, so hopefully after a spackle and a sanding they won't be too noticeable under the canvas.

I also stitched the top together with a support panel underneath and a cap panel on the roof. You can't see the cap panel from the ground, but I'm going to sand a nice gradual bevel onto the edge before canvasing.
uploadfromtaptalk1433744459194.jpg
uploadfromtaptalk1433744459194.jpg (93.54 KiB) Viewed 2294 times
uploadfromtaptalk1433744447250.jpg
uploadfromtaptalk1433744447250.jpg (69.74 KiB) Viewed 2294 times
uploadfromtaptalk1433744432487.jpg
uploadfromtaptalk1433744432487.jpg (71.26 KiB) Viewed 2294 times
User avatar
Robot
Teardrop Advisor
 
Posts: 78
Joined: Mon Mar 30, 2015 3:06 pm
Top

Re: Slipstream

Postby Robot » Mon Jun 08, 2015 1:25 am

uploadfromtaptalk1433744568391.jpg
uploadfromtaptalk1433744568391.jpg (81.09 KiB) Viewed 2294 times
uploadfromtaptalk1433744558106.jpg
uploadfromtaptalk1433744558106.jpg (97.75 KiB) Viewed 2294 times
uploadfromtaptalk1433744536138.jpg
uploadfromtaptalk1433744536138.jpg (117.96 KiB) Viewed 2294 times


I also got my first Wiley window put together. I haven't cut the plexi or built the screen frame, but I have the material. I built the side brackets for the other three windows, but have not yet cut the holes.
User avatar
Robot
Teardrop Advisor
 
Posts: 78
Joined: Mon Mar 30, 2015 3:06 pm
Top

Re: Slipstream

Postby Robot » Mon Jun 08, 2015 1:36 am

uploadfromtaptalk1433744918059.jpg
uploadfromtaptalk1433744918059.jpg (99.66 KiB) Viewed 2291 times


The last thing I got accomplished was the mold for the upper corners. I found a pack of 36" round balloons at Party City. I inflated one to what I sure hope is the right size. I wrapped it in saran wrap as a release agent. After marking the quarter hemisphere I need, I laid down a layer of paper & glue, covered by a layer of cloth & glue. I'll let it dry completely before giving it another coat of glue. I don't know if the canvas and glue alone will hold it's shape, but I sure hope so. Once its dry, I'll trim it to size and spray the inside with expanding foam (once again using cling wrap as a release agent) hopefully this will give me a nice smooth corner radius that will require minimal filling & sanding.
User avatar
Robot
Teardrop Advisor
 
Posts: 78
Joined: Mon Mar 30, 2015 3:06 pm
Top

Re: Slipstream

Postby Wolffarmer » Mon Jun 08, 2015 9:32 am

Good to see you are drying up. Nice work.
"these guys must be afraid of the dark"
User avatar
Wolffarmer
Donating Member
 
Posts: 4612
Images: 309
Joined: Wed May 02, 2007 1:32 pm
Location: Idaho Rupert
Top

Re: Slipstream

Postby Sheddie » Tue Jun 09, 2015 3:45 am

Interesting project :thinking:
Have you considered using glass cloth and resin to form the corners? As used in boats and cars like the corvette.
User avatar
Sheddie
1000 Club
1000 Club
 
Posts: 1499
Images: 1129
Joined: Mon Jul 01, 2013 3:26 pm
Location: Whangarei, New Zealand
Top

Re: Slipstream

Postby Robot » Tue Jun 09, 2015 4:13 am

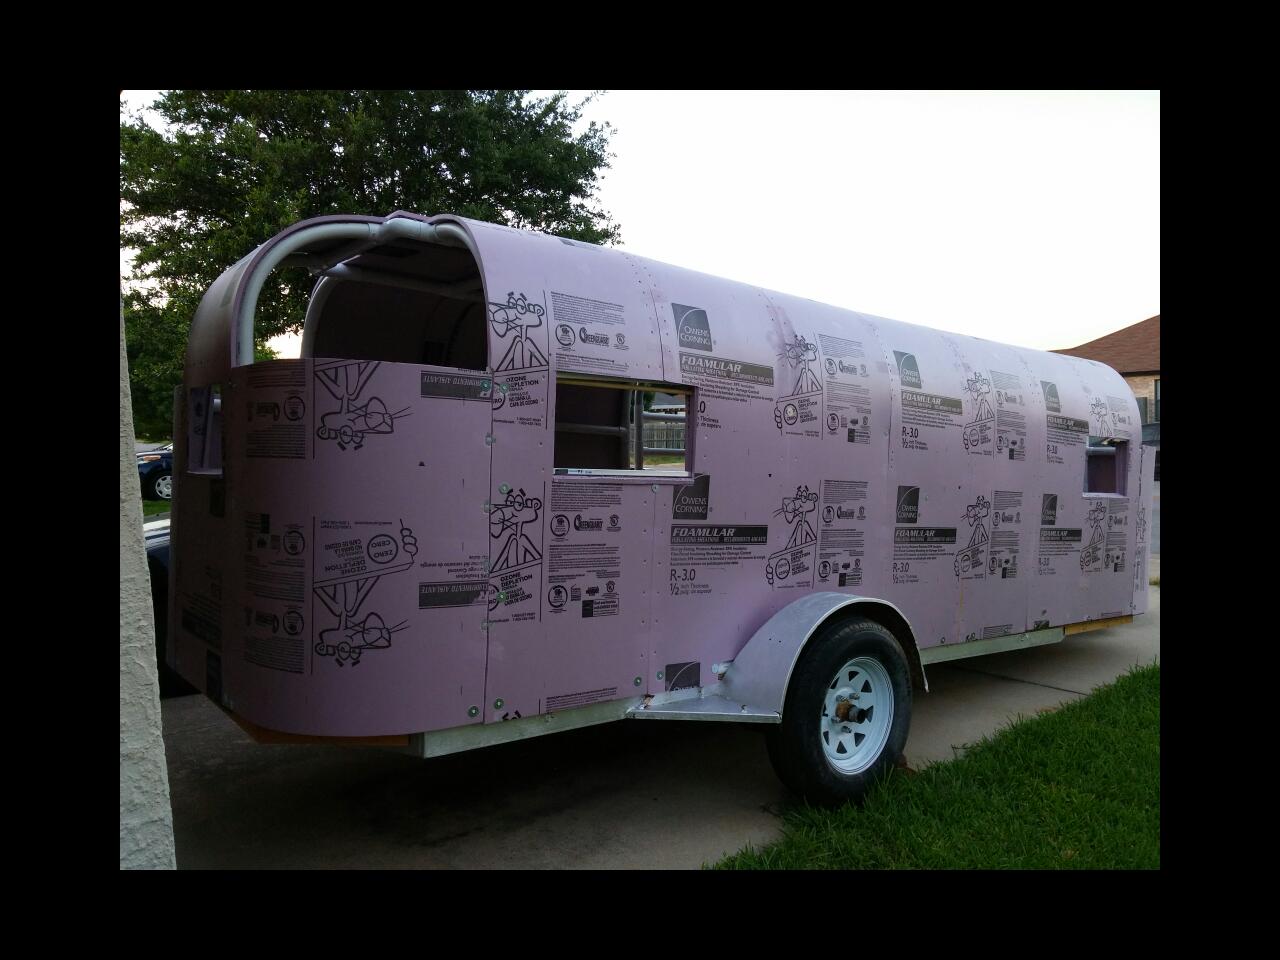
I got home from work this morning to find that my balloon had popped and my mold was crumpled up on the floor. Fortuanately, it was still slightly wet and malleable. I pumped up a new balloon and put the mold on top. I put a fan on it and hoped for the best. I went outside, cut 2 more windows and installed the Wiley window um...brackets? Is there a name for those?

I slept through the hottest part of the day (my favorite part of working nights), woke up and checked on my mold. The outer surface was now hard. I flipped it over and found the underside was still a little wet. I let it air out while I went outside and cut out the last two windows.
uploadfromtaptalk1433841155893.jpg
uploadfromtaptalk1433841155893.jpg (99.42 KiB) Viewed 2212 times


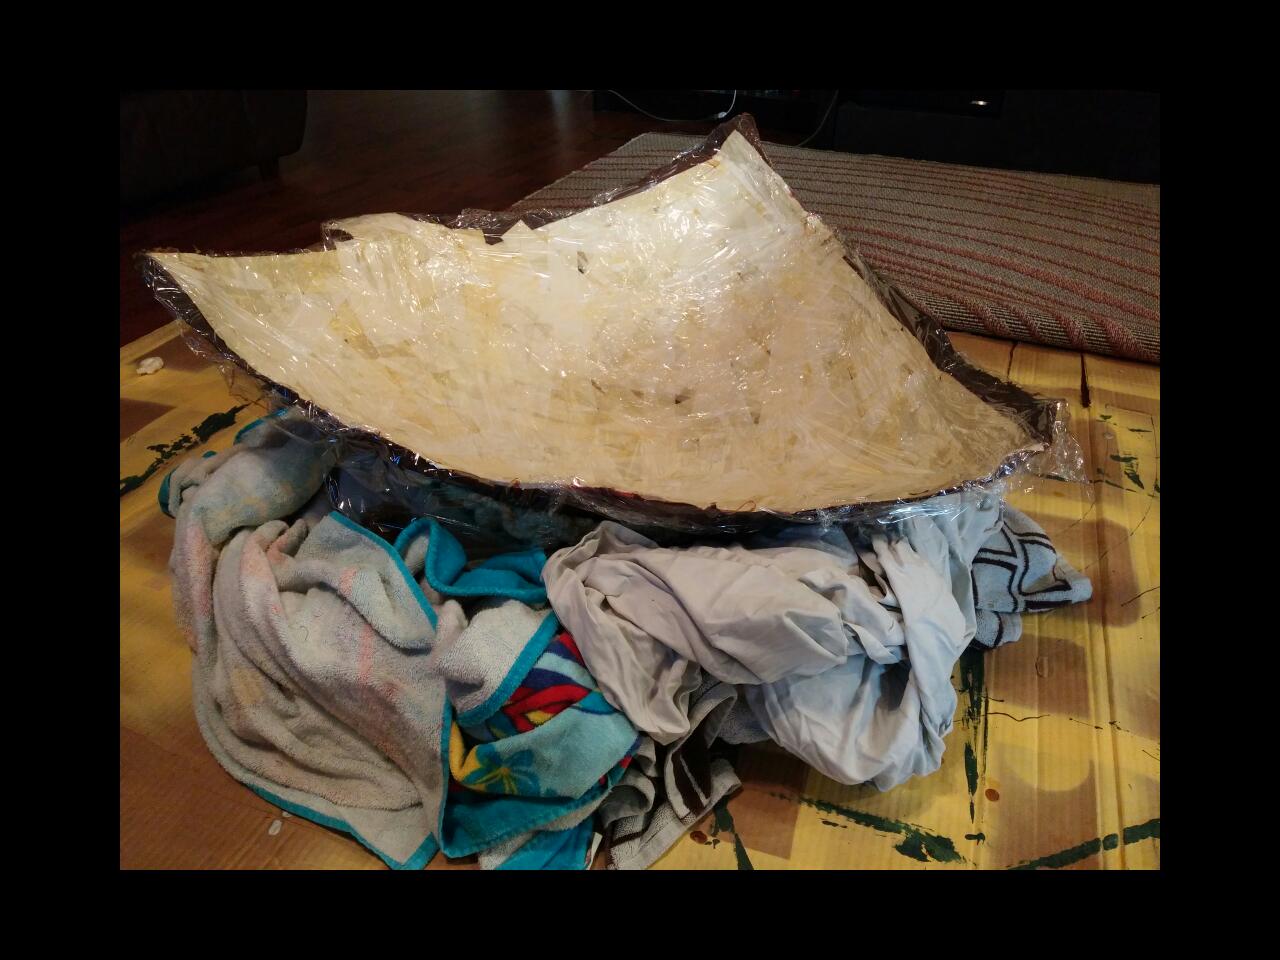
Once the mold was dry, I lined it with cling wrap and filled it with expanding foam. It took 2.5 cans to do a single layer, then I used up the last of the can making the center a little thicker.
uploadfromtaptalk1433841144581.jpg
uploadfromtaptalk1433841144581.jpg (127.95 KiB) Viewed 2212 times
uploadfromtaptalk1433841032548.jpg
uploadfromtaptalk1433841032548.jpg (117.37 KiB) Viewed 2212 times


The foam takes 8 hours to cure, so I have to wait till morning to pop it out of the mold and see how it lined up with the walls.
User avatar
Robot
Teardrop Advisor
 
Posts: 78
Joined: Mon Mar 30, 2015 3:06 pm
Top

Re: Slipstream

Postby Robot » Tue Jun 09, 2015 4:16 am

Sheddie, I'd rather not use resin & glass because I'm not confidant that I'd produce good results. The canvas and glue is the exact same principal, but is a more forgiving method due to the slow cure time on the glue.
User avatar
Robot
Teardrop Advisor
 
Posts: 78
Joined: Mon Mar 30, 2015 3:06 pm
Top

Re: Slipstream

Postby Robot » Wed Jun 10, 2015 12:07 am

Well the corners of the mold sagged while the foam was curing, resulting in a train wreck of a foam plug. The canvas and glue alone was not strong enough to hold its shape. So I put the mold back on the balloon & hit the outside with 2 cans of foam and laid a scrap piece of rigid foam on top. I let it dry and flipped it over...now I have a strong mold with a base.
uploadfromtaptalk1433912835478.jpg
uploadfromtaptalk1433912835478.jpg (79.48 KiB) Viewed 2163 times
uploadfromtaptalk1433912824194.jpg
uploadfromtaptalk1433912824194.jpg (84.73 KiB) Viewed 2163 times
User avatar
Robot
Teardrop Advisor
 
Posts: 78
Joined: Mon Mar 30, 2015 3:06 pm
Top

Re: Slipstream

Postby Robot » Wed Jun 10, 2015 12:10 am

The new and improved mold put out a pretty nice plug. It will still take some sanding to get the bumps out, but I'm really happy with the way it came out.
uploadfromtaptalk1433913003842.jpg
uploadfromtaptalk1433913003842.jpg (120.87 KiB) Viewed 2163 times
uploadfromtaptalk1433912993773.jpg
uploadfromtaptalk1433912993773.jpg (98.63 KiB) Viewed 2163 times
User avatar
Robot
Teardrop Advisor
 
Posts: 78
Joined: Mon Mar 30, 2015 3:06 pm
Top

Re: Slipstream

Postby Robot » Wed Jun 10, 2015 12:13 am

I also worked on a reinforcement frame for the corners. 1/4 inch pvc pipe inserted into holes drilled in the main frame. Intersections tied with zip ties.
uploadfromtaptalk1433913182811.jpg
uploadfromtaptalk1433913182811.jpg (111.68 KiB) Viewed 2162 times


And taillights! I installed the taillights.
uploadfromtaptalk1433913145141.jpg
uploadfromtaptalk1433913145141.jpg (127 KiB) Viewed 2162 times
Last edited by Robot on Wed Jun 10, 2015 12:16 am, edited 1 time in total.
User avatar
Robot
Teardrop Advisor
 
Posts: 78
Joined: Mon Mar 30, 2015 3:06 pm
Top

Re: Slipstream

Postby Robot » Wed Jun 10, 2015 12:15 am

I checked Craig's list free section before I left for work and found a big pile of 1/8 birch paneling right on my way to work. Some things are worth being late for. Now I know what my interior walls will be!
uploadfromtaptalk1433913326289.jpg
uploadfromtaptalk1433913326289.jpg (79.41 KiB) Viewed 2162 times
User avatar
Robot
Teardrop Advisor
 
Posts: 78
Joined: Mon Mar 30, 2015 3:06 pm
Top

PreviousNext

Return to Build Journals

Who is online

Users browsing this forum: No registered users and 19 guests