Lance and Becky's Sagwagon

...ask your questions in the appropriate forums BUT document your build here...preferably in a single thread...dates for updates, are appreciated....

Re: Lance and Becky's Sagwagon - Progress

Postby Oldragbaggers » Sun Apr 07, 2013 8:14 pm

Here is the update on my progress over spring break. I am not going to bore with a dozen pictures of paint drying, but here is where I am currently (which is a lot further than I was when break began).

Image

For some reason that I can't understand, getting a paint finish that we are satisfied with has been very elusive. We did 2 coats this past week, but still were not quite happy with the results. We got her all sanded again yesterday but it turned out to be too cold and windy to paint today so that last (I hope) coat will have to wait until next weekend.

The weather was also too cold for the resin work I had hoped to finish on the hatch. I kept putting it off thinking that perfect day was going to come before the break was over but it never did. I finally gave up and moved it inside. It is in the basement right now with an electric heater on it and epoxy hopefully kicking. (My thanks to Doug Hodder for his suggestion on how to get epoxy into my crushed edge. I was able to separate the plys enough to get the tip of a toothpick in there. I then brushed epoxy on the edge and blew it into the crack. I did this a couple of times. I know plenty went in because when I removed the toothpick a lot of excess squeezed out. I feel a lot more confident that corner has integrity and is waterproof now.)

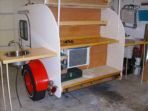
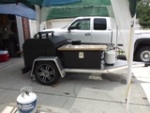
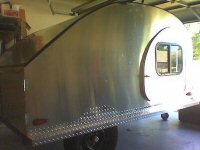
Things I did get done: The fenders repainted and installed, the doors and vent installed, diamond plate on the front and new tongue box. I also did a little woodwork on a shelf for the cabin.

I already mentioned in a different thread the problems I had with the fasteners that came with my Fantastic Vent. I will say again, for the record, I have nothing bad to say about the vent itself. It is very attractive, seems to be well made (especially for the price) and works well. But the heads snapped off of two of the screws when I was tightening them down. There was really no way to extract the shanks without digging into my roof so I drilled new holes right next to the old ones, replaced all the screws with stainless steel and filled the old holes. I put the vent down with butyl tape. Each screw hole had a dollup of 3M 5200 squeezed into it before putting in the screw.

The doors came from Frank Bear at Vintage Technologies and I love them. I am so happy I decided to buy the doors. They are quality, work beautifully and were very simple to install. These doors have an interior trim ring that lines up with a channel in the door itself. In theory you use self tapping screws that go through pre-drilled holes in the trim ring and tap into that channel in the door. The only issue I had is that I'll be darned if I could get those screws to self tap, so I ended up drilling pilot holes. No big deal. The fit is beautiful, the door is beautiful, and I didn't have to build it!! If anyone is considering these doors for their build, I highly recommend them.

The fenders are screwed directly to my walls. I used a total of eleven screws on each side, 4 along the bottom that are 2" long and 7 around the arch that are 1" long. I sealed all around the edges of the fender with butyl tape to keep water from getting behind it and, again, 3M 5200 in all screw holes.

The tongue box was a real deal. We started out by buying the heavy duty tongue box from Harbor Freight. As we were carrying it home, all 58 pounds of it, we were wondering if it had been a good choice. It's a really nice box, roomy and seems to be well made, but just seemed too heavy for our little teardrop. Then we placed it on the tongue of the trailer and it didn't match up with the angle. It narrowed too much too quick so it ran off the rails. That gave us a good excuse to take it back. We purchased the light duty one instead which is a perfect fit for my tongue, weighs half as much as the other one, was on sale for $75 and with my 20% off coupon it was only $60. It's a very attractive box and has a key lock. It's not huge, but big enough for our hose, electrical cord, wheel chocks, bike locks and such.

We had a couple of cold rainy days so I used those to do some sewing. I cut our foam mattress in half from side to side. I wanted it to be stackable to free up floor space in case I wanted to store some items in the teardrop either in transit or when it's not in use. I also wanted two covers. One is a thick quilted utility fabric that is sewn on and is more or less permanent. (It can be removed if necessary simply by removing the hand stitching along one edge). The other cover is Sunbrella upholstery fabric and that one has Velcro closures so it can be removed for cleaning. That was four covers in two days. That's a lot of bobbin winding!!!

Image

The only items left to install on the outside besides the hatch are the lights, rain gutters over the doors (and I am still uncertain whether i will put them on or not), and the electrical inlet.

The hatch just needs one more coat of resin on the outside, paint and trim and I will be ready to install it. At that point we will be campable. I'm estimating another 3 weeks unless we have a string of rainy weekends. I was beginning to doubt I would ever get to this point, but it's feeling pretty good right now!!

I want to thank Lance for all his hard work this week. Sanding, sanding and more sanding, painting and painting again, running to help every time I called his name. I know I don't say it enough, I couldn't have done this without him!!
Life is sooooo good.........
Sail...camp....bike...repeat
Becky

Build Journal http://www.tnttt.com/viewtopic.php?f=50&t=45917
Visit our blog at http://www.oldragbaggers.com
Image Image
User avatar
Oldragbaggers
Gold Donating Member
 
Posts: 1842
Images: 331
Joined: Mon Aug 01, 2011 9:22 pm
Location: Essex, MD

Re: Lance and Becky's Sagwagon - Progress

Postby louis c » Sun Apr 07, 2013 8:29 pm

Your tear really looks great! :)
User avatar
louis c
Teardrop Inspector
 
Posts: 14
Images: 2
Joined: Sat Jul 28, 2012 6:32 pm

Re: Lance and Becky's Sagwagon - Progress

Postby S. Heisley » Sun Apr 07, 2013 8:32 pm

Becky, I gasped when I saw your latest picture! Not only is your trailer looking terrific; but also, you're almost done!!!
Good Job, Becky and Lance!!! :thumbsup: :applause:
User avatar
S. Heisley
Super Lifetime Member
 
Posts: 8774
Images: 495
Joined: Mon Sep 17, 2007 10:02 am
Location: No. California
Top

Re: Lance and Becky's Sagwagon - Progress

Postby Forrest747 » Sun Apr 07, 2013 8:36 pm

:bowdown: :bowdown: :bowdown: :bowdown:
"All the success on the trail can not compensate for having square headlights"

"I've got a fever and the only prescription is more cowbell!"
http://www.tnttt.com/viewtopic.php?f=50&t=37701 Build Journal
User avatar
Forrest747
Cowbell Donating Member
 
Posts: 1327
Images: 447
Joined: Mon Apr 06, 2009 3:40 am
Location: West Valley Utah, Utah
Top

Re: Lance and Becky's Sagwagon - Progress

Postby Jdw2717 » Sun Apr 07, 2013 8:38 pm

Forrest747 wrote::bowdown: :bowdown: :bowdown: :bowdown:

x2. Looking great.
"Twenty years form now you will be more disappointed by the things that you didn't do than by the ones you did. So throw off the bowlines... Explore. Dream. Discover" Mark Twain

John & Tatanya
User avatar
Jdw2717
Teardrop Master
 
Posts: 180
Images: 34
Joined: Tue Feb 14, 2012 8:34 pm
Location: Knoxville, TN
Top

Re: Lance and Becky's Sagwagon - Progress

Postby Junkboy999 » Sun Apr 07, 2013 8:44 pm

A thing of beauty. You two did a great job. I’m sure you're gonna enjoy it for many years.
:thumbsup:
User avatar
Junkboy999
1000 Club
1000 Club
 
Posts: 1259
Images: 52
Joined: Fri Jul 06, 2012 9:18 pm
Location: Wichita, KS
Top

Re: Lance and Becky's Sagwagon - Progress

Postby KCStudly » Sun Apr 07, 2013 8:48 pm

x3 Looking really great! :thumbsup:
KC
My Build: The Poet Creek Express Hybrid Foamie

Poet Creek Or Bust
Engineering the TLAR way - "That Looks About Right"
TnTTT ORIGINAL 200A LANTERN CLUB = "The 200A Gang"
Green Lantern Corpsmen
User avatar
KCStudly
Donating Member
 
Posts: 9616
Images: 8169
Joined: Mon Feb 06, 2012 10:18 pm
Location: Southeastern CT, USA
Top

Re: Lance and Becky's Sagwagon - Progress

Postby doug hodder » Sun Apr 07, 2013 8:48 pm

Your tear looks great Becky! It's always tough to get a nice looking paint job if the weather doesn't cooperate with you. People would flip out if they knew how I paint...build a fire, get it warm...shoot paint. And the stove is burning! The problem is, when the weather gets warm enough, then you have the bug issue. Regardless....it looks great, and any builder is their toughest critic. Glad you got some positive results on the epoxy thing. Doug
doug hodder
*Snoop Dougie Doug
 
Posts: 12625
Images: 562
Joined: Tue Dec 14, 2004 11:20 pm
Top

Re: Lance and Becky's Sagwagon - Progress

Postby CliffinGA » Sun Apr 07, 2013 9:04 pm

Becky its looking great girl!!! I didn't use the screws that came with my fan I used longer stainless screws just to make sure they were what I wanted. How did you attach the rock guard?

Cliff
In God we trust, shoot the rest and he will sort out!

My Build:

viewtopic.php?f=50&t=42628
User avatar
CliffinGA
1000 Club
1000 Club
 
Posts: 1499
Images: 207
Joined: Sat Nov 14, 2009 1:29 pm
Location: Jefferson, GA
Top

Re: Lance and Becky's Sagwagon - Progress

Postby Oldragbaggers » Sun Apr 07, 2013 9:06 pm

Thanks everyone. Your kind remarks are very much appreciated. You have no idea how much the support of all my friends here on the forum has meant to me over this past year and a half. (Yes, it's been THAT long!!!) You guys are the best. Now that I will be actually camping, I am looking forward to meeting as many of you as possible.
Life is sooooo good.........
Sail...camp....bike...repeat
Becky

Build Journal http://www.tnttt.com/viewtopic.php?f=50&t=45917
Visit our blog at http://www.oldragbaggers.com
Image Image
User avatar
Oldragbaggers
Gold Donating Member
 
Posts: 1842
Images: 331
Joined: Mon Aug 01, 2011 9:22 pm
Location: Essex, MD
Top

Re: Lance and Becky's Sagwagon - Progress

Postby aggie79 » Sun Apr 07, 2013 9:21 pm

Becky,

Your teardrop is looking awesome! I love the design and your color selection.

Don't worry about the 1-1/2 year build. I was just halfway at that point in time.

Take care,
Tom
Tom (& Linda)
For build info on our former Silver Beatle teardrop:
Build Thread

93503
User avatar
aggie79
Super Duper Lifetime Member
 
Posts: 5405
Images: 686
Joined: Tue Aug 07, 2007 5:42 pm
Location: Watauga, Texas
Top

Re: Lance and Becky's Sagwagon - Progress

Postby Oldragbaggers » Sun Apr 07, 2013 9:26 pm

Thank you Tom. Your teardrop is above and beyond in craftsmanship and attention to detail. I can't imagine how long it would take me to build one like yours, if I could even pull it off.
Life is sooooo good.........
Sail...camp....bike...repeat
Becky

Build Journal http://www.tnttt.com/viewtopic.php?f=50&t=45917
Visit our blog at http://www.oldragbaggers.com
Image Image
User avatar
Oldragbaggers
Gold Donating Member
 
Posts: 1842
Images: 331
Joined: Mon Aug 01, 2011 9:22 pm
Location: Essex, MD
Top

Re: Lance and Becky's Sagwagon - Progress

Postby 91kuhndog » Sun Apr 07, 2013 9:50 pm

Wow Becky, that tear is one of the cleanest looking designs I've seen yet. I like the fiberglass look with the boat paint.... amazing finish, and the rock guard helps complete it too. I'm ordering my doors from Frank Bear this week too, along with a Fantastic fan and all my moldings... one order to try to get it all bought at once.... Congrats on the build... Love it! :applause: :applause: :applause: :applause: :applause: :applause: :applause: :applause: :applause:
Our only limitations in life are purely self-induced!

My build; viewtopic.php?f=50&t=54749
User avatar
91kuhndog
Donating Member
 
Posts: 104
Images: 91
Joined: Wed Jan 23, 2013 4:45 pm
Location: Charleston SC
Top

Re: Lance and Becky's Sagwagon - Progress

Postby PSBreen » Sun Apr 07, 2013 9:59 pm

All I can say is WOW! Your tear is looking awesome. You guys are almost done.
Steve & Cynthia
User avatar
PSBreen
Donating Member
 
Posts: 185
Images: 93
Joined: Tue May 24, 2011 12:36 pm
Location: Layton, UT
Top

Re: Lance and Becky's Sagwagon - Progress

Postby nevadatear » Sun Apr 07, 2013 10:07 pm

Becky, plus one to what evereyone else has said. It looks grand! Remember, you are going to be the only one that knows or cares about the problems. the most important thing is to get the thing campable and go off and have fun! :thumbsup:
Deb
Debbie (with Randy looking over my shoulder)
Our build thread: http://www.tnttt.com/viewtopic.php?t=41295&highlight=monstero
2009 Homebuilt woody, Kenskill inspired 5 wide
ImageImage
User avatar
nevadatear
Silver Donating Member
 
Posts: 2374
Images: 171
Joined: Mon Nov 10, 2008 2:37 pm
Location: No. Nevada
Top

PreviousNext

Return to Build Journals

Who is online

Users browsing this forum: No registered users and 13 guests