kinto wrote:looking great dave!

everything is so precise it's amazing... mine is about 10% wood filler!

kent

Hi Everyone,
Wow, it's been two weeks since my last update! We've been working like crazy to make IRG 4! Back to the build!


We insulated the hatch with the first layer of 3/4", finished the wiring and then added the second layer.
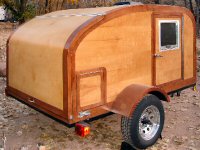
My new fenders arrived from Grant and I needed to see how they'll work!


These images show them clamped in place.
Last week my brother had a couple of days off so I took full advantage of his help. We disassembled the interior and the galley to ready them for varnishing. I can't believe how many screws and such I had used.

Here's the galley all prepped for the first sealer coat.
Next up was to fur out the door jams with 1/8" ply strips. The CNC used a 1/2" bit so we had to take up the extra space on both the jams and the doors. I've always thought a double seal was the way to go with my doors but the costs of an aluminum solution proved way too expensive. We went with 1/4" birch ply panels. These had to be shaped by hand since they were not CNC'd.


These two images show them glued in place and the interior all sanded, ready for the first seal coat.

That's my brother Dan spraying the second sealer coat! Between the first and second coat we ended up with almost two full days of sanding.


These two shots show how nice the interior is looking and that's just the sealer!
It was then finally time to address the doors. They were thankfully still dead flat and straight after sitting for many months. We added the 1/8" furring strips to the outside edge then cut the holes for the windows.

I had to see them in place! Here's the divers door all sanded up in the opening.

This is the passengers side.

You can see all the doors and drawers here, double sealed, sanded and ready for varnishing!
More to come soon!
Dave