Tucson tortoise: Edit for photos

...ask your questions in the appropriate forums BUT document your build here...preferably in a single thread...dates for updates, are appreciated....

Re: Tucson tortoise

Postby noseoil » Thu Nov 19, 2015 9:23 pm

Thanks everyone. This would never have been possible without the help & generous input from everyone here. It was a great trip, a bit long on the driving part, but well worth the visit with people & getting to see other builds in person for a change. I'll be plugging away at it again this weekend & will post progress pictures. Thinking I may get the stove installed, but will have to see how it goes. Thanks again. tim
Build log: viewtopic.php?f=50&t=60248
The time you spend planning is more important than the time you spend building.........

137905
User avatar
noseoil
1000 Club
1000 Club
 
Posts: 1820
Images: 669
Joined: Sun Apr 27, 2014 8:46 am
Location: Raton, New Mexico, living the good life!

Re: Tucson tortoise

Postby McGuffin » Fri Nov 20, 2015 7:42 pm

Hey Tim,

What are you going to do with all your free time ...?

:)

Larry
User avatar
McGuffin
Teardrop Advisor
 
Posts: 90
Images: 211
Joined: Sat Jan 04, 2014 6:04 am
Location: Ireland

Re: Tucson tortoise

Postby noseoil » Sat Nov 21, 2015 10:07 pm

Larry, here's where the "free time" is going now. I mentioned that I had a "few" things to do still, so here's today's work. I ran a ground from the inverter & ground strip to the frame per Rick's input from last weekend. No problems with faults, just being careful. The 110 volt, 12 volt & inverter are all grounded now, or earthed, as those who speak proper English would say.

The alarm system was never wired completely, so I spent part of the day working on trimming it out. It's all working now, but I have one thing to fix. I ran all the magnetic switches as "normally closed" in the doors, tongue box & hatch. WRONG! they should have been normally open, so an open door would ground the system & trigger an alarm. On Monday I'll go to an electronics store to buy a solid state relay to reverse the circuit & fix the problem. The spare tire is now alarmed & working since it's a (-) ground pin switch, the blinking LED is working & shows up in the port holes, the valet switch is functioning properly. The siren sounds when the spare is moved now.

Here's a shot of some of the alarm wiring & the gas pipe in the back behind the stove. The gas bottle sits in the A frame up front. I won't hook up the gas line until I have the alarm 100% set & working. I still need to test the line & fittings again, but it should be OK once things are hooked up.
160211

I had a couple of hoses made at a local place which works on hydraulic & LPG lines near work. This is the back of the stove. The line is just looped into the back for safe keeping, but it shows the regulator & the line attached at the back of the stove & how it will sit when the stove is installed for good. The line has a loop in it since the stove tracks out about a foot to run. I got some Teflon & made rub strips on the galley floor, so the stove can't hop up & down on rough roads. Hopefully this will help keep the fasteners tight over time & prevent problems later on when using it. You can see them under the stove in the galley shot.
160212

And finally, here's what the galley will look like when things are in place for good.
160213

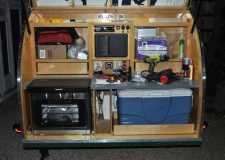
As you can see, the doors & drawer heads aren't made yet & installed. The inner skin for the hatch still needs to be put in, but I'm waiting to do the stereo & test it out prior to skinning the hatch. Want to make sure the speaker wires are right, as it would be a PITA to have to strip the hatch once it's skinned & trimmed out. The skin will be removable, but I'm not going there until I'm sure everything is working properly.

So Larry, does this answer your question? My "free time" isn't quite free just yet. Propane, stereo, TV & entertainment system, stereo, doors & drawers inside, curtains, etc. etc. etc. are still left to do....
Last edited by noseoil on Tue Nov 12, 2019 9:03 am, edited 1 time in total.
Build log: viewtopic.php?f=50&t=60248
The time you spend planning is more important than the time you spend building.........

137905
User avatar
noseoil
1000 Club
1000 Club
 
Posts: 1820
Images: 669
Joined: Sun Apr 27, 2014 8:46 am
Location: Raton, New Mexico, living the good life!
Top

Re: Tucson tortoise

Postby Atomic77 » Sun Nov 22, 2015 11:01 pm

As someone else on here says, (maybe KC?) You're never really done... Great work man, looking forward to being at this stage someday!
Michael

"The Strength is in the Sum of the Parts..."

The Astroliner

Follow The Astroliner Blog Here!

Check out our YouTube video
User avatar
Atomic77
1000 Club
1000 Club
 
Posts: 1463
Images: 309
Joined: Tue Oct 08, 2013 5:29 pm
Location: Fort Wayne Indiana
Top

Re: Tucson tortoise

Postby KCStudly » Mon Nov 23, 2015 12:47 am

Michael, Everyone says that. I can't help but see how it must be true, so I may have said it a few times, too. :lol:

Still, I agree, I can't wait to get to that 95/ct done and campable stage. For now we are living vicariously thru Noseoil's success! :thumbsup:
KC
My Build: The Poet Creek Express Hybrid Foamie

Poet Creek Or Bust
Engineering the TLAR way - "That Looks About Right"
TnTTT ORIGINAL 200A LANTERN CLUB = "The 200A Gang"
Green Lantern Corpsmen
User avatar
KCStudly
Donating Member
 
Posts: 9617
Images: 8169
Joined: Mon Feb 06, 2012 10:18 pm
Location: Southeastern CT, USA
Top

Re: Tucson tortoise

Postby dales133 » Mon Nov 23, 2015 12:50 am

X eleventy
User avatar
dales133
4000 Club
4000 Club
 
Posts: 4605
Images: 1
Joined: Mon Oct 13, 2014 5:26 pm
Top

Re: Tucson tortoise

Postby Vedette » Mon Nov 23, 2015 1:48 am

What size is your propane hard line and how did you come up with that size?
brian
Good Roads
Brian & Sandi
Here is a link to my Build Journal
viewtopic.php?f=50&t=50912
Image109106109111109110138766
User avatar
Vedette
Silver Donating Member
 
Posts: 5141
Images: 443
Joined: Thu Dec 01, 2011 4:28 am
Location: Westbank B.C.
Top

Re: Tucson tortoise

Postby dales133 » Mon Nov 23, 2015 1:50 am

Vedette wrote:What size is your propane hard line and how did you come up with that size?
brian

I think 3/8 is the standard here brian.
Yes we still do some stuff in cave man measurements.
Btw i wish i could borrow you for a week on mine!
User avatar
dales133
4000 Club
4000 Club
 
Posts: 4605
Images: 1
Joined: Mon Oct 13, 2014 5:26 pm
Top

Re: Tucson tortoise

Postby noseoil » Mon Nov 23, 2015 8:01 am

Thanks again guys.

Brian, I just used 1/2" black pipe for the main line under the frame, stubbed out front & back. This was done due to availability of parts, fittings, clamps & hangers, plus it's what I've worked with in the past on houses. I know it's way-overkill in dimension, but I figured it would be robust enough to take the occasional hunk of road debris, rocks & gravel and still not get damaged. With the QD "T" fitting at the back, I wanted to have plenty of gas flow if necessary for a fire place or other cooker and still be able to use the galley stove at the same time. Originally, I thought I was going to be able to use a standard regulator with the normal 11" water column output for my stove. Part way through the build I started reading about other people who had issues with running my type of stove with low pressure lines. It won't work! Brad had a write-up on his build journal about the problem & his solution to the low pressure fix.

viewtopic.php?f=50&t=58223&start=615

In retrospect, 3/8" copper would have been easier & cheaper to use with flare fittings, but I wanted the harder steel pipe. Not sure how much flow there would be with the 3/8" copper if I started adding more stuff on the line while running with the T fitting.

What can I say, I'm a construction worker.
Build log: viewtopic.php?f=50&t=60248
The time you spend planning is more important than the time you spend building.........

137905
User avatar
noseoil
1000 Club
1000 Club
 
Posts: 1820
Images: 669
Joined: Sun Apr 27, 2014 8:46 am
Location: Raton, New Mexico, living the good life!
Top

Re: Tucson tortoise

Postby Vedette » Mon Nov 23, 2015 11:36 am

Thanks! :thumbsup:
I was thinking 3/8" copper (just because of weight consciousness on my build) but now I can wait for others to chime in with their suggestions and thoughts.
I do want to be able to plug in our Outland Fire Bowl.
Good Roads
Brian & Sandi
Good Roads
Brian & Sandi
Here is a link to my Build Journal
viewtopic.php?f=50&t=50912
Image109106109111109110138766
User avatar
Vedette
Silver Donating Member
 
Posts: 5141
Images: 443
Joined: Thu Dec 01, 2011 4:28 am
Location: Westbank B.C.
Top

Re: Tucson tortoise

Postby noseoil » Fri Nov 27, 2015 6:01 pm

More finishing stuff today, odds & ends. Worked on the stove & propane installation. The 1/2" line was roughed in already, so just the trim-out was all we needed to do. Here's the tongue & 10# bottle with variable regulator. No leaks anywhere! Did the soapy water test on all connections & no bubbles were growing. I had tested it last year, but no reason to be complacent about gas under pressure.
160214

Here's the stove with the locks in place. It's up & running, but I still need to do a "test" on something. Cookies, perhaps per Cap'n Telescope's stove trials? Too tired today, but soon....
160216

I got some stainless steel bathroom stall latches. Made a couple of diamond plate escutcheons for the floor & drilled the floor to accept the sliding tongue. Worked out OK & keeps the stove in place when moving down the road. They just slide up & down, friction fit only & gravity holds everything in place. As long as there's gravity, we should be good. The stove is on full extension drawer guides. I may swap them out for a longer set in the future, but the 12" ones are good for now.
160215

Also installed the TV, Blu-Ray player & a sound bar. Here's a shot of the inside with the tv & a movie running. I had mapped out all of this last year & incorporated it into the cabinets, so it all fits well enough. The solar system is doing a good job with the battery & charging chores. This is all running off the inverter now, no shore power. Didn't measure a load, but best guess is that it might be drawing about 4.5 amps with all three things going. Not sure about the inverter load (1000 watt), but I guess about an amp there as well (about 10% maybe?), so not too worried about power consumption. With the 100 amp hour battery we should be good for a movie or two at night if it's raining. Still need to look into a hard drive to store movies on for travel, but that's later. For now it was a good day of work.
160217

The list is growing, but it's growing shorter now! Time to think about doors & drawer heads soon, but there's no hurry on that one. As always, thanks for looking & for all the help along the way.
Last edited by noseoil on Tue Nov 12, 2019 9:12 am, edited 1 time in total.
Build log: viewtopic.php?f=50&t=60248
The time you spend planning is more important than the time you spend building.........

137905
User avatar
noseoil
1000 Club
1000 Club
 
Posts: 1820
Images: 669
Joined: Sun Apr 27, 2014 8:46 am
Location: Raton, New Mexico, living the good life!
Top

Re: Tucson tortoise

Postby KCStudly » Fri Nov 27, 2015 10:41 pm

First class! :thumbsup: :applause:
KC
My Build: The Poet Creek Express Hybrid Foamie

Poet Creek Or Bust
Engineering the TLAR way - "That Looks About Right"
TnTTT ORIGINAL 200A LANTERN CLUB = "The 200A Gang"
Green Lantern Corpsmen
User avatar
KCStudly
Donating Member
 
Posts: 9617
Images: 8169
Joined: Mon Feb 06, 2012 10:18 pm
Location: Southeastern CT, USA
Top

Re: Tucson tortoise

Postby OP827 » Sat Nov 28, 2015 2:06 am

No bubbles - no troubles :) and your trailer build shows a very fine workmanship! :thumbsup:
User avatar
OP827
Donating Member
 
Posts: 1561
Images: 405
Joined: Fri Apr 25, 2014 7:27 pm
Location: Bruce County Ontario
Top

Re: Tucson tortoise

Postby felixx » Sat Nov 28, 2015 4:20 am

this is awesome :applause: :applause: :shock: :beer:
felixx
Donating Member
 
Posts: 644
Images: 22
Joined: Sun Nov 30, 2014 3:01 pm
Location: Christchurch, New Zealand
Top

Re: Tucson tortoise

Postby dales133 » Sat Nov 28, 2015 4:34 am

Sharp!
Nice problem solving and wxecution ma man
User avatar
dales133
4000 Club
4000 Club
 
Posts: 4605
Images: 1
Joined: Mon Oct 13, 2014 5:26 pm
Top

PreviousNext

Return to Build Journals

Who is online

Users browsing this forum: Bing [Bot] and 17 guests