 It looks like a stained concrete floor, I love the look. You may have just given me a solution to cover the inside of my hatch boo-boo!
MyAway build - Updates for space usage & organization
![]() by GreatPumpkin » Sun Nov 14, 2010 1:01 am
by GreatPumpkin » Sun Nov 14, 2010 1:01 am
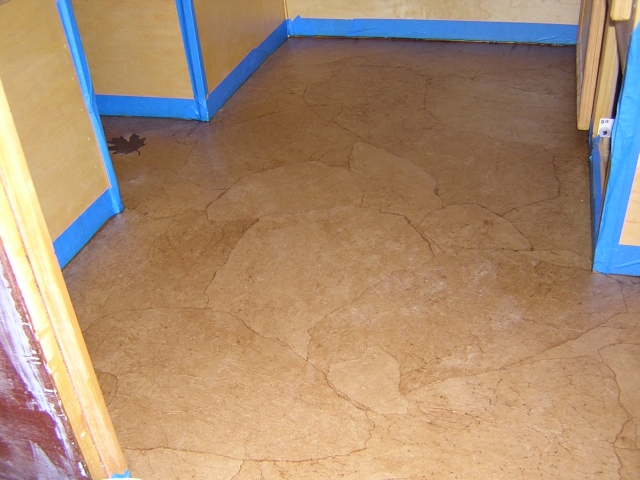
Sharon that is awesome! It looks like a stained concrete floor, I love the look. You may have just given me a solution to cover the inside of my hatch boo-boo!
It looks like a stained concrete floor, I love the look. You may have just given me a solution to cover the inside of my hatch boo-boo!
Custom Benroy/Grunman/Hybrid...In Progress
2001 Dodge Ram 1500
2001 Honda XR650R
"In regione caecorum rex est luscus." GP
2001 Dodge Ram 1500
2001 Honda XR650R
"In regione caecorum rex est luscus." GP
-
GreatPumpkin - Teardrop Master
- Posts: 124
- Images: 5
- Joined: Sun Oct 11, 2009 12:47 am
- Location: Colville, WA
![]() by S. Heisley » Sun Nov 14, 2010 1:34 am
by S. Heisley » Sun Nov 14, 2010 1:34 am
Parnold wrote:
Paul,
As I thought about your question, I decided that I need to explain a little more in case you or someone else needs this information.
The reason for wadding up each piece of paper is to give it random small breaks in its surface so that more polyurethane will be absorbed at those places, thus, changing the shading there. The color also changes on the torn edges. The more you wad the paper up and even which side you put up can change the shade and ‘print’ of the piece you are working with. When you polyurethane the piece down and smooth it out, the wrinkles disappear but not the newly added color shadings. As the pieces are placed and begin to dry, air bubbles develop under the surface. Even though you smooth these bubbles out to remove the air pockets, in some places, the paper will have stretched. This is what leaves a sort of raised wrinkle here and there and gives it that nice texture. The color changes and raised wrinkles are what give it that leather or sandstone look.
I have just finished putting on the 5th coat of polyurethane and I can tell you that, yes, it will still have a slightly textured feel to it, but not from the original wadding of the paper. The wadding wrinkles are gone.
Great Pumpkin wrote:
Cool, Great Pumpkin! Have at it.
One more tip: Get and wear some disposable gloves and change them about every half hour. This is because you use your hands to smooth out the wrinkles and release air bubbles. You hands work the best to do this. However, after about half an hour, some of the polyurethane starts to dry and flake off onto your work. If you have disposable gloves on, that's easy to fix. You just replace your gloves with a new pair. Also, when you take off the old gloves, save them. The inside of the glove is still good and can be used to contain a wet sponge brush or paint brush so you can use it for your next application. You just stick it inside the palm area and twist the wrist area around the handle until you're ready to use it again.
Will there be enough polyurethane on it so that it will be smooth, or will it have a slightly textured feel to it!
Paul,
As I thought about your question, I decided that I need to explain a little more in case you or someone else needs this information.
The reason for wadding up each piece of paper is to give it random small breaks in its surface so that more polyurethane will be absorbed at those places, thus, changing the shading there. The color also changes on the torn edges. The more you wad the paper up and even which side you put up can change the shade and ‘print’ of the piece you are working with. When you polyurethane the piece down and smooth it out, the wrinkles disappear but not the newly added color shadings. As the pieces are placed and begin to dry, air bubbles develop under the surface. Even though you smooth these bubbles out to remove the air pockets, in some places, the paper will have stretched. This is what leaves a sort of raised wrinkle here and there and gives it that nice texture. The color changes and raised wrinkles are what give it that leather or sandstone look.
I have just finished putting on the 5th coat of polyurethane and I can tell you that, yes, it will still have a slightly textured feel to it, but not from the original wadding of the paper. The wadding wrinkles are gone.
Great Pumpkin wrote:
You may have just given me a solution to cover the inside of my hatch boo-boo!
Cool, Great Pumpkin!
Have at it.
One more tip: Get and wear some disposable gloves and change them about every half hour. This is because you use your hands to smooth out the wrinkles and release air bubbles. You hands work the best to do this. However, after about half an hour, some of the polyurethane starts to dry and flake off onto your work. If you have disposable gloves on, that's easy to fix. You just replace your gloves with a new pair. Also, when you take off the old gloves, save them. The inside of the glove is still good and can be used to contain a wet sponge brush or paint brush so you can use it for your next application. You just stick it inside the palm area and twist the wrist area around the handle until you're ready to use it again.
...Sharon....
I think I can...I THINK I can...I THINK; I CAN! (I think I did it!)
http://www.doityourselfrv.com/handcraft ... g-trailer/
viewtopic.php?f=50&t=27313&start=555
http://www.squidoo.com/painting-a-campi ... ramebuster

I think I can...I THINK I can...I THINK; I CAN! (I think I did it!)
http://www.doityourselfrv.com/handcraft ... g-trailer/
viewtopic.php?f=50&t=27313&start=555
http://www.squidoo.com/painting-a-campi ... ramebuster
-

S. Heisley - Super Lifetime Member
- Posts: 8866
- Images: 495
- Joined: Mon Sep 17, 2007 10:02 am
- Location: No. California


 Basically that and a little time.