Travel trailer with slide out build

...ask your questions in the appropriate forums BUT document your build here...preferably in a single thread...dates for updates, are appreciated....

Postby Dmanrick » Wed Jul 13, 2011 9:11 pm

Well real life caught up to me and slammed me with work. I finally got back started on this thing but not very much.

I got a digital thermostat hooked up to the ac. Also I had major issues with the paneling. I understand what Fromeo was talking about when we discussed attaching the walls to the top of the floor instead of the side. When you get everything buttoned down, it will put pressure on the paneling and buckle it so I had to take all of it off and trim it a little and reattach it. I still have a couple more pieces to go on the bathroom walls.

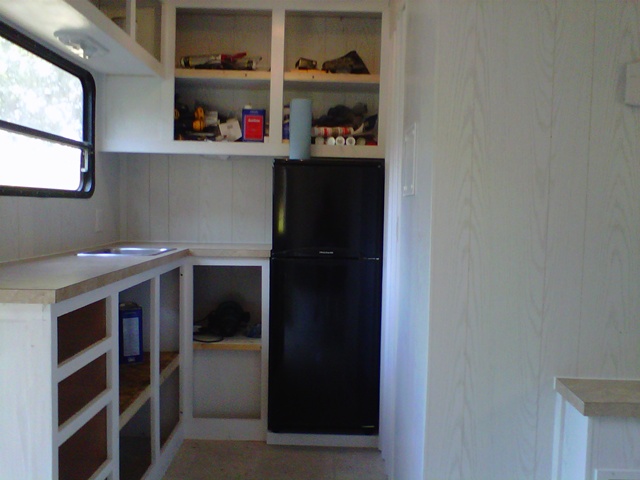
I also got the cabinet frames made up. I am saving the doors and drawers for last. They have the first coat of paint on them so they will be pretty easy to finish off. Here's a couple of views of them along with the dorm fridge that we are using.


Image

Image

Image

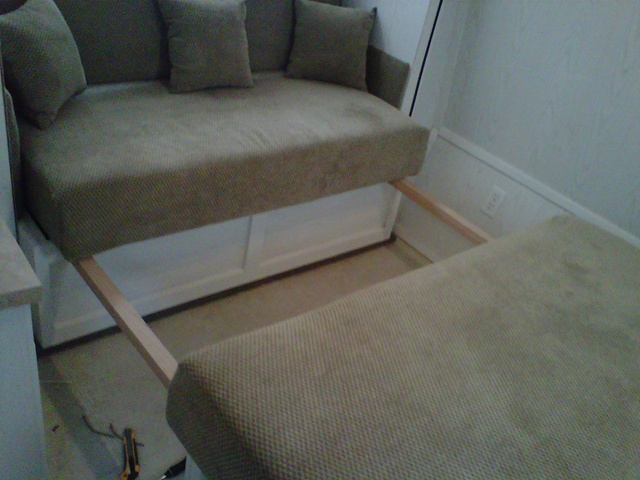
I am going to try to get the inside of the slideout finished up this weekend along with trying to get all of the paneling squared away.
Dmanrick
Gold Donating Member
 
Posts: 65
Joined: Tue Sep 14, 2010 8:42 pm

Postby fromeo » Fri Jul 15, 2011 10:01 am

Great to see you back, Rick! It's coming along nicely. Looking forward to those inslide slideout pics.

- Frank
fromeo
Teardrop Master
 
Posts: 157
Joined: Tue Feb 27, 2007 2:01 pm
Location: Sicklerville, NJ

Postby Dmanrick » Sun Sep 04, 2011 6:52 pm

Thanks. Real life caught up to me for one last blast but hopefully my tinkering can become a higher priority now.

Anyway over the last few weeks we have piddled a little here and there but this weekend we have been hitting it pretty good. We got the countertop made and the laminate on there. It is just sitting on there for now. I am going to put in all of the bracing and shelving tomorrow and mount it permanently


Image

This is the box around the electrical stuff. I am going to trim it out tomorrow also.

Image

I wired in a digital thermostat onto the AC.

Image

I got most of the trim work done up front. I am waiting to permanently mount the countertops to do the rest. Then we will caulk all nail holes and gaps and put the last coat of paint on everything.

Image

Image

I got the under cabinet lights all mounted and working.

Image


I finally broke out my 1954 Singer and got the seats/bed covered. I even made 3 throw pillows. :)

Here it is in bed mode. It is 8" memory foam.

Image

These next couple of pics show how the bed works. This is the brackets I made to attach the couch and ottoman/bed piece together. The couch cushion lifts up as well as the ottoman and the brackets just slide over the edges. Then the middle cushion lays on the top of them.

Image

There is also storage under the couch and footstool to hold bed stuff when in couch mode and cushions and stuff when in bed mode.

Image

Here it is in couch mode. The ottoman also serves as seating if needed.

Image

Image

Image

I'm going to try to get most everything done in the main part tomorrow and then finish the bathroom in the next few weeks. We have the shower and surround all installed but I will post that stuff when we do the rest of the bathroom.
Dmanrick
Gold Donating Member
 
Posts: 65
Joined: Tue Sep 14, 2010 8:42 pm
Top

Postby droid_ca » Sun Sep 04, 2011 11:10 pm

Can't wait to see more this is a well thought out trailer
There is a world, just beyond now,
where reality runs a razor thin seam between fact and possibility;

Anywhere I roam where I lay my head is home....
Image
“Fide Canem”
Please check out my build thread
viewtopic.php?f=5&t=52816
User avatar
droid_ca
Donating Member
 
Posts: 1981
Images: 176
Joined: Thu Sep 30, 2010 5:08 am
Location: Prince George BC Canada
Top

Postby Dmanrick » Sun Sep 04, 2011 11:17 pm

Thanks. I'm just glad to be back working on it. The last couple of months have been slammed with work. We are probably not going to take it on its first road trip until New Years. Well, maybe a quick weekend run if we have time when it is finished. :)
Dmanrick
Gold Donating Member
 
Posts: 65
Joined: Tue Sep 14, 2010 8:42 pm
Top

Postby CarlLaFong » Mon Sep 05, 2011 3:54 pm

You can notify the authorities. I have stolen your slide out mechanism for my Stoopy.
"You'll never take me alive, coppers"
http://jkcallin.blogspot.com/
"As I wandered, alone, through the endless fields of corn, I could hear the crows. They seemed to mock me, calling out my name, over and over", said Cawe
User avatar
CarlLaFong
500 Club
 
Posts: 701
Images: 5
Joined: Wed Jul 06, 2011 9:51 pm
Location: Sunny SoCal
Top

Postby Dmanrick » Mon Sep 05, 2011 6:19 pm

That's why I posted it. Hopefully you (or others) can improve on it.

Well we pretty much got everything done in the main part of the trailer except for the finishing paint, the cabinet doors and drawers and the plumbing into and out of the sink. Here is where we are at now.

The electrical box cover is all trimmed and caulked.

Image

The kitchen is all trimmed and caulked.

Image

Image

My connections for the wall mounted tv.

Image

I got the bathroom door and the shower connection cover on.

Image

Here is the light switched for the outside light, main room light and kitchen light.

Image

Another look at the countertop all completely screwed down and caulked.

Image

A couple of looks at the slide out. The trim around the outside that covers everything up is just a 1x4 that is covered in the coil stock. It has screws that hold it on that are in the plastic snap covers. That way if I ever have to take the slide out off, it will just all unscrew.

Image

Image
Dmanrick
Gold Donating Member
 
Posts: 65
Joined: Tue Sep 14, 2010 8:42 pm
Top

Postby S. Heisley » Mon Sep 05, 2011 7:53 pm

Beeeautiful job! :thumbsup: 
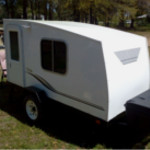
That trailer looks more like a house than a trailer!
User avatar
S. Heisley
Super Lifetime Member
 
Posts: 8866
Images: 495
Joined: Mon Sep 17, 2007 10:02 am
Location: No. California
Top

Postby jbyrd » Mon Sep 05, 2011 9:09 pm

WOW is all i can say!!! simple amazing.
I really really like your method for the siding something I might have to check into. :thumbsup:
Til later, See ya
Jeremy

My build journal #1 "SOLD" : viewtopic.php?t=45945
my build journal #2 "SOLD": viewtopic.php?f=50&t=59216
User avatar
jbyrd
Teardrop Master
 
Posts: 146
Images: 172
Joined: Sun Aug 28, 2011 8:24 pm
Location: marianna, Florida
Top

Postby Dmanrick » Mon Sep 05, 2011 11:50 pm

Thanks. I am looking forward to getting this thing finished and being used.

Jbyrd, I would do the siding again but I would do a few things differently next time. When I am getting close to finished, I am going to make a post on things I would not have done, should have done or should have done differently.

I believe people would learn more from that than they do seeing things that are not done the best way and never realizing there might be a better way.
Dmanrick
Gold Donating Member
 
Posts: 65
Joined: Tue Sep 14, 2010 8:42 pm
Top

Postby copout » Tue Sep 06, 2011 7:32 am

that is a bloody ripper of a build. Well done!
Veni Vidi Vici
User avatar
copout
Teardrop Inspector
 
Posts: 19
Images: 15
Joined: Mon Aug 01, 2011 10:27 am
Location: Western Australia
Top

Postby Dmanrick » Wed Sep 07, 2011 7:15 pm

Thanks a lot.

Here is what we have gotten done the last couple of afternoons. We finished up all of the final painting except for the cabinet doors and drawer fronts.

We got the cabinet doors and drawer fronts made, primed and the insides painted

Image

We got the drawers made and installed.

Image

We got the faucet and sink completely installed.

Image

We have water coming in and going out!

Image
Dmanrick
Gold Donating Member
 
Posts: 65
Joined: Tue Sep 14, 2010 8:42 pm
Top

Postby Dmanrick » Thu Sep 08, 2011 7:13 pm

I sanded the primer on the outside of the doors last night before I went to bed. This morning before work I put the first coat of paint on the outside. Then the second at lunch and when I got home, I got them all hung and attached.

Just a few little odds and ends and the main room/kitchen will be completely finished. Then I tackle the bathroom.

Image

Image

Image
Dmanrick
Gold Donating Member
 
Posts: 65
Joined: Tue Sep 14, 2010 8:42 pm
Top

Postby PhotoGuy » Thu Sep 08, 2011 7:37 pm

looking really good.
PhotoGuy
Teardrop Master
 
Posts: 132
Images: 2
Joined: Wed Jun 09, 2010 1:16 am
Location: St Thomas Ont Canada
Top

Postby Dmanrick » Fri Sep 09, 2011 6:38 pm

Thanks. Here's this afternoon's progress.

I got the tv mounted. I am glad the antenna seems to work ok.

Image

We got the valance made for the kitchen and the curtains hung. We also got all of the handles and magnetic door and drawer latches on. The kitchen area is finished except for putting the tie down on the fridge and installing the microwave.

Image


Image


Image
Dmanrick
Gold Donating Member
 
Posts: 65
Joined: Tue Sep 14, 2010 8:42 pm
Top

PreviousNext

Return to Build Journals

Who is online

Users browsing this forum: No registered users and 14 guests