Colorado_Carter Teardrop Build

...ask your questions in the appropriate forums BUT document your build here...preferably in a single thread...dates for updates, are appreciated....

Re: Colorado_Carter Teardrop Build

Postby bdosborn » Wed Jan 02, 2013 11:01 am

The hard part is done, cabinet doors are easy. Won't be long now....

Looking good.
Bruce
2009 6.5'X11' TTT - Boxcar
All it takes is a speck of faith and a few kilowatts of sweat and grace.
Image
Boxcar Build
aVANger Build
User avatar
bdosborn
Donating Member
 
Posts: 5594
Images: 806
Joined: Wed May 05, 2004 11:10 pm
Location: CO, Littleton

Re: Colorado_Carter Teardrop Build

Postby Colorado_Carter » Wed Jan 02, 2013 11:33 am

Thanks Bruce
User avatar
Colorado_Carter
Teardrop Advisor
 
Posts: 72
Images: 102
Joined: Mon Jun 04, 2012 12:17 pm

Re: Colorado_Carter Teardrop Build

Postby Colorado_Carter » Mon Jan 07, 2013 10:13 am

It seemed like I worked hard this weekend but the done pile was a little dissapointing. My main goal was to get working on the cabinet doors. My initial attempt wasn't good enough though, but I was limited by equipment. I just couldn't manage to get a decent mortis and tennon joint with a table saw, it was OK but not up to std. I have a router, but never got around to building a router table, which is where I started. I built one out of a scrap of counter top. I built it so it will bolt to my existing bench and fold up to store underneath the bench when I was done. I think it came out well, it seemed to work. I was then on to the cabinet doors. Once I got the hang of it, it went pretty smoothly just a big production line of pieces and parts. I did put in a pocket hole screw in each on, I figure they get abused going down the road. I made two minor errors. The first is I wasn't paying attention to the grain of the panel but it worked out the interior doors are horizontal which matches the interior walls and the galley is vertical. The other is I wasn't paying attention to back and front and accidently rounded over the corner of the back and front on one door. Once I did one, I had to do the rest.

I think they came out well, well they will after sanding, staining and some poly.

Image
Image
User avatar
Colorado_Carter
Teardrop Advisor
 
Posts: 72
Images: 102
Joined: Mon Jun 04, 2012 12:17 pm
Top

Re: Colorado_Carter Teardrop Build

Postby KCStudly » Mon Jan 07, 2013 4:01 pm

Nice pile-o-parts! :thumbsup:
KC
My Build: The Poet Creek Express Hybrid Foamie

Poet Creek Or Bust
Engineering the TLAR way - "That Looks About Right"
TnTTT ORIGINAL 200A LANTERN CLUB = "The 200A Gang"
Green Lantern Corpsmen
User avatar
KCStudly
Donating Member
 
Posts: 9640
Images: 8169
Joined: Mon Feb 06, 2012 10:18 pm
Location: Southeastern CT, USA
Top

Re: Colorado_Carter Teardrop Build

Postby bdosborn » Mon Jan 07, 2013 4:49 pm

Told you doors are easy! :thumbsup: :lol:

Bruce
2009 6.5'X11' TTT - Boxcar
All it takes is a speck of faith and a few kilowatts of sweat and grace.
Image
Boxcar Build
aVANger Build
User avatar
bdosborn
Donating Member
 
Posts: 5594
Images: 806
Joined: Wed May 05, 2004 11:10 pm
Location: CO, Littleton
Top

Re: Colorado_Carter Teardrop Build

Postby Colorado_Carter » Wed Jan 09, 2013 10:16 am

Ooh Shiny. It never seems like they are going to turn out well until a coat of stain and poly brings them to life.
Image
Image

Dear Homebrew Club, I never would have made it this far on this project without beer! (A tasty wheat in the primary)
Image

I know what your thinking.... He's from Colorado, of course he knows a good joint.
Image
User avatar
Colorado_Carter
Teardrop Advisor
 
Posts: 72
Images: 102
Joined: Mon Jun 04, 2012 12:17 pm
Top

Re: Colorado_Carter Teardrop Build

Postby Lonnie Mac » Wed Jan 09, 2013 10:21 am

Colorado_Carter wrote:Dear Homebrew Club, I never would have made it this far on this project without beer! (A tasty wheat in the primary)
Image


The build looks great! And so does this beer!
Lonnie Mac!
AleNuts Radio and home of Brutus "Ten"!
President of the Brutus Ten Cult...

Build Thread (Almost): http://www.tnttt.com/viewtopic.php?f=50&t=53596
User avatar
Lonnie Mac
Teardrop Advisor
 
Posts: 95
Joined: Tue Sep 25, 2012 8:15 pm
Location: Bacliff, TX
Top

Re: Colorado_Carter Teardrop Build

Postby Colorado_Carter » Mon Jan 14, 2013 10:29 am

Brrrr, too chilly to get more than a days work done this weekend. I did manage to get the cabinet doors hung.

On a side note when staining be sure to mix the stain well. I have had three staining sessions, the first was for the interior walls, the second for the cabinet faces and the counter, the third was for the cabinet doors. I musn't have mixed the stain well on the cabinet faces and counter, the color is a bit off. It will have to do for now-it isnt too bad. I just don't have the will to sand and restain the cabinet faces-next winter maybe. Its marginally acceptable so-it will do.

Image
Image
User avatar
Colorado_Carter
Teardrop Advisor
 
Posts: 72
Images: 102
Joined: Mon Jun 04, 2012 12:17 pm
Top

Re: Colorado_Carter Teardrop Build

Postby bdosborn » Mon Jan 14, 2013 12:45 pm

Colorado_Carter wrote:On a side note when staining be sure to mix the stain well. I have had three staining sessions, the first was for the interior walls, the second for the cabinet faces and the counter, the third was for the cabinet doors. I musn't have mixed the stain well on the cabinet faces and counter, the color is a bit off. It will have to do for now-it isnt too bad. I just don't have the will to sand and restain the cabinet faces-next winter maybe. Its marginally acceptable so-it will do


Sanding and restaining might not help as much as you would hope. It looks like you used red oak and the oak is so hard it doesn't accept stain very well. You also have to be careful not to oversand it, which clogs the pores and can keep the stain out. I had the same problem on my build. If you start looking closely at oak furniture you'll see that everyone has issues with red oak and stain. I wouldn't sweat it and move on. It looks fine in the pictures and I bet you won't notice it in a month.
Bruce
2009 6.5'X11' TTT - Boxcar
All it takes is a speck of faith and a few kilowatts of sweat and grace.
Image
Boxcar Build
aVANger Build
User avatar
bdosborn
Donating Member
 
Posts: 5594
Images: 806
Joined: Wed May 05, 2004 11:10 pm
Location: CO, Littleton
Top

Re: Colorado_Carter Teardrop Build

Postby Colorado_Carter » Mon Jan 14, 2013 2:02 pm

Thanks Bruce, I am sure that is the case too.
User avatar
Colorado_Carter
Teardrop Advisor
 
Posts: 72
Images: 102
Joined: Mon Jun 04, 2012 12:17 pm
Top

Re: Colorado_Carter Teardrop Build

Postby KCStudly » Mon Jan 14, 2013 4:04 pm

It doesn't look "fine" in the pictures, it looks GREAT in the pictures! I can only hope that my finishes come out as good.

Remember, the final presentation is the sum of the parts. So long as you keep a steady eye on quality (not a microscope) you will have a very fine camper in the end. :thumbsup:
KC
My Build: The Poet Creek Express Hybrid Foamie

Poet Creek Or Bust
Engineering the TLAR way - "That Looks About Right"
TnTTT ORIGINAL 200A LANTERN CLUB = "The 200A Gang"
Green Lantern Corpsmen
User avatar
KCStudly
Donating Member
 
Posts: 9640
Images: 8169
Joined: Mon Feb 06, 2012 10:18 pm
Location: Southeastern CT, USA
Top

Re: Colorado_Carter Teardrop Build

Postby Colorado_Carter » Mon Jan 21, 2013 11:53 am

Who ever said "What goes up-must come down" was sooooooo wrong. There might have been a slight over estimation on my part as well.

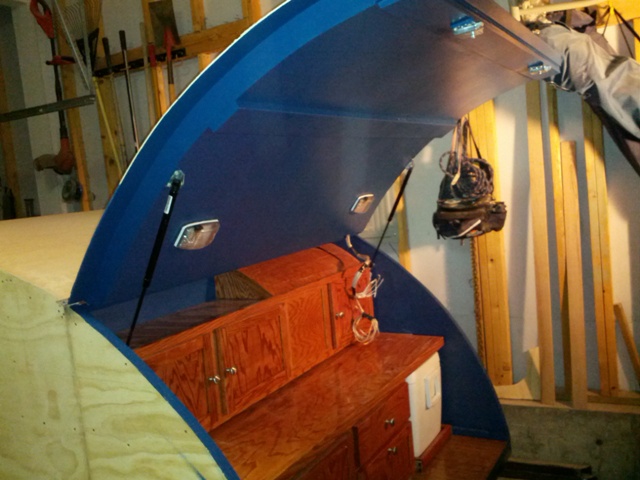
So I ordered up some sweet gas struts for the hatch-I wanted to have them installed prior to making final adjustments and installation of handles. I did some research then decided more is better and ordered something different. Long story short, I installed them and started to rip out the hinge (one screw needed reset-no big damage) when I tried to close them. They didnt even budge or pretend like they want to close-I even gave them a once over to see if there was a lock on them somewhere.

Oh well back to the drawing board-I'll repost in building techniques to get some help.

On the positive side I was able to sand, fill and paint the underside of the galley. It was very helpful to have the hatch open without a prop stick in the way of painting. I also installed the galley lights, and the slam latches. Due to the angles the latches are a little stiff, there are no rubbing points-I think they will wear in and work great.

I think the next little project is the the electrical box. I really should have wired the circuit board prior to installing the cabinets. My back hurts just thinking about it. I really need to do my hunting for the skin, after the electrical all work will stop until its sorted.

Image
Image
Image
User avatar
Colorado_Carter
Teardrop Advisor
 
Posts: 72
Images: 102
Joined: Mon Jun 04, 2012 12:17 pm
Top

Re: Colorado_Carter Teardrop Build

Postby Colorado_Carter » Tue Feb 12, 2013 6:17 pm

Laisses les bons temps rouler!

The aluminum is ordered, on its way and should be in hand this Thursday! I also will have new 90lb struts on hand. I haven't done much work based on looking locally for the skin. I will have two seams on the roof, but I am OK with it since everyday storage will be inside and I will have about 4" seams. I am also OK with it based on the smokin deal I think I got (delivered to town too). 2-4X10 sheets and 2-4X12 sheets of 0.04 5052 Aluminum sheeting.

Happy Fat Tuesday!

Hopefully there will be some progress picks next week.
User avatar
Colorado_Carter
Teardrop Advisor
 
Posts: 72
Images: 102
Joined: Mon Jun 04, 2012 12:17 pm
Top

Re: Colorado_Carter Teardrop Build

Postby Colorado_Carter » Wed Feb 13, 2013 10:32 am

KISS-keep it simple stupid. I need to get that tattooed somewhere.

So I received some new struts last night and I took the two seconds to install them. The galley hatch now has the ability to go down, which it did rather well. But.... not all the way down. I made an assumption that if I installed them in about the extended position the closed position would also be correct. Wrong! Now I need to move one of the brackets, but which one and how far? Might have to do some advanced mathmatical reasoning.

A stick would have been sooo much easier.

ImageImage
User avatar
Colorado_Carter
Teardrop Advisor
 
Posts: 72
Images: 102
Joined: Mon Jun 04, 2012 12:17 pm
Top

Re: Colorado_Carter Teardrop Build

Postby S. Heisley » Wed Feb 13, 2013 10:57 am

Those cabinets look really good and the red oak goes especially well with that royal blue paint. :thumbsup: :applause:
User avatar
S. Heisley
Super Lifetime Member
 
Posts: 8867
Images: 495
Joined: Mon Sep 17, 2007 10:02 am
Location: No. California
Top

PreviousNext

Return to Build Journals

Who is online

Users browsing this forum: No registered users and 9 guests