Big Woody Build - St. Pete, FL

...ask your questions in the appropriate forums BUT document your build here...preferably in a single thread...dates for updates, are appreciated....

Re: Big Woody Build - St. Pete, FL

Postby ELM » Mon Sep 26, 2016 2:00 pm

If you have an air compressor you could buy a cheap spray gun from Harbor Freight and spray your clear finish on. http://www.harborfreight.com/air-tools. ... goryExpand You might need to thin your clear a little bit. If it's water based thin with water.
My Build journal. viewtopic.php?f=50&t=65395
User avatar
ELM
Teardrop Master
 
Posts: 277
Images: 176
Joined: Thu Nov 26, 2015 5:49 am
Location: Sutter Creek CA

Re: Big Woody Build - St. Pete, FL

Postby Philip » Mon Sep 26, 2016 2:21 pm

ELM wrote:If you have an air compressor you could buy a cheap spray gun from Harbor Freight and spray your clear finish on. http://www.harborfreight.com/air-tools. ... goryExpand You might need to thin your clear a little bit. If it's water based thin with water.


For this type of small project one of the 4 oz touch guns works good. They only need around 15 PSI to run. I have one of the HF touchup guns. They are not a bad gun. I have used more expensive guns that didn't work as good as these do.

They are cheap. If you don't feel like buying a supply of thinner to do clean ups. Just pitch them and get another one for the next job. A gallon of thinner cost about what the gun does.
Philip
Silver Donating Member
 
Posts: 498
Images: 323
Joined: Thu Jun 09, 2016 3:57 am
Location: Peru,Indiana

Re: Big Woody Build - St. Pete, FL

Postby toconnor602 » Mon Sep 26, 2016 5:18 pm

Great ideas on buying the spray gun! Its on the way now.
toconnor602
Teardrop Advisor
 
Posts: 89
Joined: Tue Jun 21, 2016 3:27 pm
Top

Re: Big Woody Build - St. Pete, FL

Postby ELM » Mon Sep 26, 2016 6:50 pm

When I spray with water based paint in my paint guns I clean them with warm water an then run some paint thinner or lacquer thinner through to get the water out of the gun so it doesn't rust. Most paint guns have steel needle and seats.
My Build journal. viewtopic.php?f=50&t=65395
User avatar
ELM
Teardrop Master
 
Posts: 277
Images: 176
Joined: Thu Nov 26, 2015 5:49 am
Location: Sutter Creek CA
Top

Re: Big Woody Build - St. Pete, FL

Postby toconnor602 » Tue Sep 27, 2016 7:48 am

ELM wrote:When I spray with water based paint in my paint guns I clean them with warm water an then run some paint thinner or lacquer thinner through to get the water out of the gun so it doesn't rust. Most paint guns have steel needle and seats.


How much are you typically thinning the water based poly?
toconnor602
Teardrop Advisor
 
Posts: 89
Joined: Tue Jun 21, 2016 3:27 pm
Top

Re: Big Woody Build - St. Pete, FL

Postby ELM » Tue Sep 27, 2016 9:49 am

toconnor602 wrote:
ELM wrote:When I spray with water based paint in my paint guns I clean them with warm water an then run some paint thinner or lacquer thinner through to get the water out of the gun so it doesn't rust. Most paint guns have steel needle and seats.


How much are you typically thinning the water based poly?


This might sound funny but I watch how it drips off my stir stick. If it just runs off in a stream it's to thick. If it just drips off it's to thin. What I look for is when it runs off then starts to drip off the stir stick. Try starting with 4 parts paint to 1 part water when using water based paint. When it sprays out of the gun you want a mist. Maybe watch some you tube on mixing and spraying paint. We are off on a three week trip to Yellowstone and then to Wisconsin and then Grand Canyon in the Teardrop.
My Build journal. viewtopic.php?f=50&t=65395
User avatar
ELM
Teardrop Master
 
Posts: 277
Images: 176
Joined: Thu Nov 26, 2015 5:49 am
Location: Sutter Creek CA
Top

Re: Big Woody Build - St. Pete, FL

Postby toconnor602 » Tue Sep 27, 2016 12:36 pm

ELM wrote:
toconnor602 wrote:
ELM wrote:When I spray with water based paint in my paint guns I clean them with warm water an then run some paint thinner or lacquer thinner through to get the water out of the gun so it doesn't rust. Most paint guns have steel needle and seats.


How much are you typically thinning the water based poly?


This might sound funny but I watch how it drips off my stir stick. If it just runs off in a stream it's to thick. If it just drips off it's to thin. What I look for is when it runs off then starts to drip off the stir stick. Try starting with 4 parts paint to 1 part water when using water based paint. When it sprays out of the gun you want a mist. Maybe watch some you tube on mixing and spraying paint. We are off on a three week trip to Yellowstone and then to Wisconsin and then Grand Canyon in the Teardrop.


Have fun on the trip! Sounds great. I did a decent amount of painting when I was in the Air Force.....just been about 14 years or so.....
toconnor602
Teardrop Advisor
 
Posts: 89
Joined: Tue Jun 21, 2016 3:27 pm
Top

Re: Big Woody Build - St. Pete, FL

Postby Philip » Tue Sep 27, 2016 1:05 pm

I have sprayed water based poly one time. It was minwax brand. From a spray gun it didn't need thinning.

When I spray a material for the first time. I just to a test piece. If the coverage looks good I keep going. If the surface is botchy or clumps. Then I thin and do it agin. Till I get the spray pattern and coverage I want.
Philip
Silver Donating Member
 
Posts: 498
Images: 323
Joined: Thu Jun 09, 2016 3:57 am
Location: Peru,Indiana
Top

Re: Big Woody Build - St. Pete, FL

Postby Graniterich » Tue Sep 27, 2016 5:43 pm

I have sprayed 12 walls, I have the 20oz HF sprayer and do not thin water based minwax. Takes seven plus coats,but feels like plastic!
User avatar
Graniterich
Donating Member
 
Posts: 502
Joined: Tue Sep 16, 2014 3:39 pm
Top

Re: Big Woody Build - St. Pete, FL

Postby toconnor602 » Wed Sep 28, 2016 9:08 am

Graniterich wrote:I have sprayed 12 walls, I have the 20oz HF sprayer and do not thin water based minwax. Takes seven plus coats,but feels like plastic!


you are sanding in between coats as well correct?
toconnor602
Teardrop Advisor
 
Posts: 89
Joined: Tue Jun 21, 2016 3:27 pm
Top

Re: Big Woody Build - St. Pete, FL

Postby toconnor602 » Sun Oct 02, 2016 6:58 pm

Monday, September 26 - Saturday, October 01, 2016 - Staining & Sealing

Sanding, Cleaning, Staining, Cleaning, Sealing, Sanding, Sealing.....and on and on. I felt like the Dunkin Donuts guy...."Time to make the Donuts". It was everyday out in the garage watching Poly dry. I stained both sides of the side panels and doors, rear bulkhead, front and rear shelves and counter top /cabin shelf base & 20 scab pieces.

The weather is so unpredictable here right now. I pushed my start time back a couple hours because the forecast was calling for rain. Beautiful weather in those couple hours, then it starts raining as soon as I get everything setup, so I stopped planning my day based on what the forecast was showing. I was just trudging forward and dealing with the weather as it presented itself. Always had a tarp nearby though

I was able to accomplish my goal of completing this by Saturday, so I could start going vertical on Sunday. I put in some extra time on Saturday night to reorganize the garage from my painting setup back into construction mode. Also put a light coat of primer on the base and sides of deck. I wouldn't wish 1 week of watching paint dry on my worst enemy.

Anyway here are some pictures. We are going with a blue stain for the interior and Kona for the exterior, counter and shelf pieces. I am deciding if I want to use the weathered grey I bought for the ceiling.
Attachments
IMG_0804.JPG
IMG_0804.JPG (127.67 KiB) Viewed 1202 times
IMG_0802.JPG
IMG_0802.JPG (119.72 KiB) Viewed 1202 times
IMG_0803.JPG
IMG_0803.JPG (112.67 KiB) Viewed 1202 times
toconnor602
Teardrop Advisor
 
Posts: 89
Joined: Tue Jun 21, 2016 3:27 pm
Top

Re: Big Woody Build - St. Pete, FL

Postby toconnor602 » Sun Oct 02, 2016 8:13 pm

Sunday, October 02, 2016 - Construction Day!

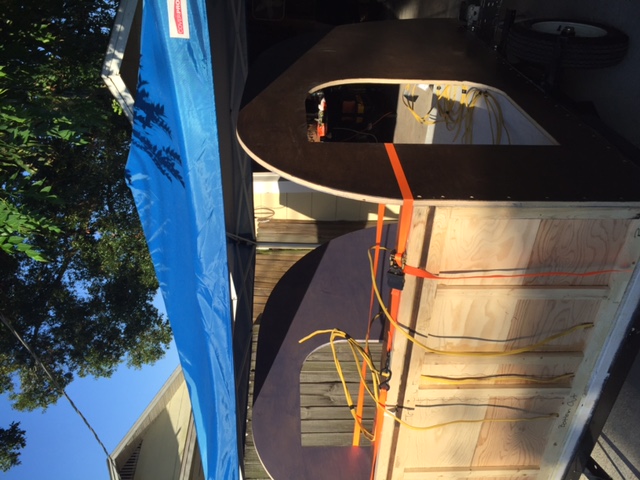
Woke up early (6am) ready to get this day going! All of the finished parts were in the guest bedroom so I move the trailer out into the driveway then setup all the parts I would be assembling today. Sides, Front Bulkhead, Rear Bulkhead & Front Shelf. Since I am using the Northern tool trailer I do not have a lip on the side so I clamped a small piece of extra plywood to each side to hold the sides in place and prevent them from falling while I fit everything into place. (Pic 1)My first test fit went pretty well. The front bulkhead was not quite square so i marked it off and used the planer to get it to fit better.

Instead of using a Bar Clamp to hold the sides together I am using ratchet straps. The bar clamp I found that would open to 60+" was $70 and I did not feel like investing that much into something I would not be getting a whole ton of use out of. I watched a few videos on how to make them, ultimately decided to use what I had on hand.

The plans I bought instructed me to dress everything from the rear to front. I did not like this method. I am starting in the front, dressing everything to the leading edge and working my way back.

After my test fit, I took it all apart. Lightly sanded the deck and made sure there would be good contact wherever I was putting glue. Made sure to clean all old excess glue, paint silicone or whatever else has accumulated on the side of the deck where why sides will sit.

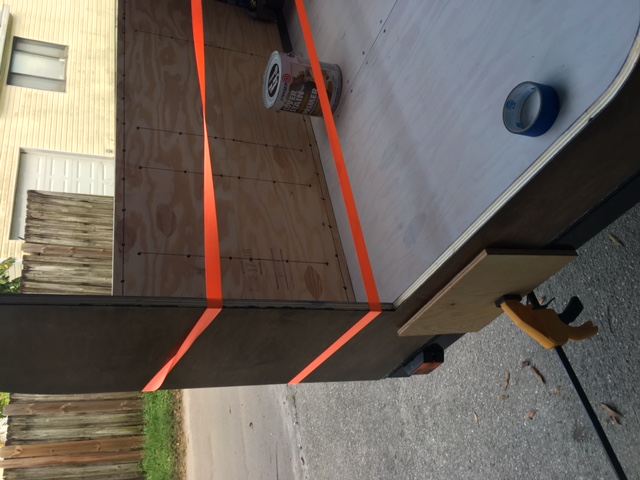
I made a chalk line 3/4" from the bottom of each side and countersunk and pilot drilled all of my screw hole locations

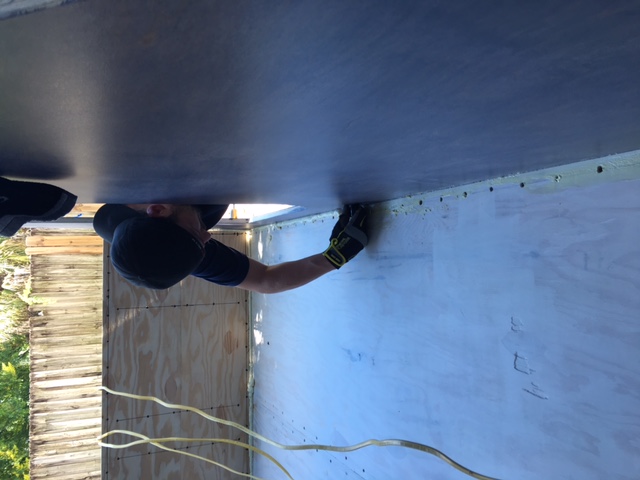
I laid the bulkhead on the deck and ran my wires through. I put one side in at a time, lined it up and placed a few screws in to secure it to the deck.

I put the ratchet straps back on to draw the top in. put the front shelf in place and first spar. Marked the hole where the electrical wire for the front cabin outlet will be. Removed the shelf, laid glue down, then screwed the shelf to the bulkhead. I then screwed the spar to the shelf and to the sides. I marked the hole locations to connect the bulkhead to the sides, countersunk and pilot drilled those and then secured them with 2" deck screws as I did with the bottom.

I cut 2 scabs for under the shelf, screwed those to the sides and then nailed the shelf to the scabs. I used Loctite foam in the holes where my electric wires come up through the floor. I decided that I would use this in and areas there may be a gap in between the sides and the deck.....don't do this...that stuff really expands haha. If you happen to use this stuff....wait for it to dry all the way before you start cleaning it....it sticks to everything and creates one heck of a mess.

I then realized it was 4:30 and I have not ate all day, so I started cleaning up and shutting down. My wife, who is also my teardrop interior designer & brainstorming partner was nice enough to take some candid shot while I was working. She also corrected me that a tool i was referring to as a scribe is actually a compass. A quick google search proved we were both correct...but I'll give her this one
Attachments
IMG_0823.JPG
IMG_0823.JPG (123.39 KiB) Viewed 1194 times
IMG_0832.JPG
IMG_0832.JPG (79.79 KiB) Viewed 1194 times
IMG_0828.JPG
IMG_0828.JPG (103.46 KiB) Viewed 1194 times
toconnor602
Teardrop Advisor
 
Posts: 89
Joined: Tue Jun 21, 2016 3:27 pm
Top

Re: Big Woody Build - St. Pete, FL

Postby toconnor602 » Thu Nov 24, 2016 6:18 am

It has been a while since I have posted and update. My wife and I recently decided we would move back to Michigan on Dec 1st to be closer to friends and family.....so that meant I needed to put in overtime to get this little beast road ready by then. I have been taking pictures along the way and they are all date stamped, so that will help me remember what I did, when, since it is all a blur now haha.

October 3rd - 8th - Hurricane Matthew / Basic Structure

Hurricane Matthew was toying with us for a while on what direction it wanted to go. Once we were pretty sure it was tracking up the east coast I drove over and picked up my Grandma who lives over there to stay with us until the storm passed and all power restored (about a week).

We only felt some strong winds and mild rain on the west side...nothing crazy. Once the sun broke out I was able to get the rear bulkhead, rear shelf and roof spars and box frame for the fantastic fan. Had to do a little planer work on the rear shelf and bulkhead to keep everything as close to square as possible.
Attachments
IMG_0841.jpg
IMG_0841.jpg (55.02 KiB) Viewed 1092 times
IMG_0842.jpg
IMG_0842.jpg (48.27 KiB) Viewed 1092 times
IMG_0843.jpg
IMG_0843.jpg (67.53 KiB) Viewed 1092 times
toconnor602
Teardrop Advisor
 
Posts: 89
Joined: Tue Jun 21, 2016 3:27 pm
Top

Re: Big Woody Build - St. Pete, FL

Postby toconnor602 » Thu Nov 24, 2016 6:45 am

October 9th, 2016 - Front Shelf

I started out making the uprights for the front overhead shelf. I had to take in the consideration for the front curve and how wide i wanted each cabinet to be. I then cut out holes for the electrical in the overhead area. I made holes for a 120 outlet (with USB plugins), 2 reading lights and 2 dimmer switches. I then made a shelf for each cabinet to cover all the wires and boxes. The shelf will sit flush with the cabinet face and will not be nailed down in case I need to access the wires and it will also make a good secret compartment as well.

My Grandma is still in town at this point and after working all day on planning, cutting, fitting she comes out to inspect my work and says..."Well geez T.R. it sure doesn't look like you got a whole lot done" Thanks Granny :lol:
Attachments
IMG_0844.jpg
IMG_0844.jpg (57.63 KiB) Viewed 1086 times
IMG_0845.jpg
IMG_0845.jpg (63.42 KiB) Viewed 1086 times
IMG_0846.jpg
IMG_0846.jpg (78.18 KiB) Viewed 1086 times
toconnor602
Teardrop Advisor
 
Posts: 89
Joined: Tue Jun 21, 2016 3:27 pm
Top

Re: Big Woody Build - St. Pete, FL

Postby toconnor602 » Thu Nov 24, 2016 7:03 am

October 11th, 2016 - Prep Work

I visited a few stores to look at my options for ceiling material. After much contemplating I decided to go with a tongue and groove bead board. I stained these in the same Kona that I used for the exterior and rear shelf / countertop. I also sanded, stained & sealed the front shelf pieces.

For the Kona stain I used 2 different techniques. For the outside and shelf I let the stain sit on for an hour and then wiped it clean with mineral spirits until there was hardly any stain coming off on the rag. For the ceiling I let sit on until it was barely dry, used a damp cloth with mineral spirits to loosen it up and then used a dry rag to rub off the remaining built up stain producing a darker shade of the same stain. I did this to create some contrast and highlight some of the accent pieces later down the road as well.

To get in the grooves of the Beadboard I used a paint scraper with a rag wrapped around the edge.
Attachments
IMG_0848.jpg
IMG_0848.jpg (62 KiB) Viewed 1080 times
toconnor602
Teardrop Advisor
 
Posts: 89
Joined: Tue Jun 21, 2016 3:27 pm
Top

PreviousNext

Return to Build Journals

Who is online

Users browsing this forum: Bing [Bot] and 9 guests